FAQ Overview
Permissions, Privacy & Security
What access do the various app levels have?
In general:
You must have the PubSafe™ mobile app to register a user. You must upgrade to join a Team or an Organization. Click Here to get the PubSafe™ app.
The app version will determine the level of access and functionality once in the portal and mobile app. The list below is just a rough outline and can change at any time.
Free - Users can only use the bottom menu functions, no Responder role, does not get alerts, cannot use Teams, or access the PubSafe™ portal.
Base - Citizen only. Limited number of Teams and team members. Can log into web portal only view the member map.
Plus - Can change to Responder status, access the web portal member map, weather data, more and bigger teams.
Pro - Designed for NGOs. Portal dispatching tools and advanced functionality. Large teams and org membership.
Government - Large teams and lots of org members. Portal access for mass messaging any PubSafe user in a limited area.
Enterprise - Designed for global organizations like the Red Cross, UNICEF, and Samaritans Purse. It can be used by any business seeking safety and communication functionality.
Author: PubSafe
Last update: 2022-06-07 21:29
What privacy options are available?
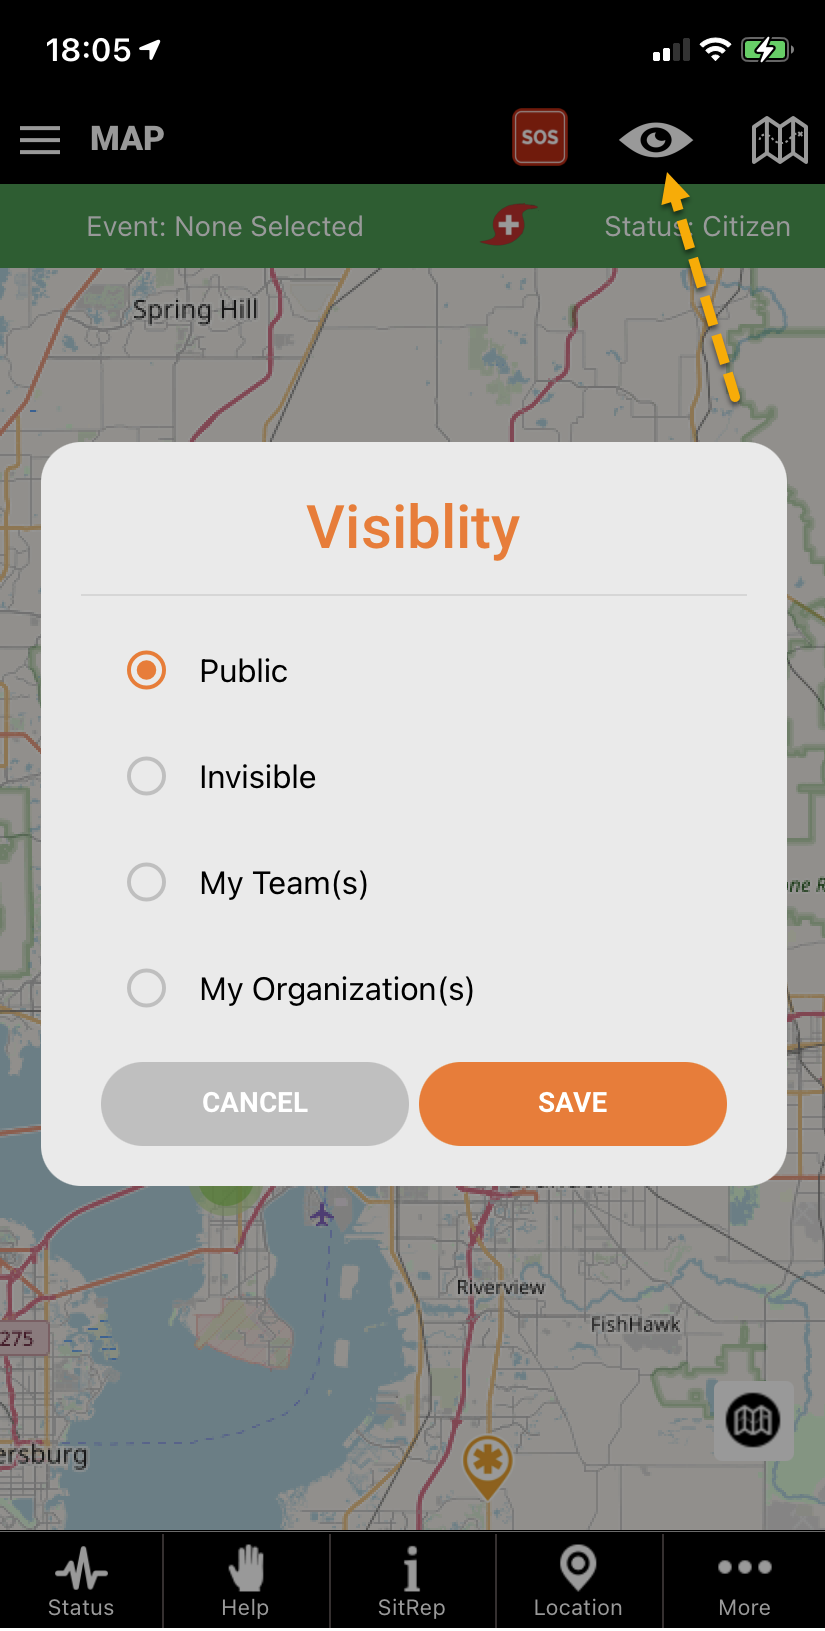
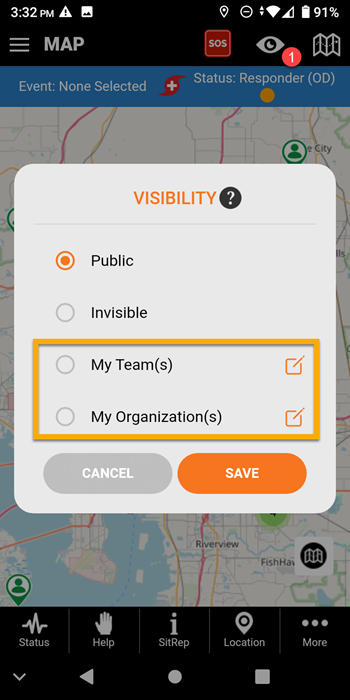
There are many privacy options in the PubSafe mobile app and the web portal designed to give users control. The quickest option is to go "invisible" by clicking on the "eyeball" icon in the top bar of the mobile app. When clicked, you will see there are options related to visibility.
You can limit visibility to a team, an organization, or all users. When visibility is limited, users cannot interact with other users or access specific functions. This is an additional security measure. If a user wants to interact with another user or the map, enable visibility using the eyeball icon.
Users will find several other options in the Settings menu. Click the admin / "hamburger" menu icon in the top left corner of the app and then select Settings. Choose the security settings that meet your needs.
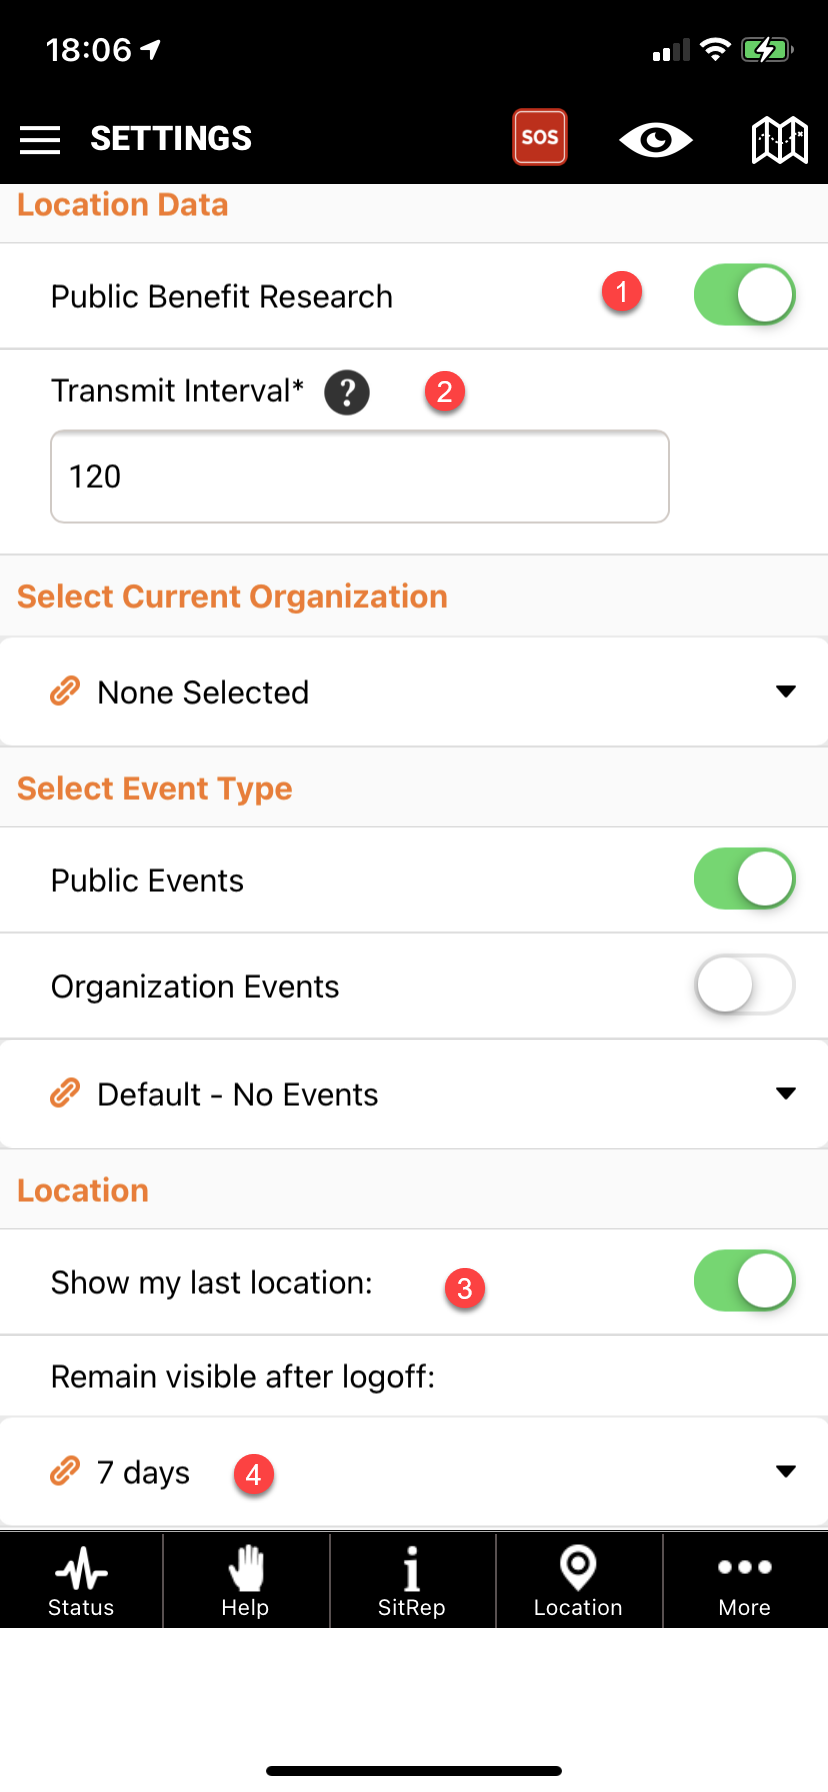
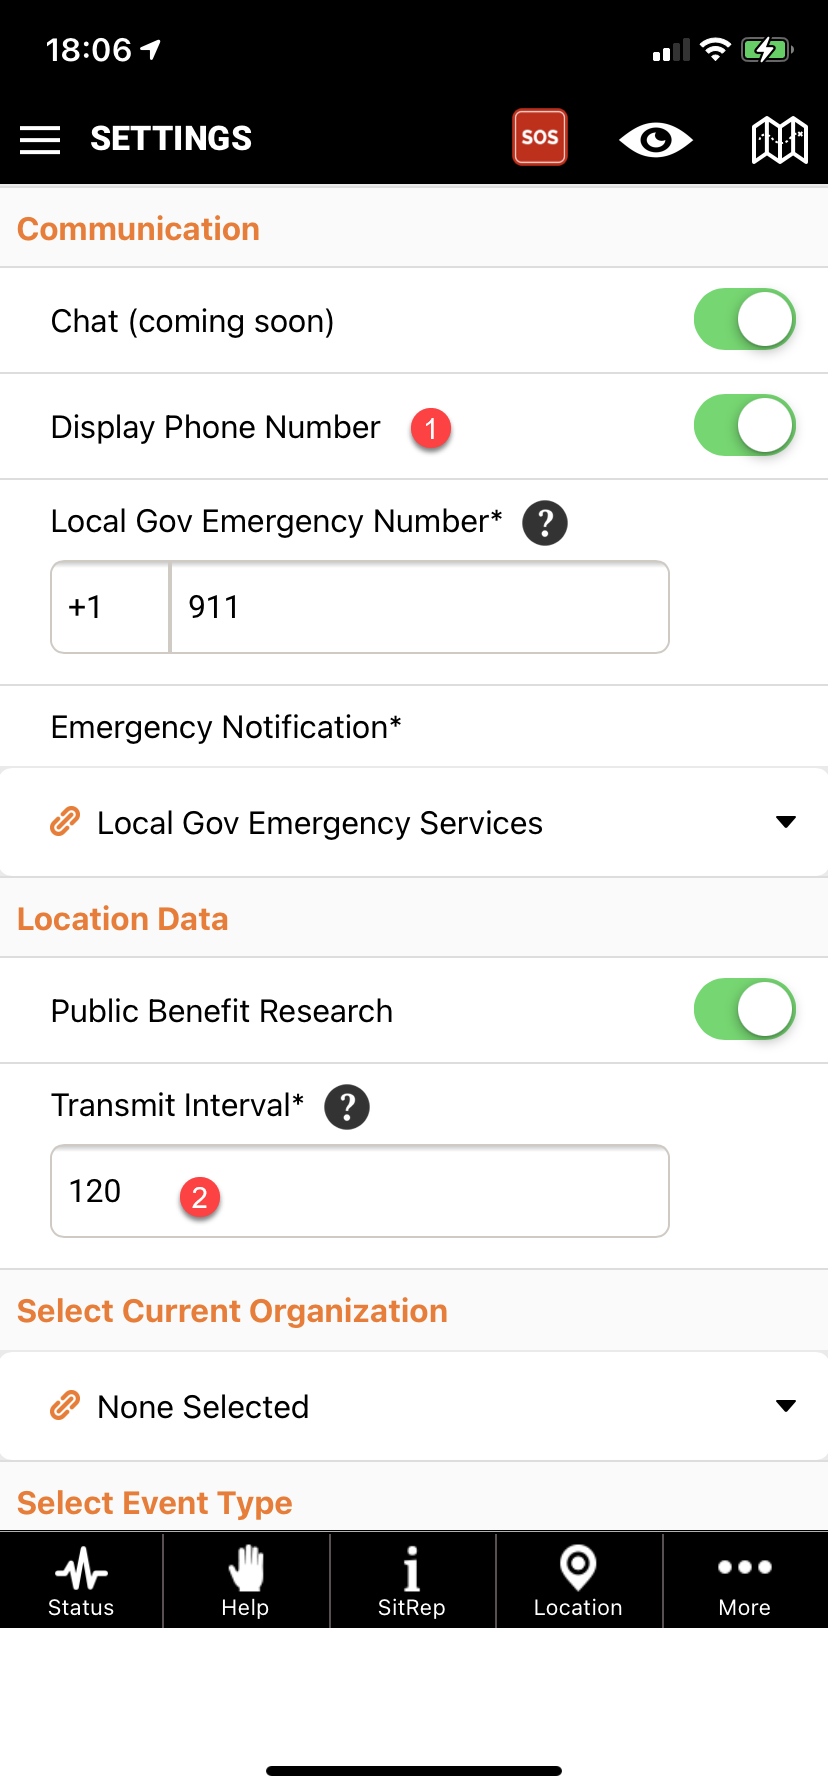
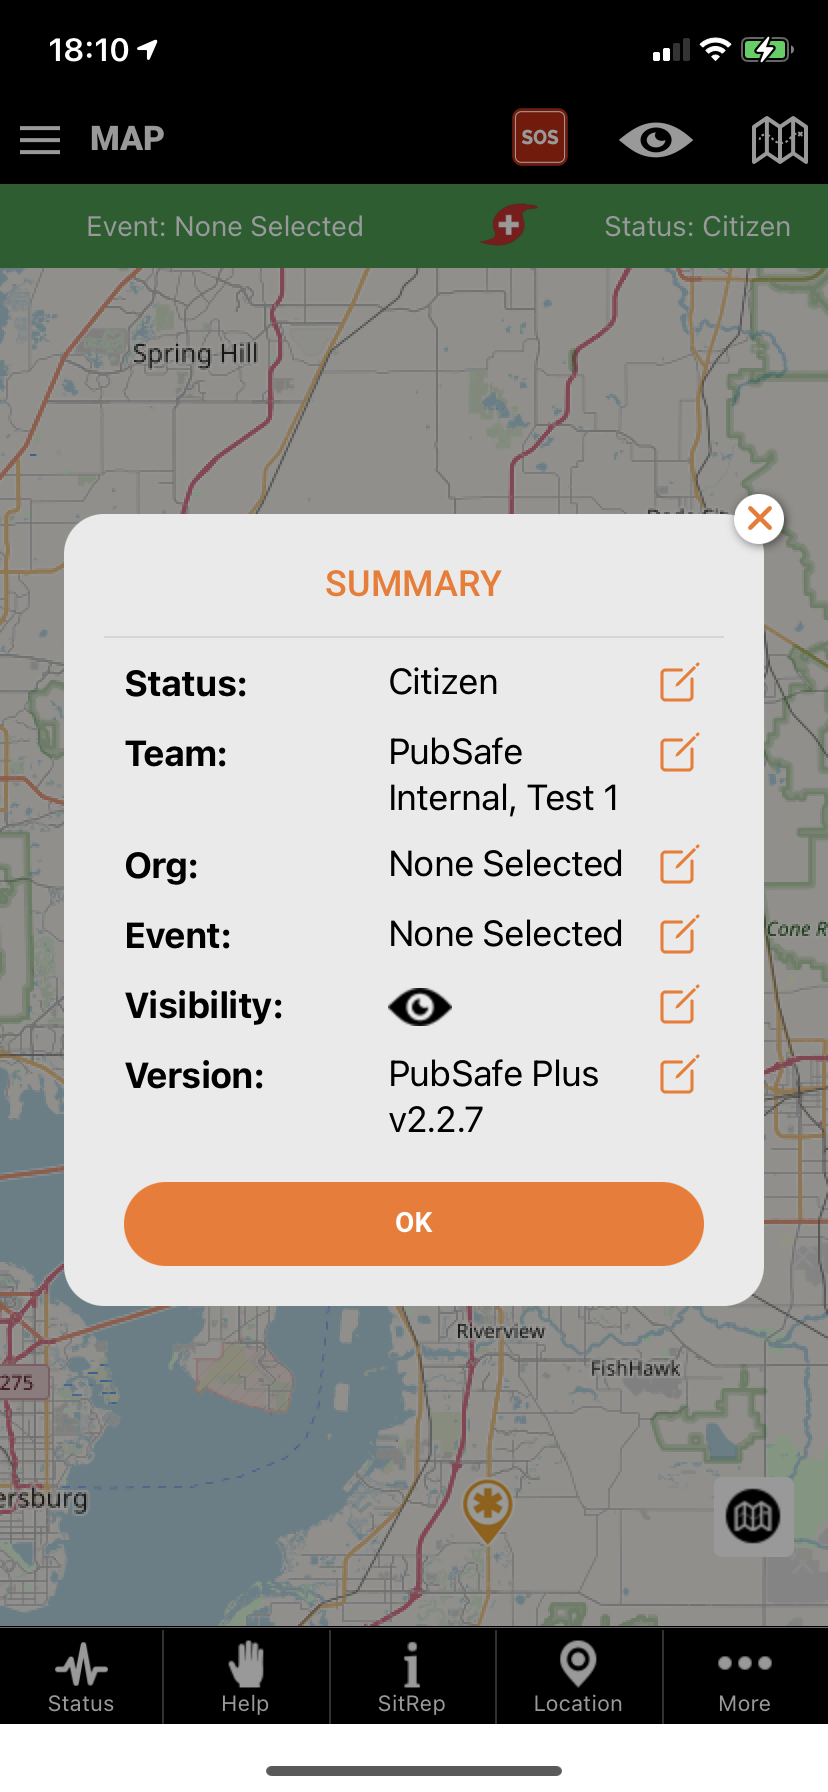
Each time you launch the app you will be shown several of the current most important privacy and security settings. This keeps the user aware of the settings in case they are forgotten for any reason.
Users have the ability to opt out of public benefit research (PBR). PBR is a future goal to study the anonymous movements of people before, during, and after disasters and emergencies. This data will help improve future response efforts by government agencies and NGOs. It will also improve the efficiency of asset allocation and ensure all communities are being served fairly. Data is made anonymous as much as reasonably possible as individual identities have no value in the research to be completed.
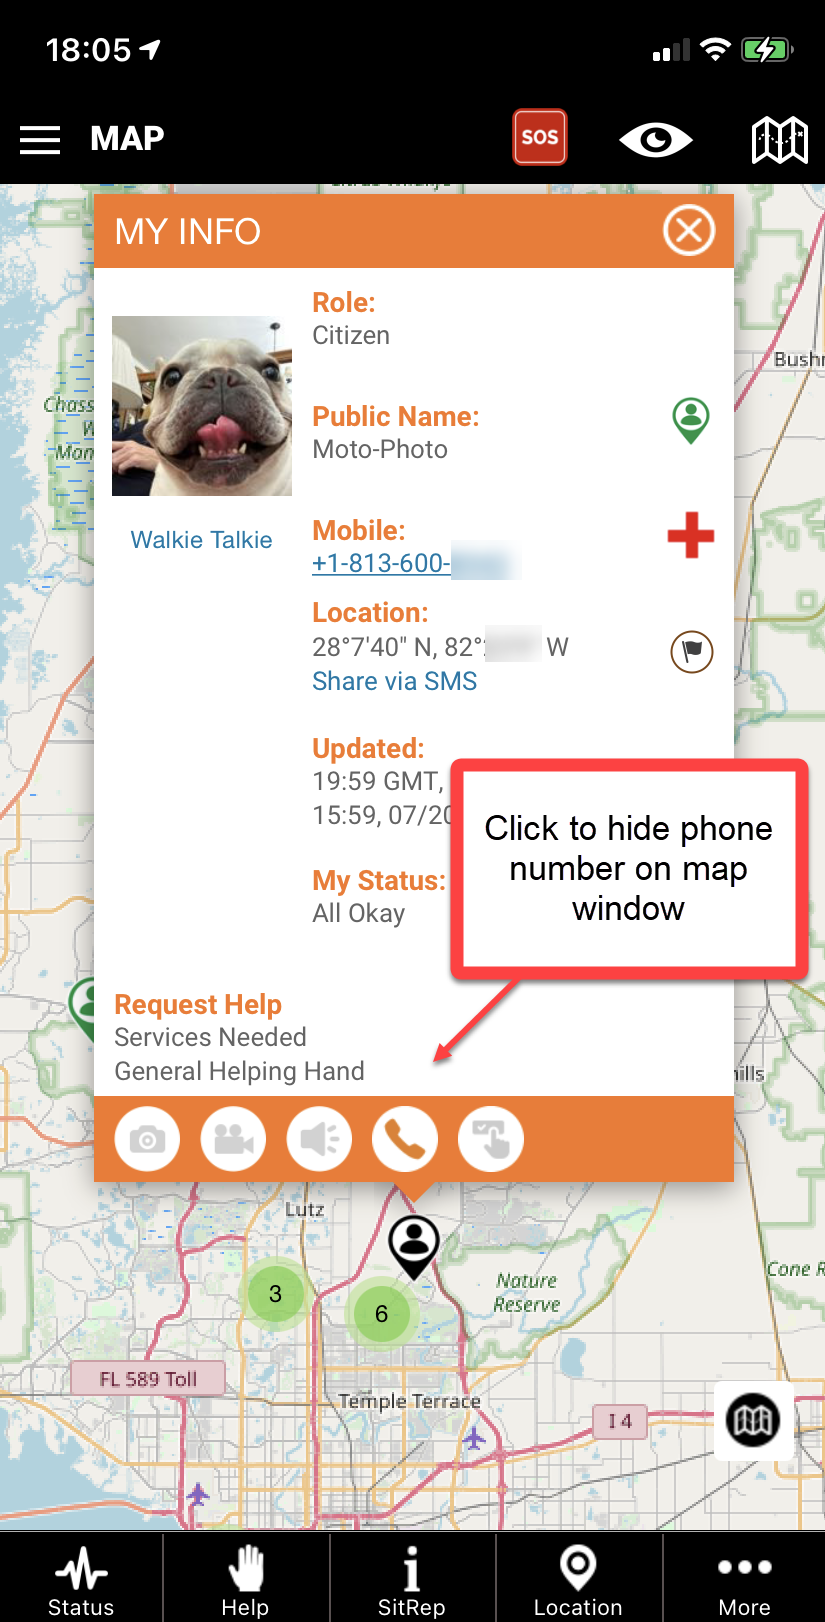
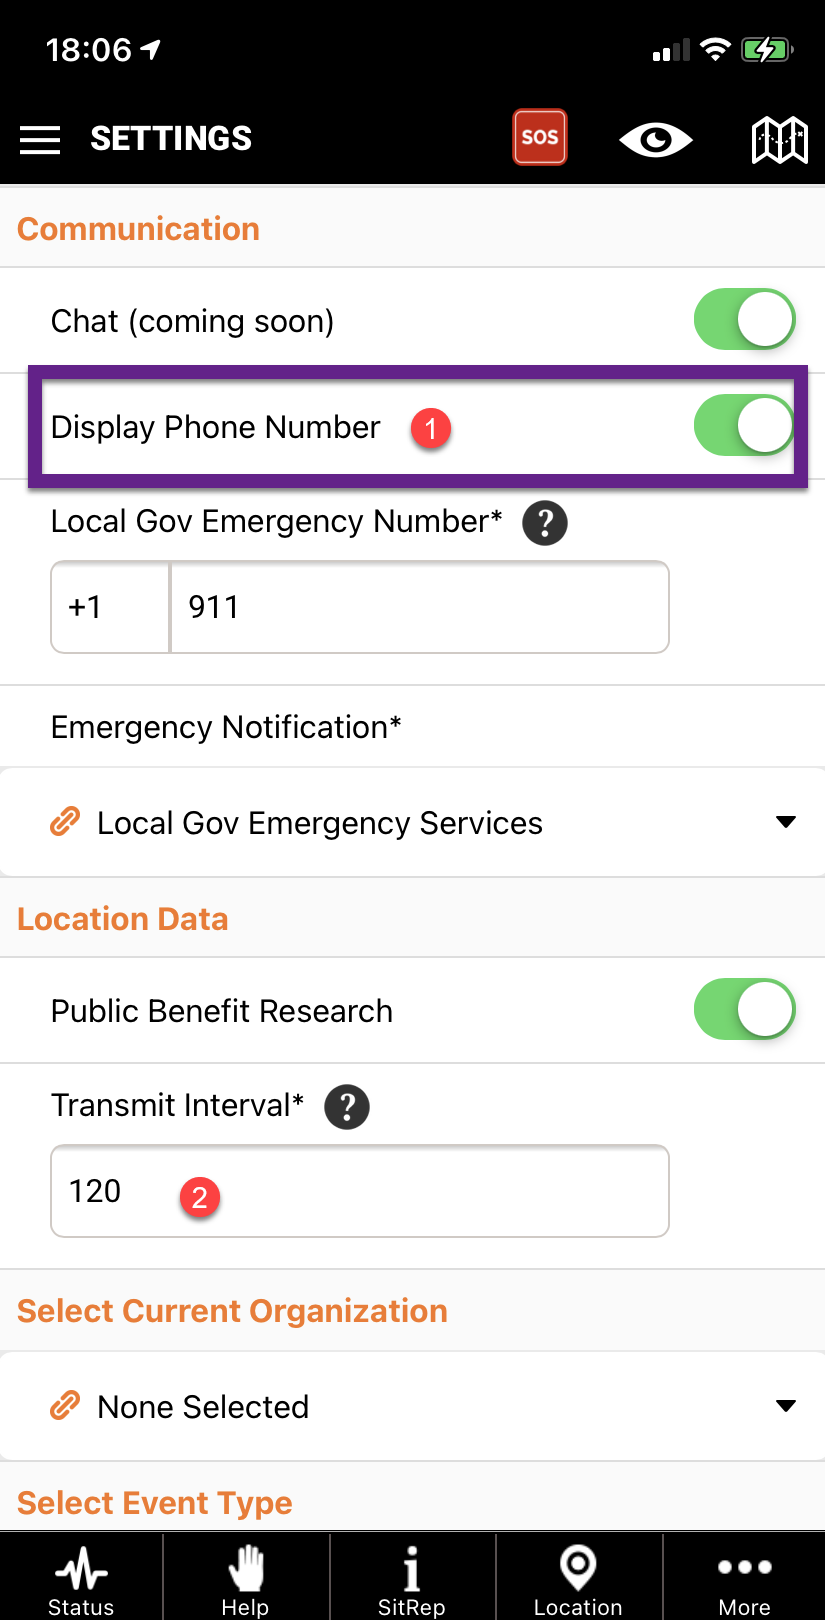
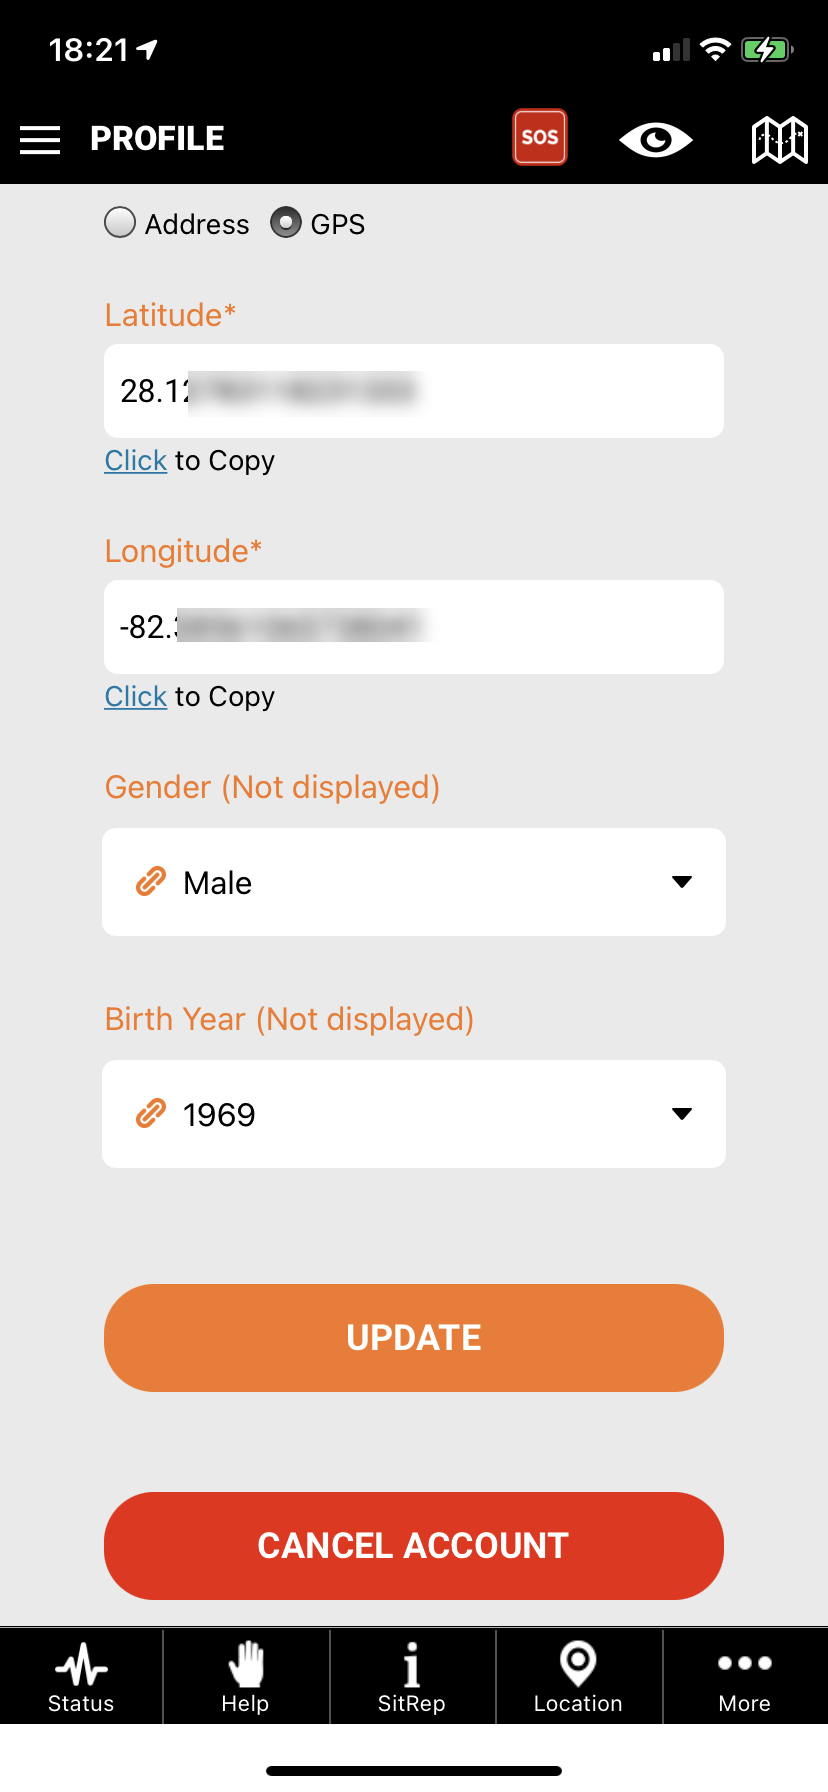
To hide your phone number you have two options as seen below. This prevents it from appearing on the map info window to other PubSafe users.
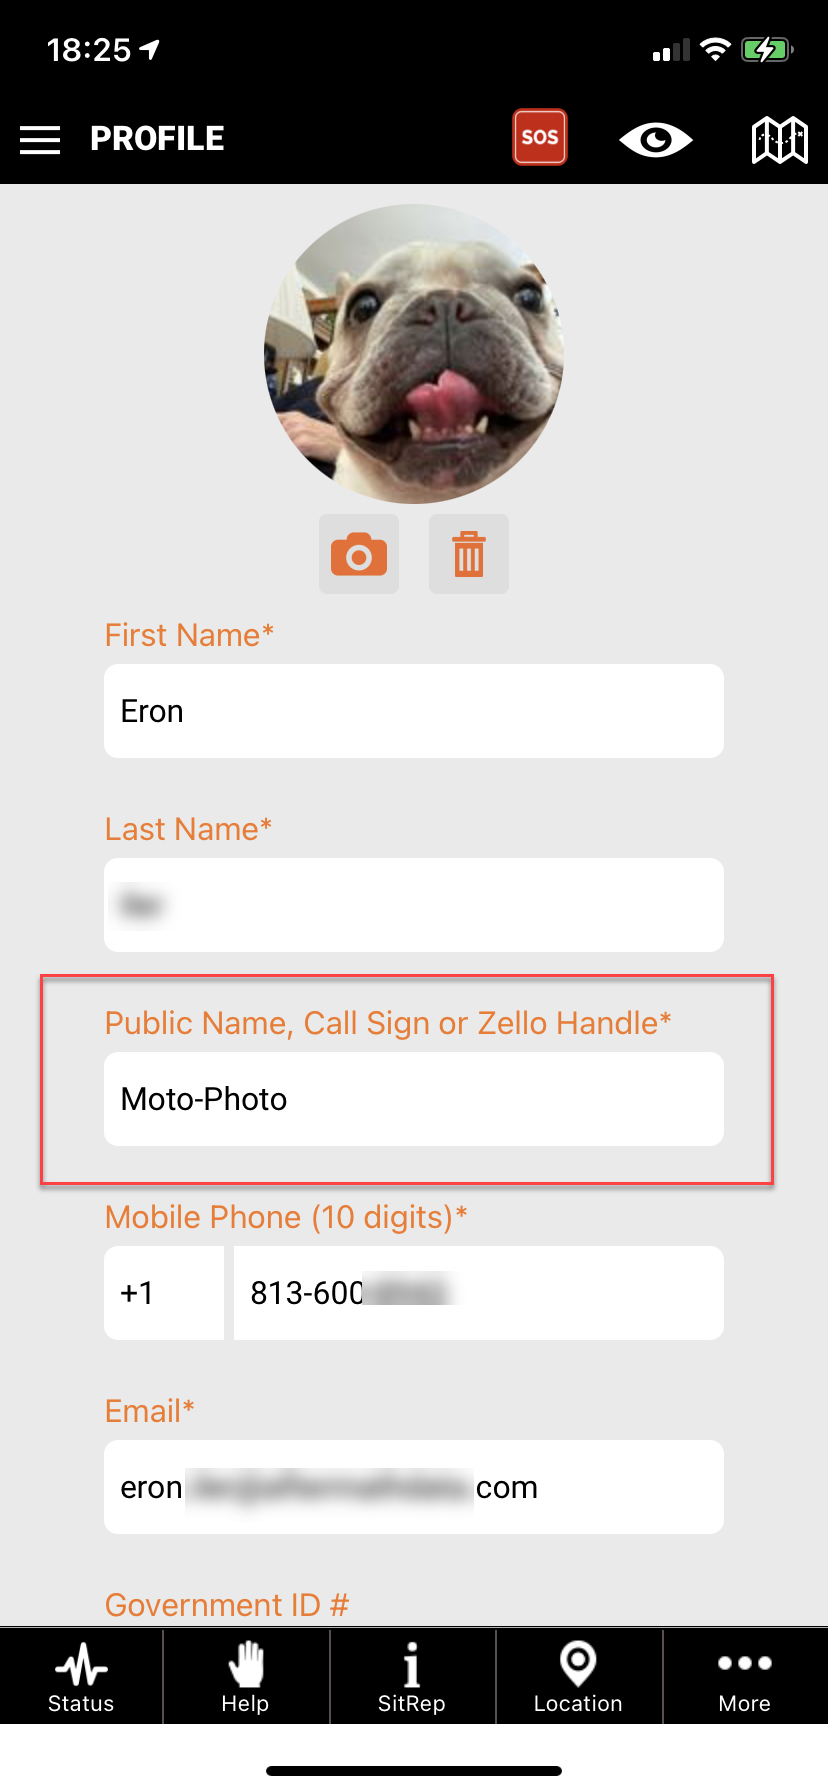
It is recommended that you do not use a Public Name that indicates your sex, age or other personal information. Sex and birth date is never shared and is available to study the demographics of our members so we can better develop solutions to meet member needs.
The final option is to delete your account and disconnect your user profile from the data.
Author: PubSafe
Last update: 2021-09-27 17:18
Team Visibility
There are three team visibility and privacy options.
- Public - visible to all users
- Team Only - Members can only be seen by other members
- Invisible - Team members cannot be seen by any user.
Users cannot interact with other users when in an "invisible" status.
Author: PubSafe
Last update: 2021-07-22 21:13
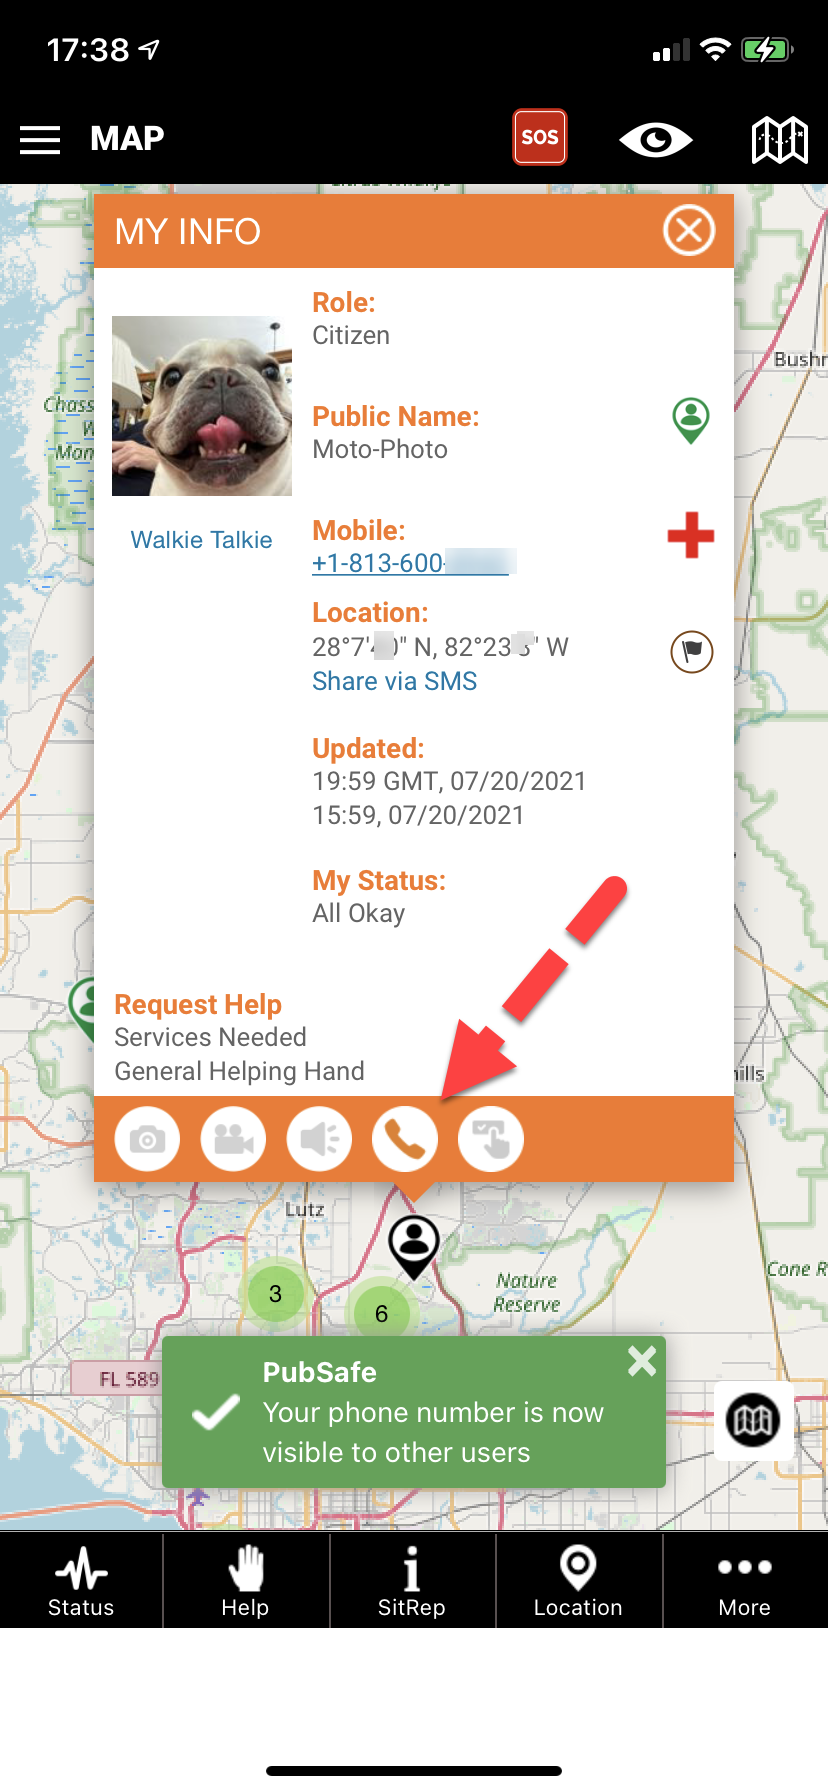
How do I hide my phone number?
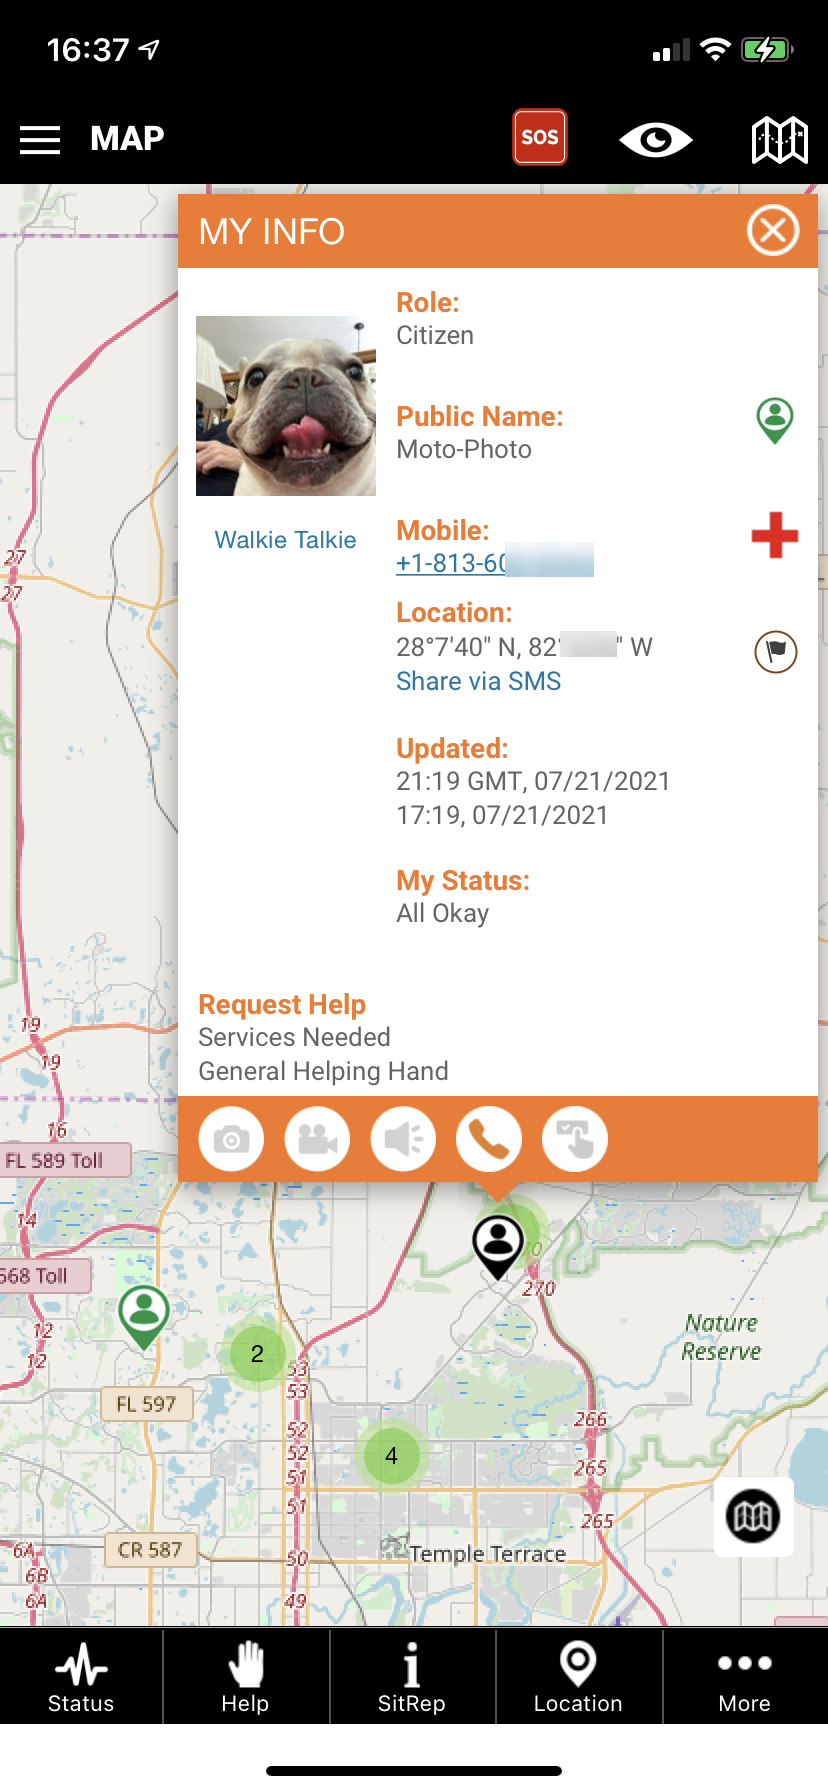
To hide your phone number when your icon is clicked on the map, click the phone icon on your info window. Your icon is always the black icon regardless of your status or role. To make it visible, click it again.
Author: PubSafe
Last update: 2021-07-22 21:12
How can I record volunteer hours?
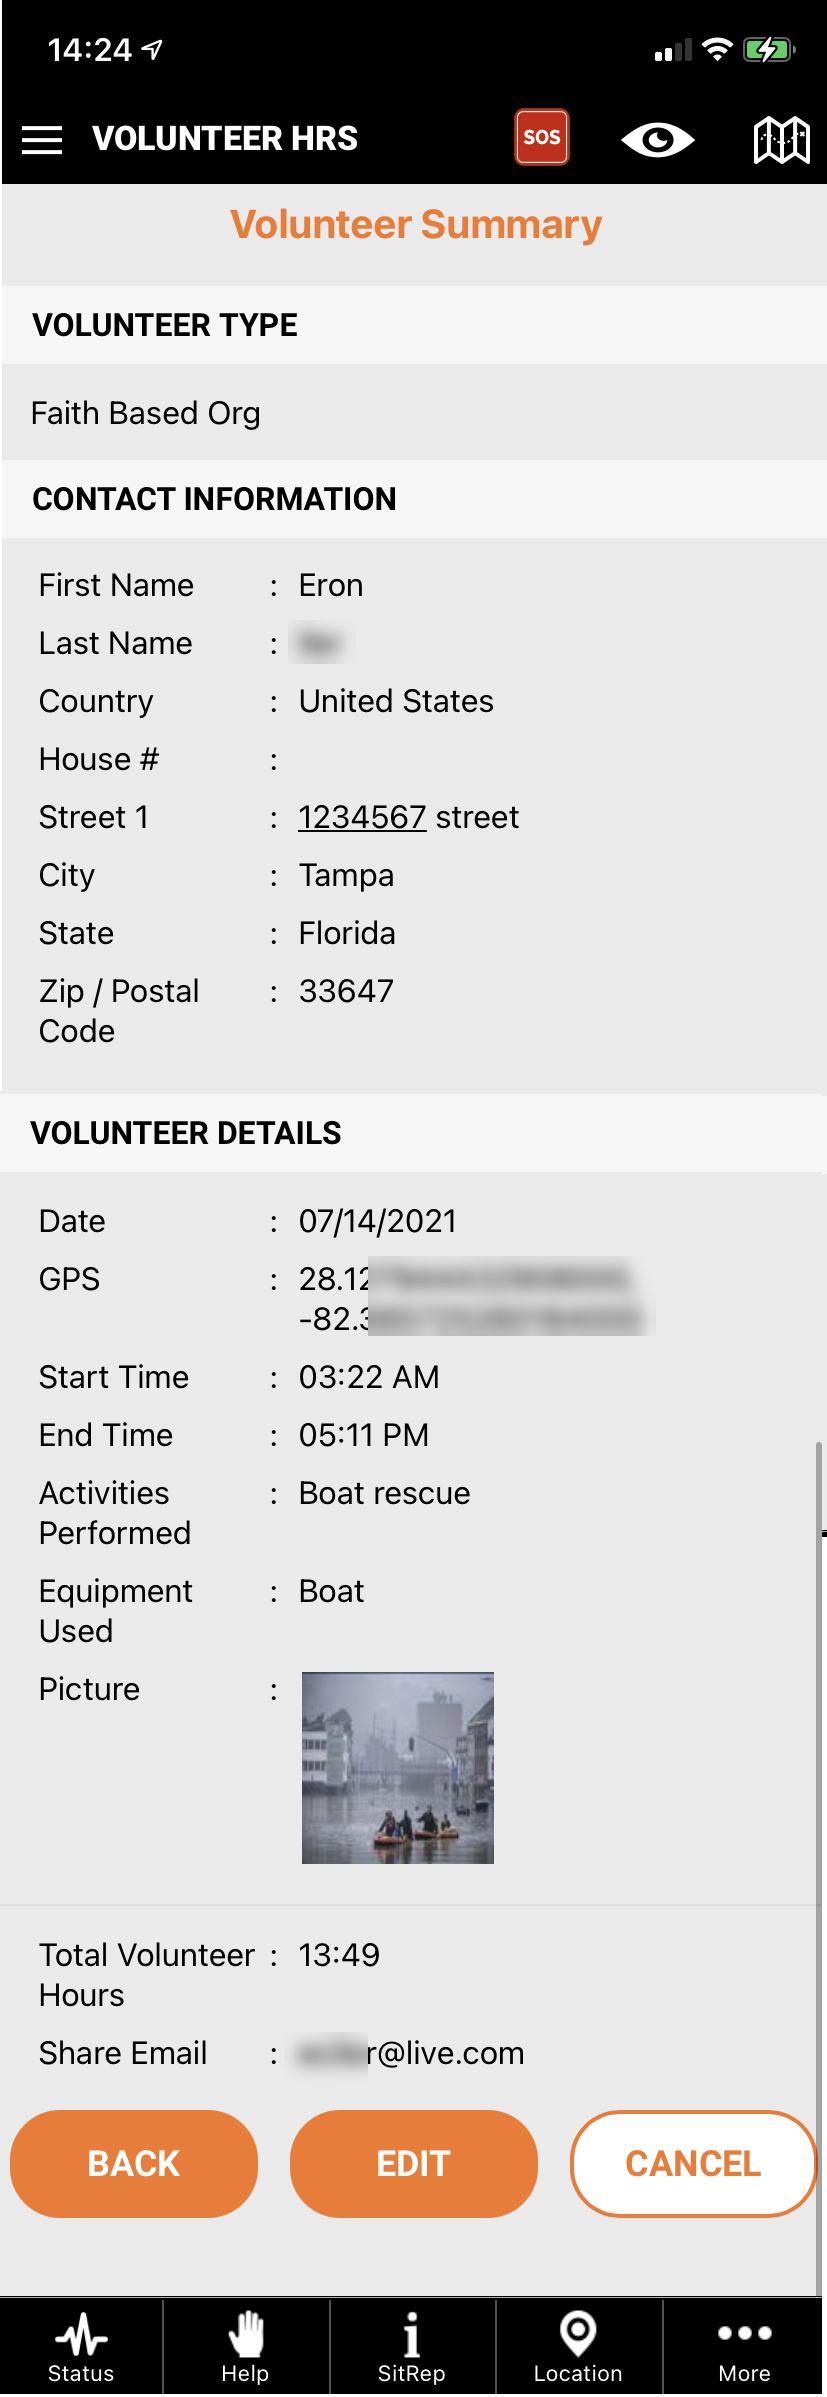
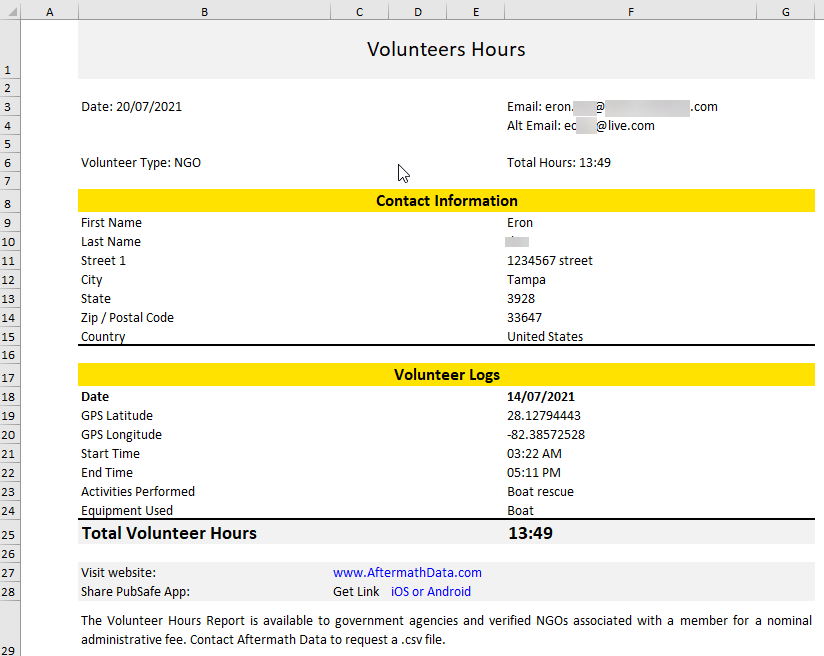
PubSafe can be used to create a record of volunteer hours with a higher degree of fraud protection and verification. Volunteer hours can log your phone GPS coordinates and include photos of your work to help others understand the time and effort you put in.
Navigate to the More menu in the lower right corner and then to Report Hours. Next, complete the forms and click submit. It is that easy.
You can opt to have a copy of the information sent to an email address in Excel format for storage outside of the PubSafe mobile app and sharing with government agencies. Organizations can use the spreadsheets to compile the type of work, hours, and location to promote the organization's efforts and for potential reimbursement from government funds and promotion of future volunteers.
Author: Eron Iler
Last update: 2021-07-22 21:12
Where can I get training?
The app is not that complicated after about 15 minutes of clicking around. You can post test content but be aware that help and emergency help request will be broadcast so these two functions should not be tested. Posting a SitRep and expiring in 3 hours will not hurt and you can label it "Test" so others know what you are doing.
To get training the best option is to visit our YouTube channel. It contains videos on specific functions and an overview. The PubSafe app is full of functionality that follows the same flow throughout the app. Once you get a feel for the flow, the rest will come easily.
Author: PubSafe
Last update: 2021-07-22 21:12
What does the "Visibility" menu options mean?
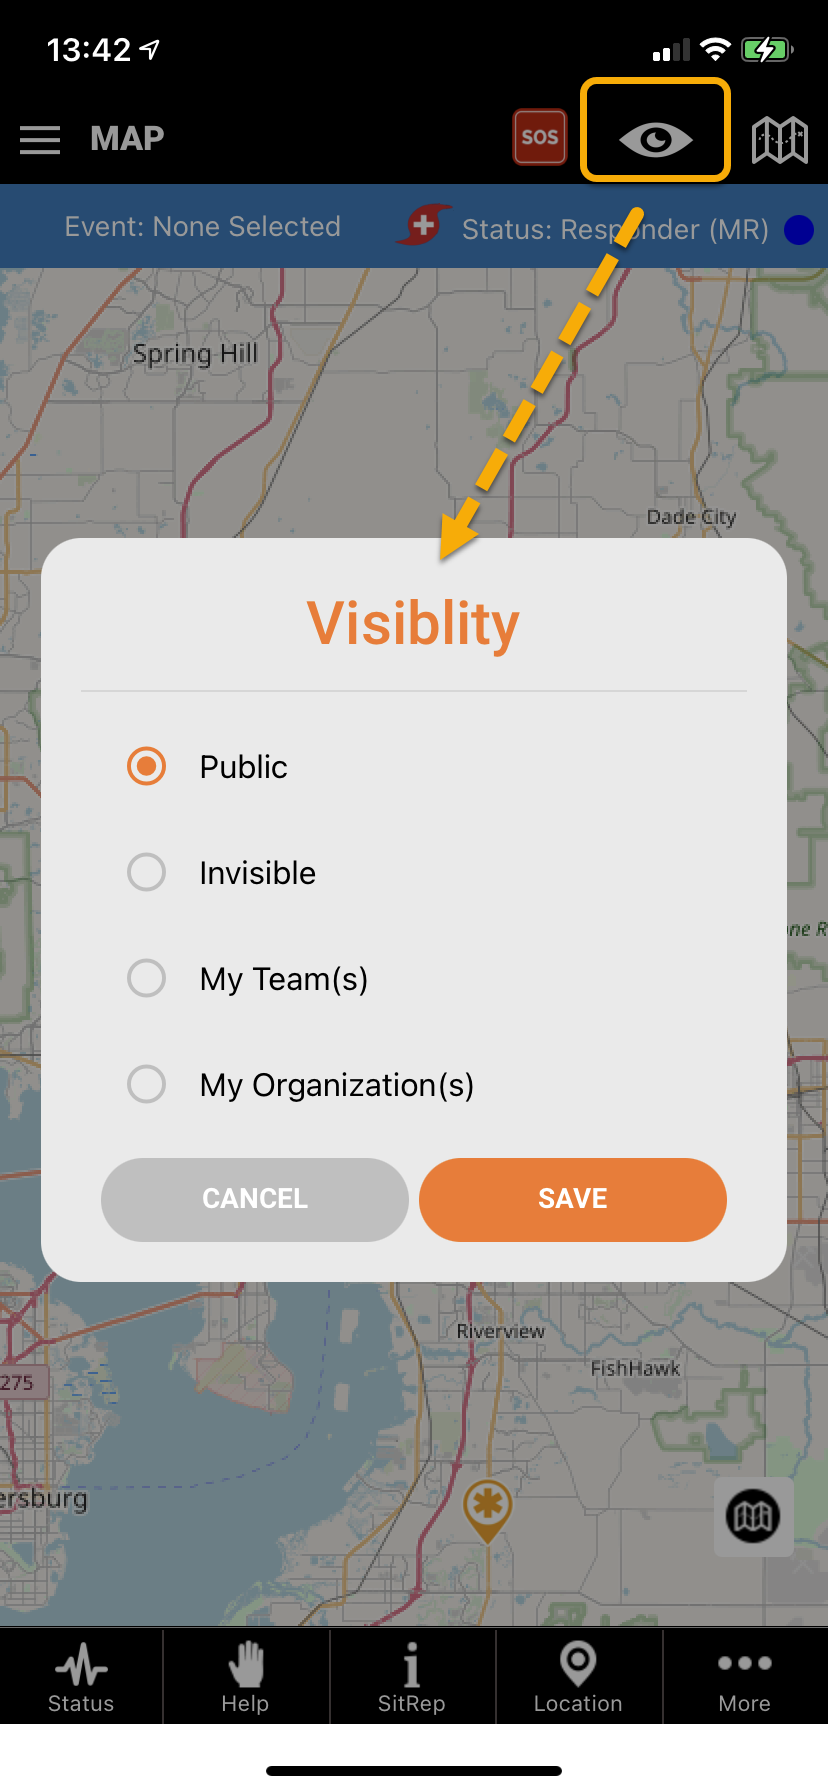
The visibility menu controls who can see you on the map. In order to interact with other users who are not part of your team or an organization, you must change your status to be visible. The most restrictive option applies. If you choose to be Invisible, organization and team members will not able able to see you. Your selection overrides other settings.
- Public - All PubSafe users can see you
- Invisible - No users can see you
- My Team - Only the team you selected can see you
- My Organization - Only the organization you selected can see you
Author: PubSafe
Last update: 2021-07-22 21:11
What is Public Benefit Research?
One goal of PubSafe is to study how people move before and after emergencies and disasters and in response to help requests. By collecting this data researchers can visualize routes users take, speed on roads, response to public announcements and instructions, timeframes for evacuations, and other factors that can shape future emergency management plans, infrastructure, and resource allocation.
Disabling Public Benefit Research
- When PBR is disabled, location tracking is disabled. This has several consequences.
- You will no longer receive geo-location-based alerts from the government, PubSafe, or NGOs
- If you have an emergency, your location will not be available to other users, your teams, or organizations.
- Your data will not be part of the dataset used to find improvements in the areas identified.
- Users have the option to go "Invisible" to other users by clicking on the eye icon in the header bar. This does not preclude location data from being collected but it prevents all users, teams and organizations from seeing your location.
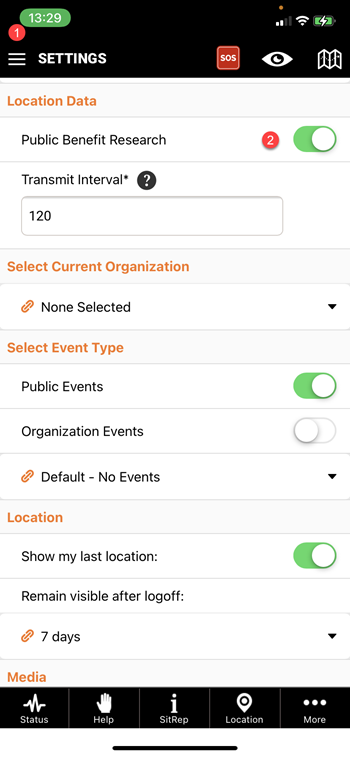
- To disable PBR navigate to the admin menu in the top left and toggle off the Public Benefit Research option. See image below.
Privacy
- Read our privacy statement in the mobile app for how data is used.
- Data is never sold or shared with 3rd parties for marketing. Anyone licensed to use the data must also agree to these terms.
- PubSafe has no interest in what you do that is not related to the research listed above.
Author: PubSafe
Last update: 2021-08-04 19:01
What is Departure Lead Time?
This represents the amount of time you require before you can leave in response for help. This time is generally not less than a day to pack gear, get supplies and alter work plans.
Author: Eron Iler
Last update: 2021-08-30 22:49
What is Departure Lead Time?
This represents the amount of time you require before you can leave in response for help. This time is generally not less than a day to pack gear, get supplies and alter work plans.
Author: PubSafe
Last update: 2021-08-30 22:49
What is Departure Lead Time?
This represents the amount of time you require before you can leave in response for help. This time is generally not less than a day to pack gear, get supplies and alter work plans.
Author: PubSafe
Last update: 2021-08-30 22:50
Help Request Window Explained
Author: Eron Iler
Last update: 2021-09-02 22:25
Government ID
The government ID field is not displayed on the PubSafe app by default. When implemented, users will have the option to make it visible to all members.
Future functionality may expose it to government organizations for the purpose of validating and identifying a member applying to join an organization or team.
The Government ID field is found under the Administration menu (hamburger icon, top left)>Profile>Government ID
Author: PubSafe
Last update: 2021-09-24 00:01
Platform Security
Information security is globally important and a topic of regular conversation. PubSafe, powered by Aftermath Data, wants users to be confident that industry-standard or higher, security practices are in place. Data is encrypted at rest (stored) and in transit (from the database to the mobile app or web portal) using encryption. Aftermath Data developers cannot view passwords or unique user information in the database which means if data was stolen, it would be almost impossible for anyone to unencrypt the data without government assistance. The simple reality is that the PubSafe data just isn't that important to cybercriminals. The low resale value means cybercriminals are more likely to focus on data from banks, small businesses, and other sources of credit and personal identity data which can be converted to cash by selling information on the dark web.
User information is never sold or shared with marketing companies. This prevents the data from being share unencrypted and potentially compromised by 3rd parties with less capable security. Unfortunately, no platform is hacker-proof as seen by the US government, along with major corporations like Colonial Pipeline, Microsoft Exchange, Apple, and others. Think about how many times you have to reboot your phone or computer to apply security updates. Most of the apps you use today are potential security leaks and likely do not maintain the backend security implemented by Aftermath Data for PubSafe. Aftermath Data relies on over 21 years of online security best practices to reduce the odds of a significant cyberattack.
The Aftermath Data infrastructure architecture is designed to provide multiple layers of protection. Security ranges from user settings to the technology used to build the mobile app and web portal, data sharing methods to the server configuration. It would not be wise to outline every security step taken which could aid potential cybercriminals.
General Security Implemented
- VPN connections
- Multiple layers of password-protected resources
- APIs
- 256-byte encryption
- Encryption at rest
- Encryption in transit
- Robust commercial-grade firewalls
- Data compartmentalization
- Complex and long passwords
- Employee cyber training
- Non-standard IP addresses
- Regular backups to other secure locations
- Tier 4 data centers or cloud services from platforms like AWS or Azure
- Regular and routine security patches to servers and to mobile devices, and workstations using Microsoft 365
Author: Aftermath Data
Last update: 2021-09-27 17:53
Organization Membership Status
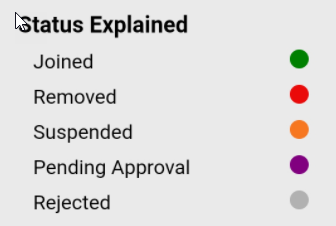
Users can join an organization but must be approved by an organization administrator. A user's status is indicated by the color dot as shown below.
Teams do not have the same requirements as organizations for membership, communication, or management.
Author: Aftermath Data
Last update: 2021-10-28 17:32
Contact Manager & Directory
During disasters, information is often fragmented between dispatchers, agencies, or organizations. By utilizing the contact manager and directory, information can be shared within a single event such as a hurricane, but also over time between multiple disasters or emergencies.
Directory entries are visible across all PubSafe Pro or higher users & organizations; Contacts are organization-specific. Anyone, or organization, can be in the directory without being in an organization or having the PubSafe app. No one can be in organization Contacts without the Pro or higher app.
Reference the glossary for various definitions found inside the Contact Manager. https://kb.pubsafe.net/admin/?action=glossary
Contact Manager
The CM is used to share information within your organization. Information entered is not visible to other PubSafe users unless you opt to share it to the PubSafe Directory. Government agencies would be an example of organizations to enter into the PubSafe Directory.
Specific to organizations and requires Pro and above mobile app.
Contacts - Members and other people associated with the organization which may or may not also appear in the directory. Contacts can be included to all of the PubSafe community by selecting the inclusion option in the contact editor window.
Accounts - These are companies or organizations visible to a specific organization in their contact manager. Accounts can also be included to all of the PubSafe community by selecting the inclusion option in the organization editor window.
Contact States - Contacts in the contact manager must be in one of the follow states.
- Active - A user which received an invitation and was approved by an org admin. Active org members which must be assigned security role and group.
- Pending - The user accepted an invitation to join an org but the org admin has not yet enabled final approval by making them active
- Suspend - Inactive, not visible in the org and cannot view org information or receive dispatched missions or communication
- Archived - Removed from the organization by an org admin
- Deleted - Removed from PubSafe by the user
Directory
Available to all PubSafe organization members and users with the Pro or higher mobile app.This enables sharing across organizations and events.
Author: Aftermath Data
Last update: 2022-06-17 19:25
Transportation Assistance
PubSafe offers users the ability to identify is transportation assistance is needed. The reason assistance is needed is not collected to avoid HIPPA (personal medical information in the USA). Users in need of transportation assistance may be contacted by non-government organizations support a disaster or government officials as part of a public service program.
Transportation assistance is not a guarantee of service, or a replacement for a government program, unless specifically stated by local government officials. PubSafe is a data augmentation tool for other data sources and systems.
If assistance is to be provided (not guaranteed), it is likely that you would receive a call to confirm your location, type of assistance, and special needs.
Author: Eron Iler
Last update: 2022-01-10 19:34
Getting Started - Registering an Org & Inviting Members
These are the general steps to get an organization on the PubSafe platform and add members.
- All portal users must install the free version of the PubSafe mobile app and upgrade to PubSafe Pro, which includes a free 30-day trial. Click here for Apple iOS or Google Android.
- Note: You will log into the portal using the same credentials as the mobile app.
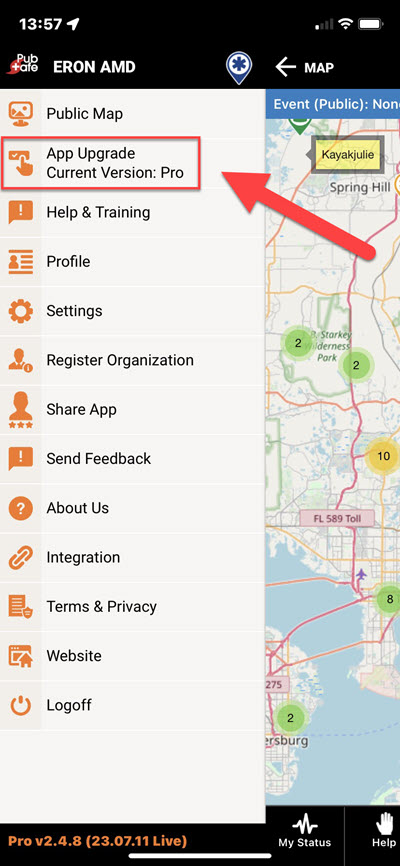
- From within the mobile app, open the top left admin menu and select App Upgrade.
- A Pro user can apply to create a new organization or be invited to join an existing organization or multiple organizations.
- To submit an organization application Apply Here
- When you submit an organization application, you are the organization creator and administrator. If you want someone else to have this role, they must register.
- Your organization will be evaluated for social and public benefit. Brand new organizations may be delayed or placed in a probationary period.
Inviting Members
- On approval, login to the portal and go to Account>User>Joins. Send invitations to other PubSafe users you want as members. You can do this individually or the recipient can share the invite with other people using the QR code, link, join code, etc. This enables a large group of people to join quickly in a pending approval status.
- Watch Video - How to Invite Member to Your Organization
- For security, an org admin must then approve each member. Since the org invitation can be easily shared, members must be approved by an org admin before they can access the portal and the organization's account.
- Members then log in to the PubSafe portal using their mobile app credentials but will only see what is available to their assigned role.
Selecting an Organization in the App
In the PubSafe app, members navigate to More>Organizations menu (lower right) and select the organization they want to affiliate with. Users can affiliate with more than one organization and freely switch between organizations. A user's visibility, role, and permission will change based on the organization selected. Once an organization is selected, you will only see, access and communicate with that organization as a member and are limited by the role assigned to your user in the organization.
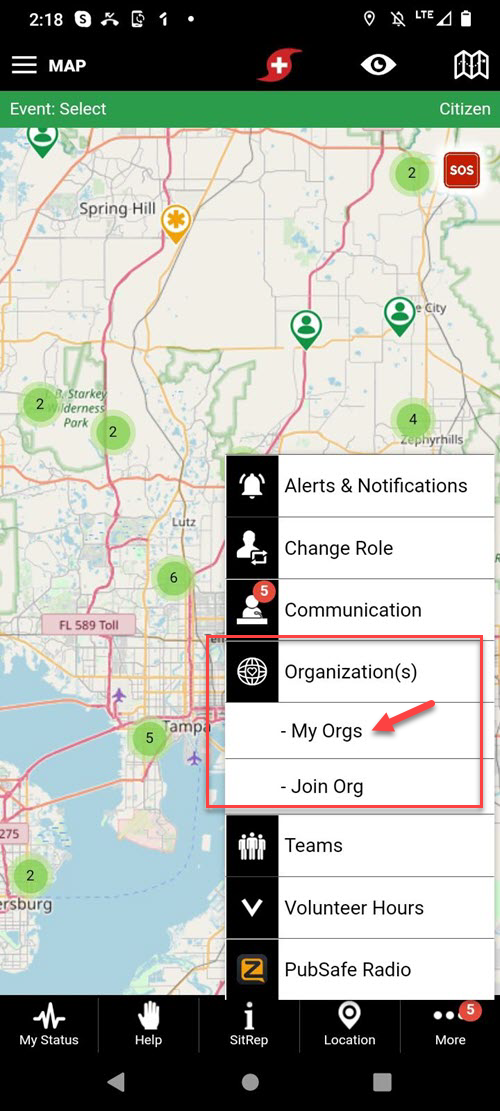
Dispatcher Organization Selection
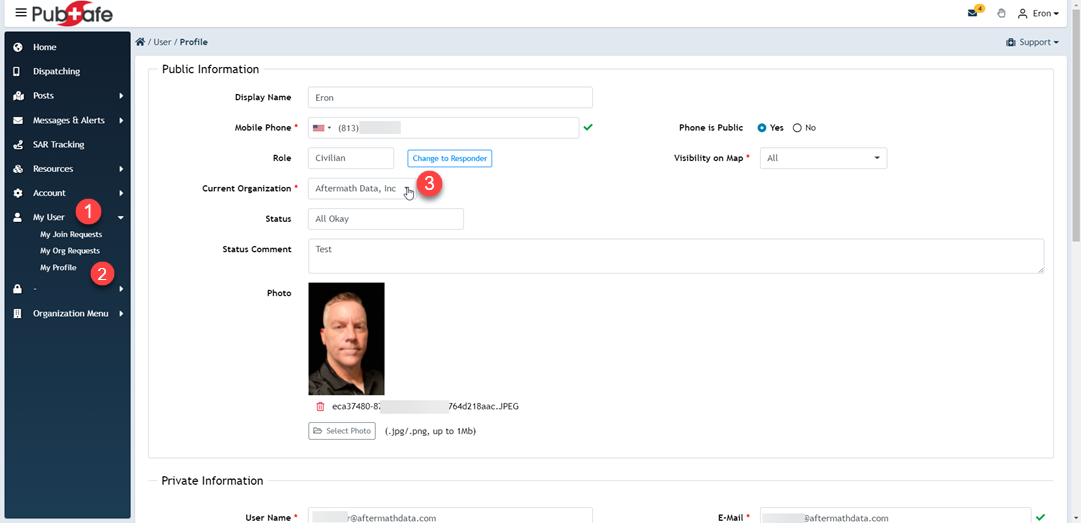
Dispatchers can switch between orgs in the portal but will generally remain with one during an disaster or event. The last organization selected and saved in the portal is the org that will be used on login. To switch orgs, select the new organization in the portal, under the user profile in the top right, and select Profile. Change the Current Organization from the drop menu showing orgs you are approved for as a member. Click save. When you log back in, the org will have changed. You can confirm this by seeing the org listed under the Profile menu (top right).
One profile can only be logged into one organization on the web and portal. You cannot cannot log into one organization on the mobile app and another on the portal.
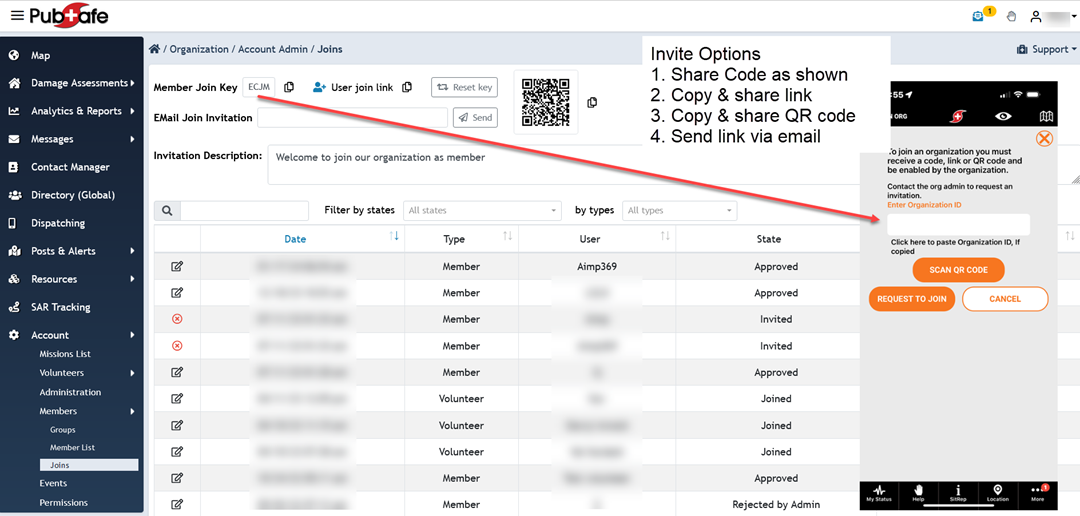
How to Invite Members to an Organization
Click here - PubSafe Knowledge Base - Inviting Members to an Organization
- Members must install the PubSafe mobile app and upgrade to the Pro version.
- Invite the users from the web portal or share the invite code from a phone or email.
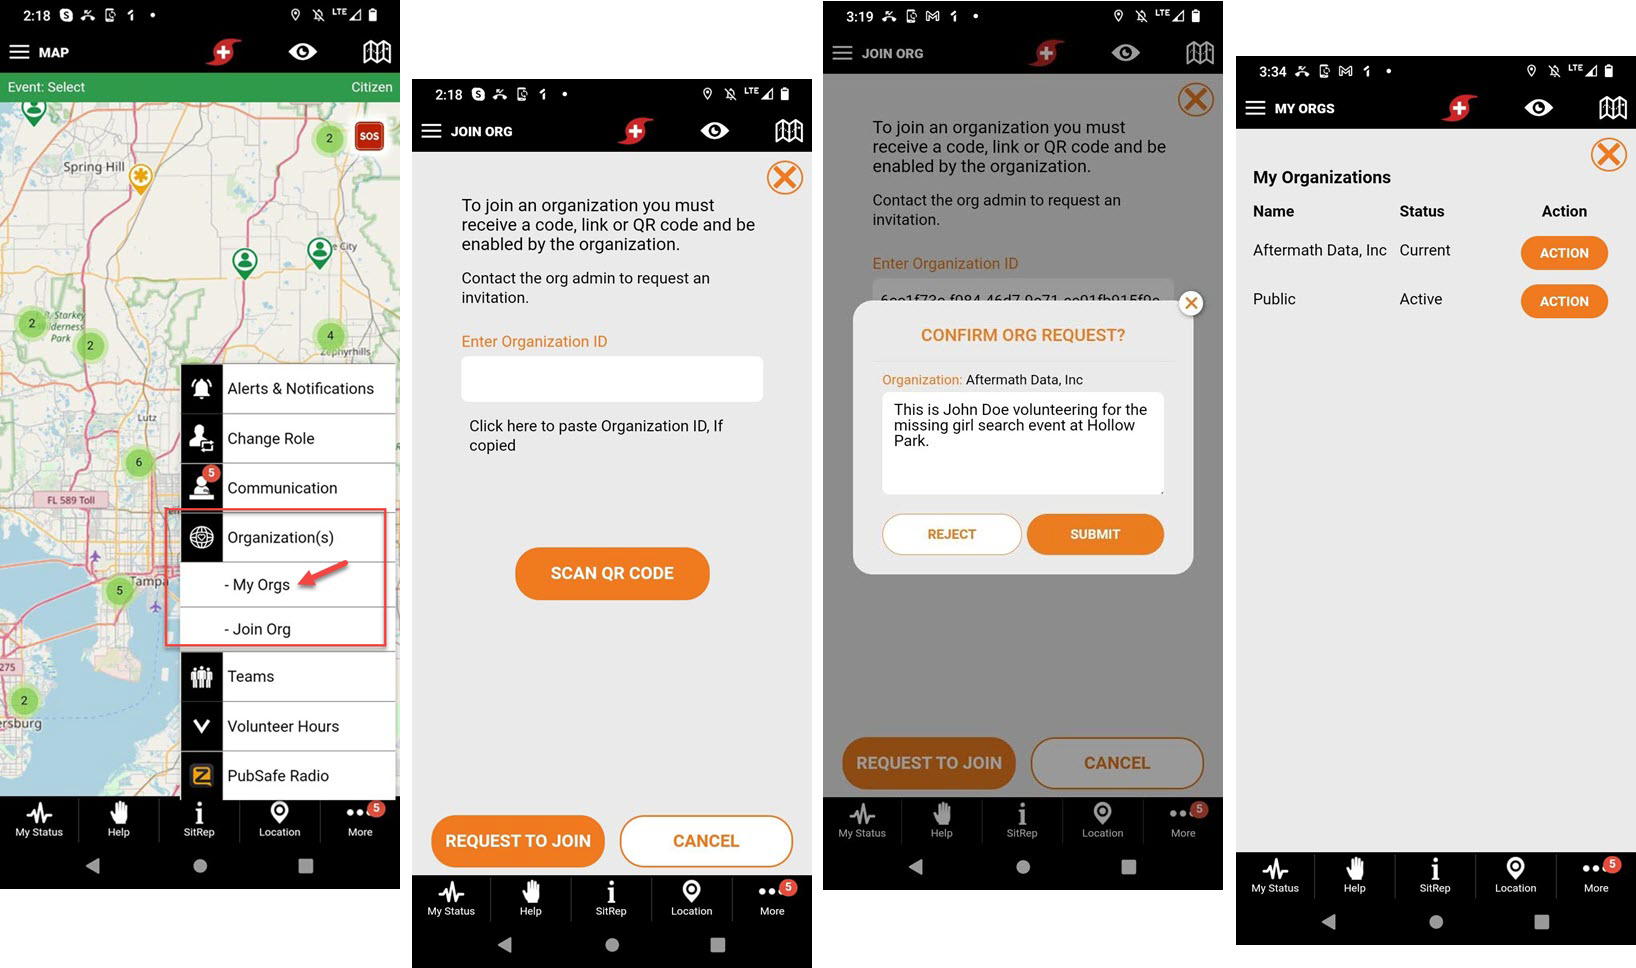
- App users must accept the invite. Menu - More>Join Org
- The portal admin must enable final approval in portal.
- The app user then selects the active Org in the app under the More (lower right)>Organizations>My Orgs menu.
Author: Aftermath Data
Last update: 2024-10-15 18:28
Changing Organizations
Prerequisites
- You must have the PubSafe app
- You must upgrade to the Pro version of the PubSafe app
- You must be invited and then approved by the org admin.
- The org admin will assign a role which determines what you can see and access.
Users can switch between orgs at any time. The number orgs you can join is determined by your PubSafe app version.
The last org selected and saved in the portal is the org that will be used on login.
Under the user profile in the top right, select Profile. Change the "Current Organization" from the drop menu showing orgs you have joined. Click save. When you log back in, the org will have changed. You can confirm this by seeing the org listed under the Profile menu (top right).
Author: Eron Iler
Last update: 2022-02-23 18:00
Inviting Members to an Organization
Once an organization application is approved, the originating user is the account owner and admin, and can login using their PubSafe app credentials.
Inviting Members to Your Organization
The next step is to invite people to join the organization from the web portal by sending invites or sharing a unique join link or QR code. All PubSafe users must install the PubSafe mobile app and upgrade to the Pro version to join an organization.
Watch Video - How to Invite Member to Your Organization
Sharing Options Include:
- Email link
- Copy link for SMS
- Scanning & sharing QR code
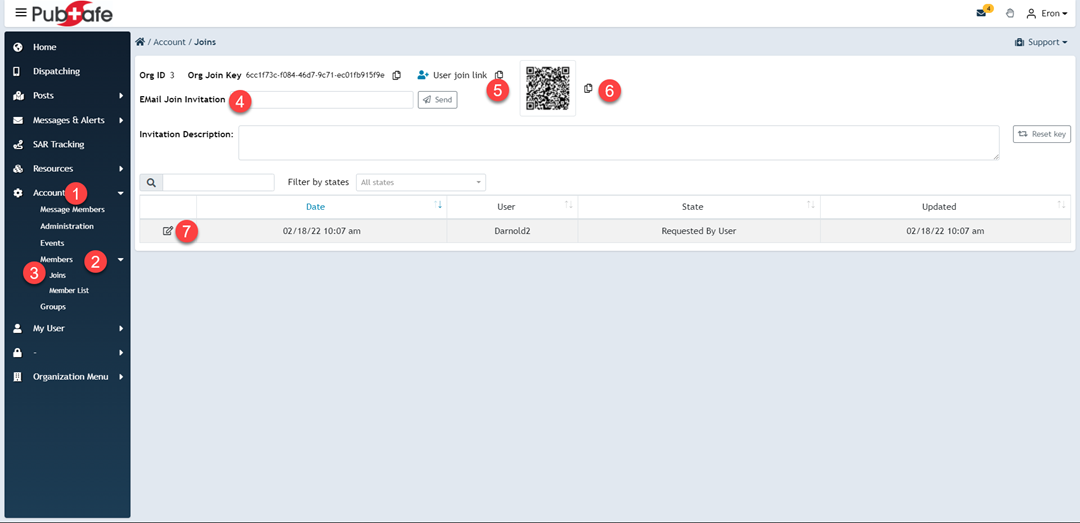
Since links can be freely shared with anyone after being sent, people must request to join an organization, and an organization administrator must give final approval. Members can be approved or rejected at any time. Follow the numbered steps below to approve a user. If in doubt, leave the option set to the default.
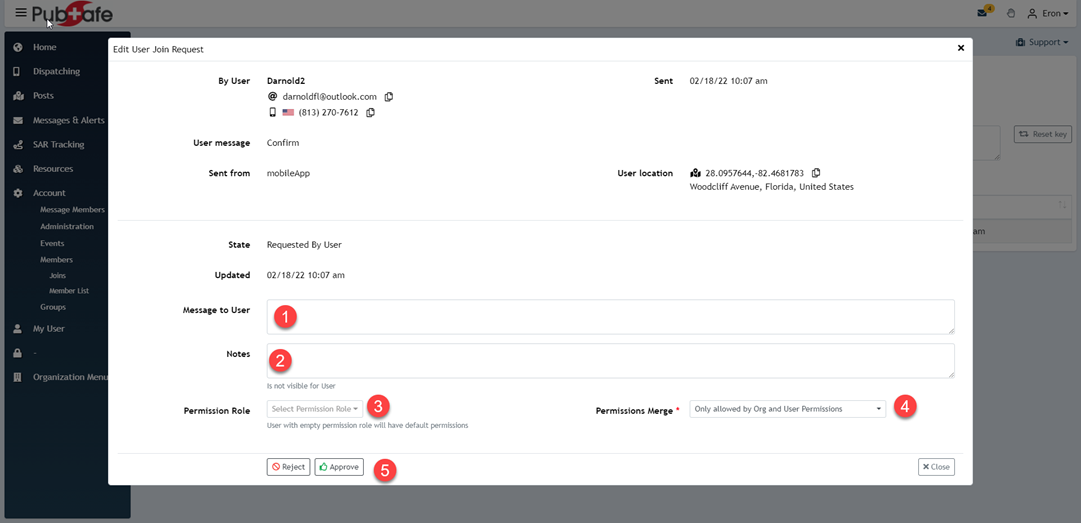
User Acceptance
Users must link the organization invite to their PubSafe mobile app profile by entering the Join ID into the mobile app. A user can join multiple organizations. Select the desired organization from those listed under My Organizations.
Author: Aftermath Data
Last update: 2024-10-15 18:41
How do events work?
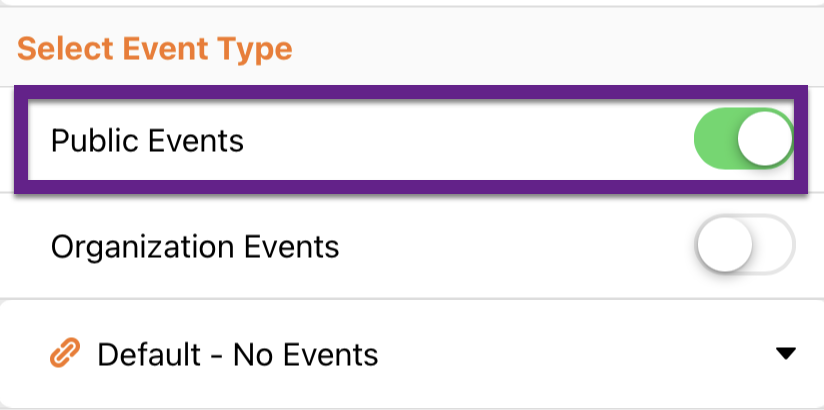
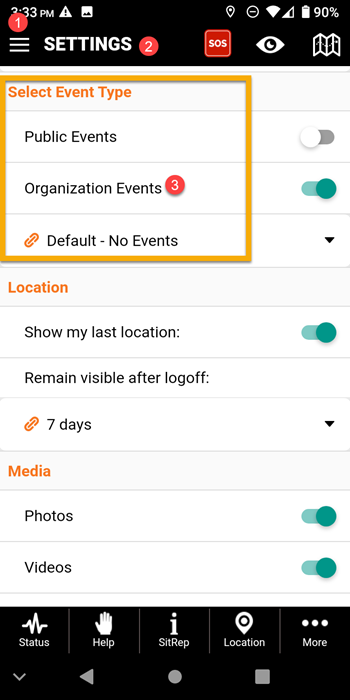
Events are a way to group data based on specific events like a hurricane, flood, tsunami, etc. By selecting an event, a member is letting researchers know their actions are related to a specific event. This facilitates improved data analysis of activities related to a particular data set. If an event is not selected, other less accurate methods have to be used to study an event.
Types of Events
There are two types of events. PubSafe platform wide events and organization level events.
PubSafe Events
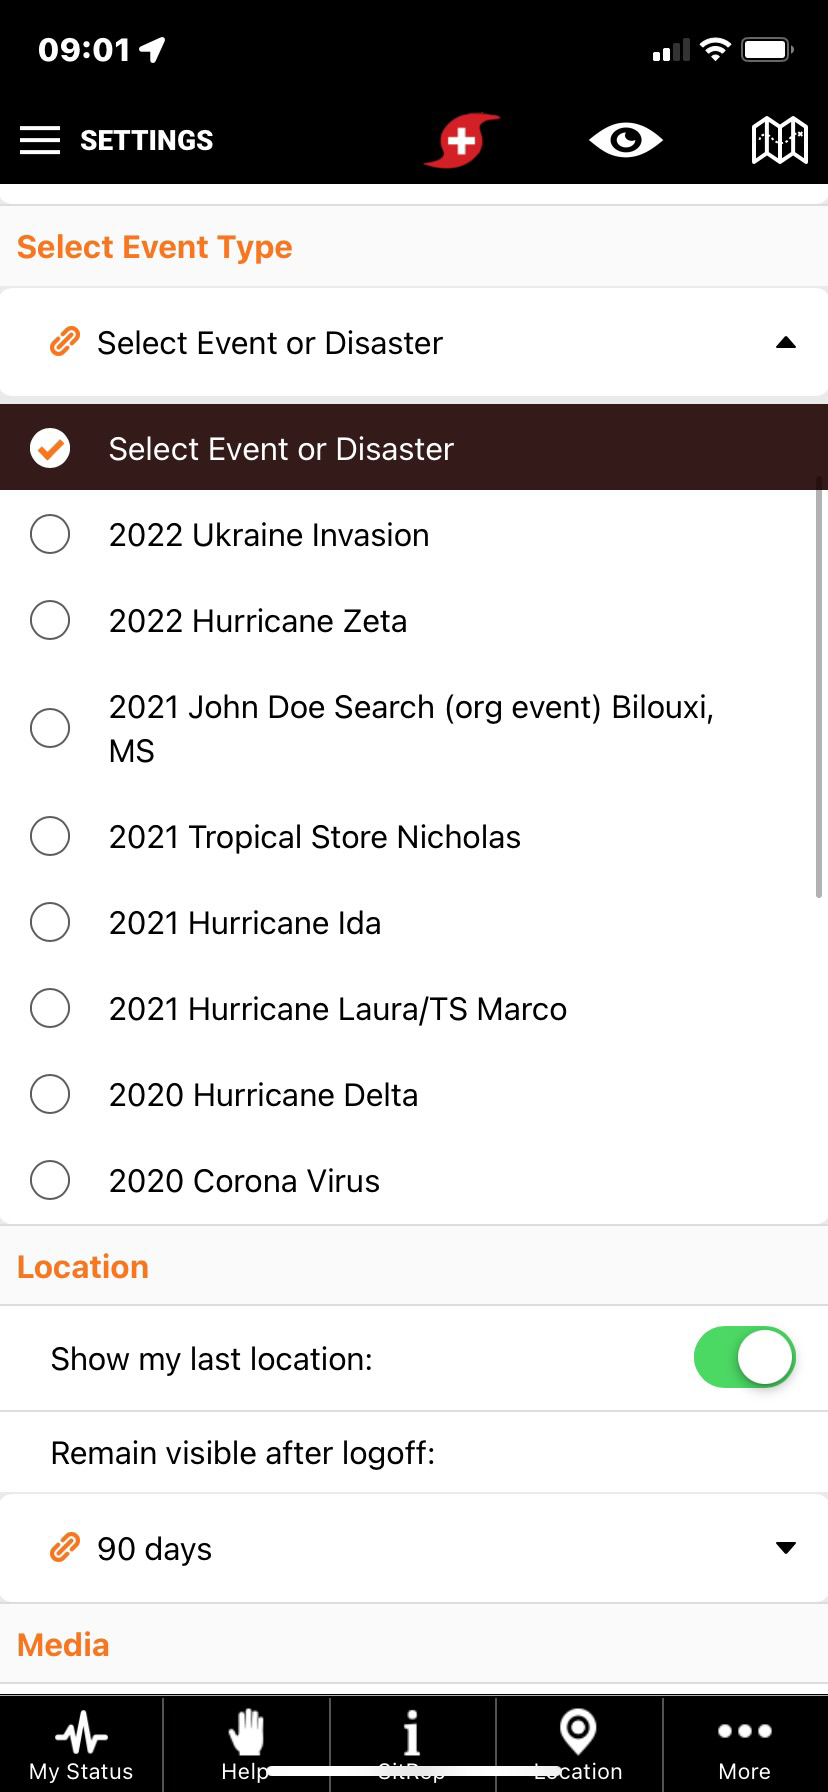
These are events created by PubSafe and are universally available to all members under the Admin>Settings menu. These are generally severe and regional events like hurricanes, wildfires, war, etc. Users are encourage to submit events for consideration.
Organization Events
There are times when organization conduct training or local searchers or events are small, less severe and local in nature that do not rise to the level of a PubSafe Event. Org events provide the foundation for analysing local events by grouping data. An org event will appear in the PubSafe mobile app when the user has designated the org to be their active organization. Users can be switch between orgs similar to how they can switch between teams. Member interaction is isolated to the active org selected. The number of orgs a member can join is determined by their PubSafe app subcription level. The higher the subscription, the more teams and orgs a user can join.
Author: PubSafe
Last update: 2022-04-19 15:07
Map
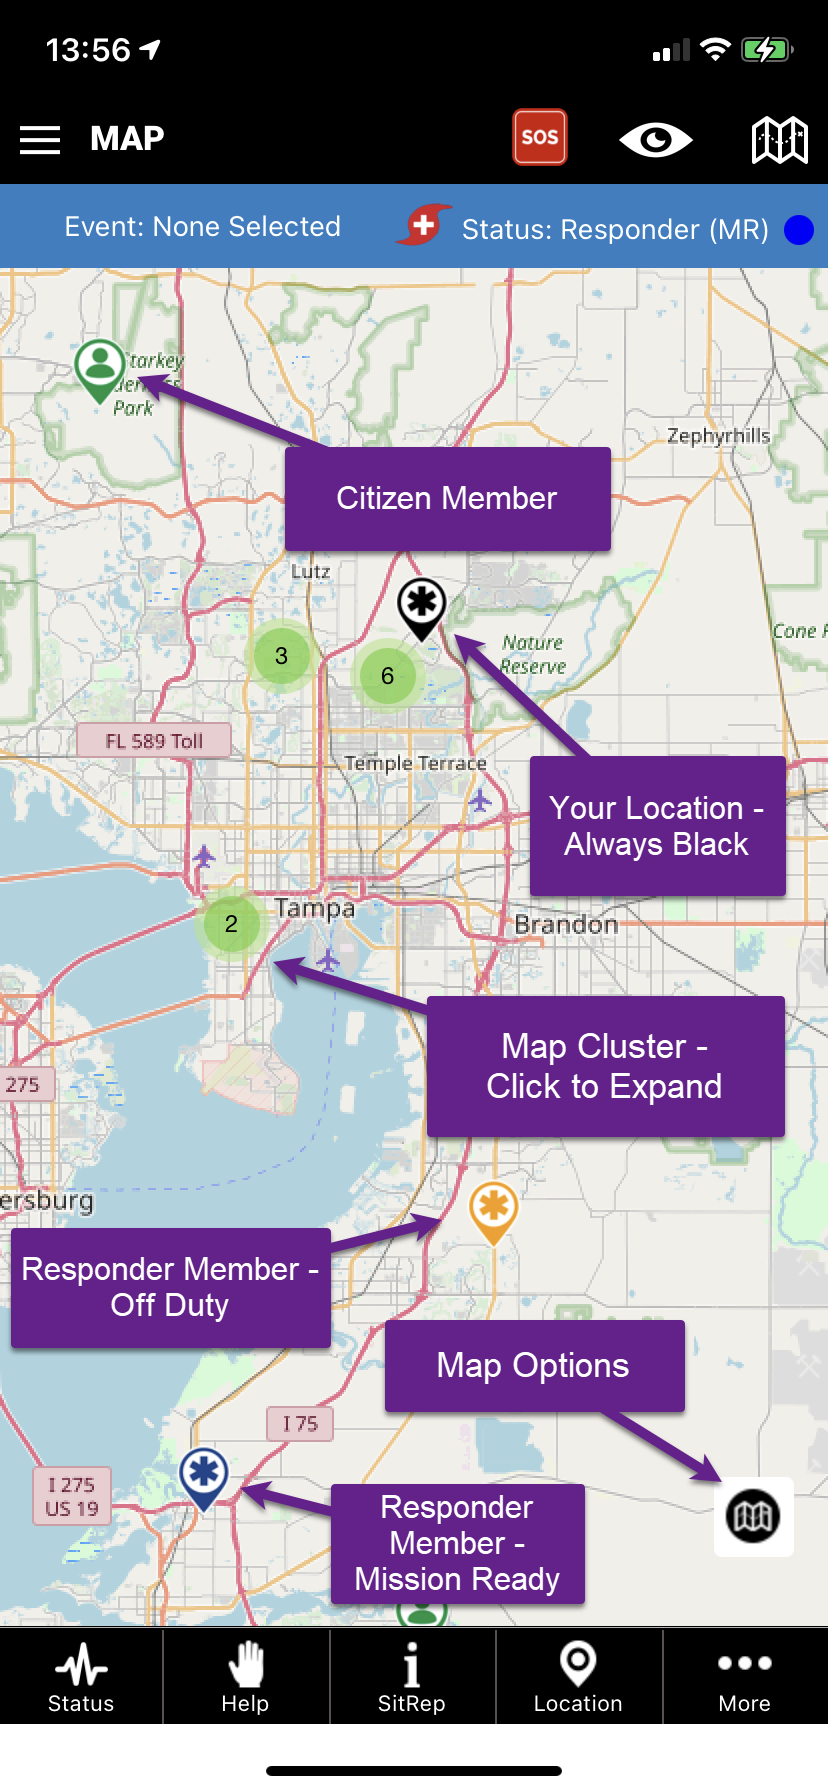
What do the different icons and menus provide?
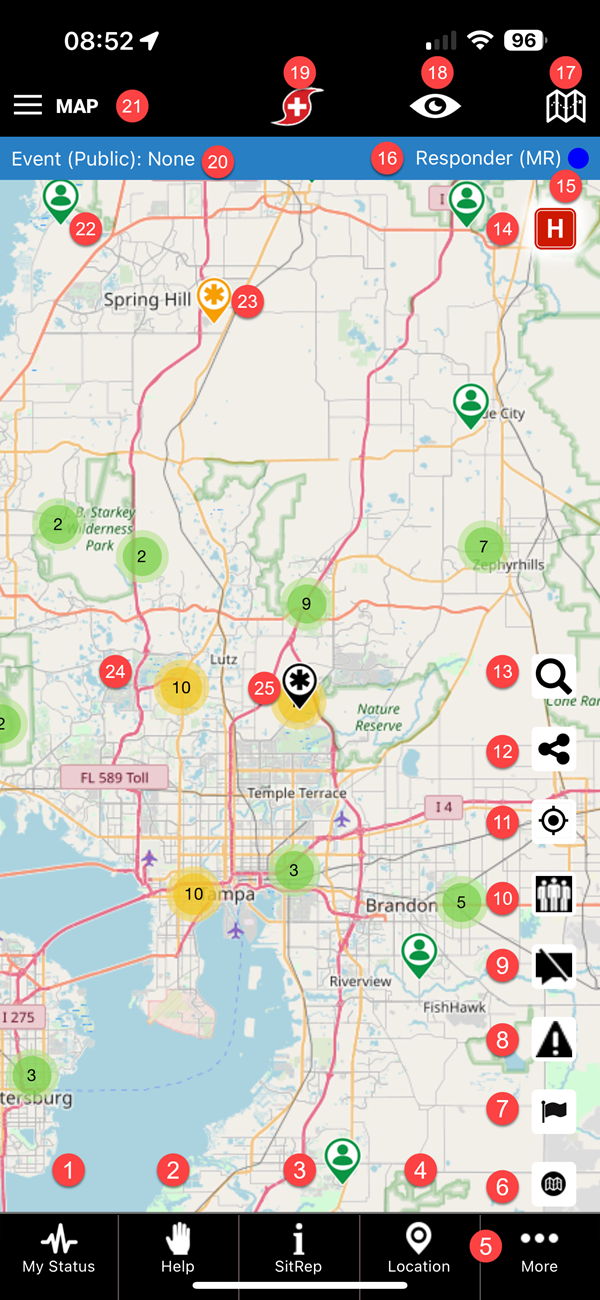
Base Map
- My Status - Share your last know location and plans for family, responders, and others to monitor if you lose communication.
- Help (routine) - Request help for routine and non-priority situations.
- SitRep - Share information about what is going on in your area.
- Location - Share information on a retail store, restaurant, shelter, aid station, hardware store inventory, etc.
- More - Access additional functionality.
- Map - Clear map filters and return to default.
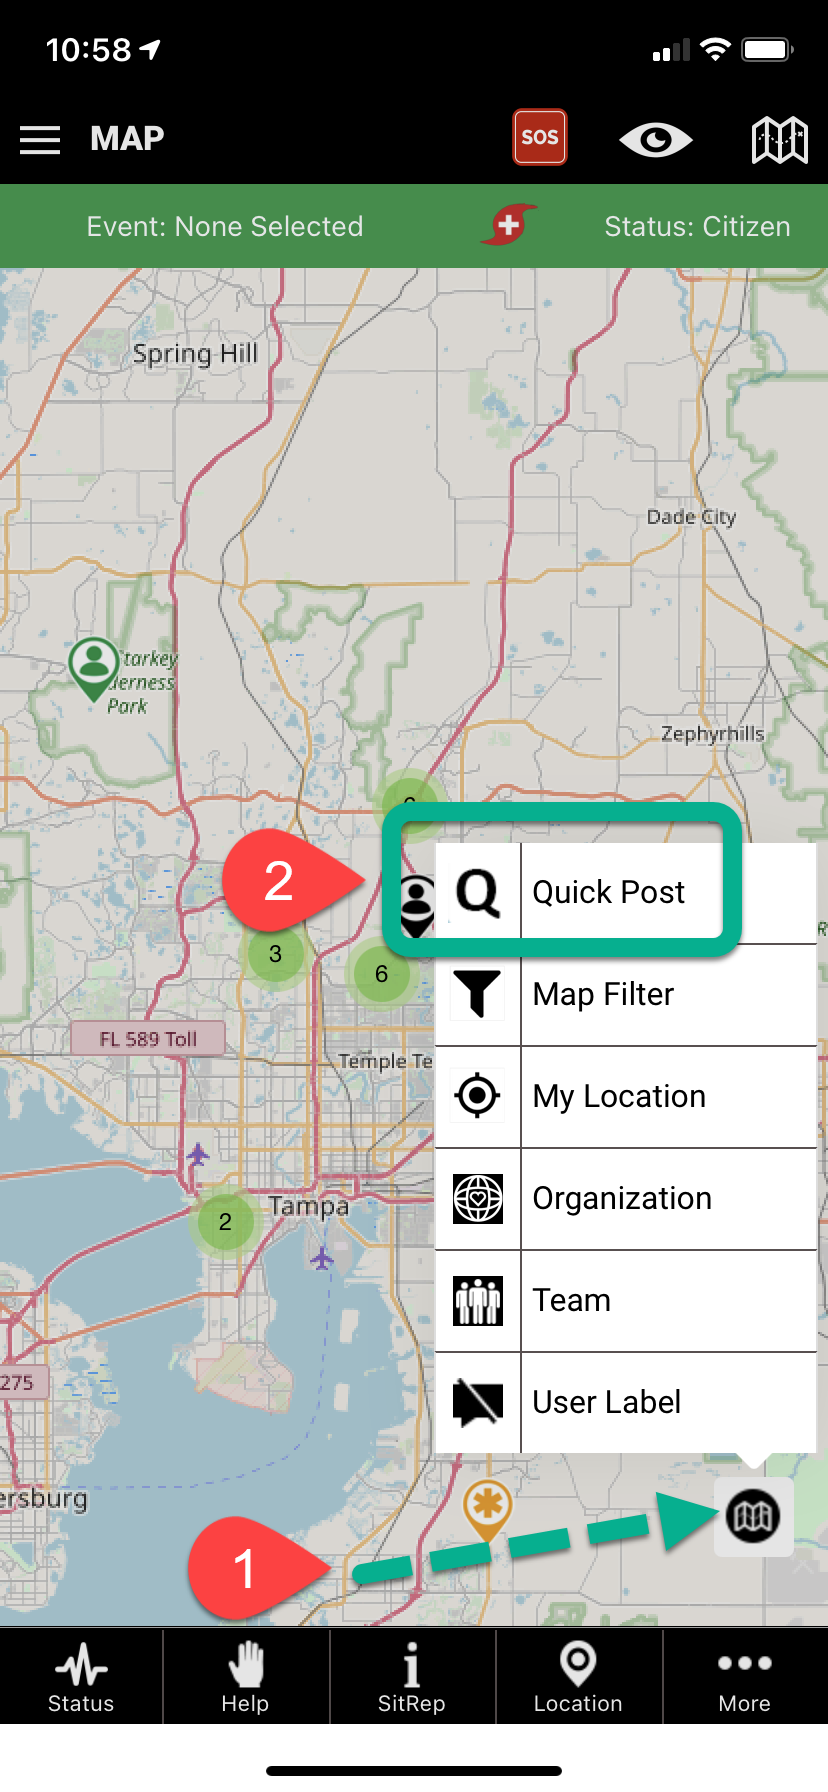
- Quick Post - Shortcut to post on popular topics.
- Notifications - Show or hide notifications on top of the map.
- Labels - Show or hide member labels on the map.
- Team Filter - Show or hide (filter) team members on the map.
- My Location - Show my location or hide my icon to access information on a layer below my icon.
- Share PubSafe - Share the app with others.
- Search and Filter - Search map data. Zoom to various areas to change the search data set.
- Help - Priority - Priority help request. Potential loss of life or significant property damage. Call government emergency services first.
- Work Order Availability - If in Responder status, you are available to accept, or not accept, additional work orders. Color-coded.
- User Status - Citizen or Responder (Only Plus and higher app users can be a Responder)
- Map Home - Return to the map from any screen.
- Visibility Selector - Choose your visibility level.
- PubSafe Share - Share the install link for the PubSafe mobile app by link.
- Event Selected - The event you are responding to or sharing information about.
- Admin menu (3 bars) - Access additional settings.
- Citizen Icon - User in citizen status.
- Responder Icon - User in Responder status.
- Data Cluster - Multiple data points grouped together. Click to expand.
- Your Icon - Your icon is always black and is the only black icon. It can be as a Responder or Citizen.
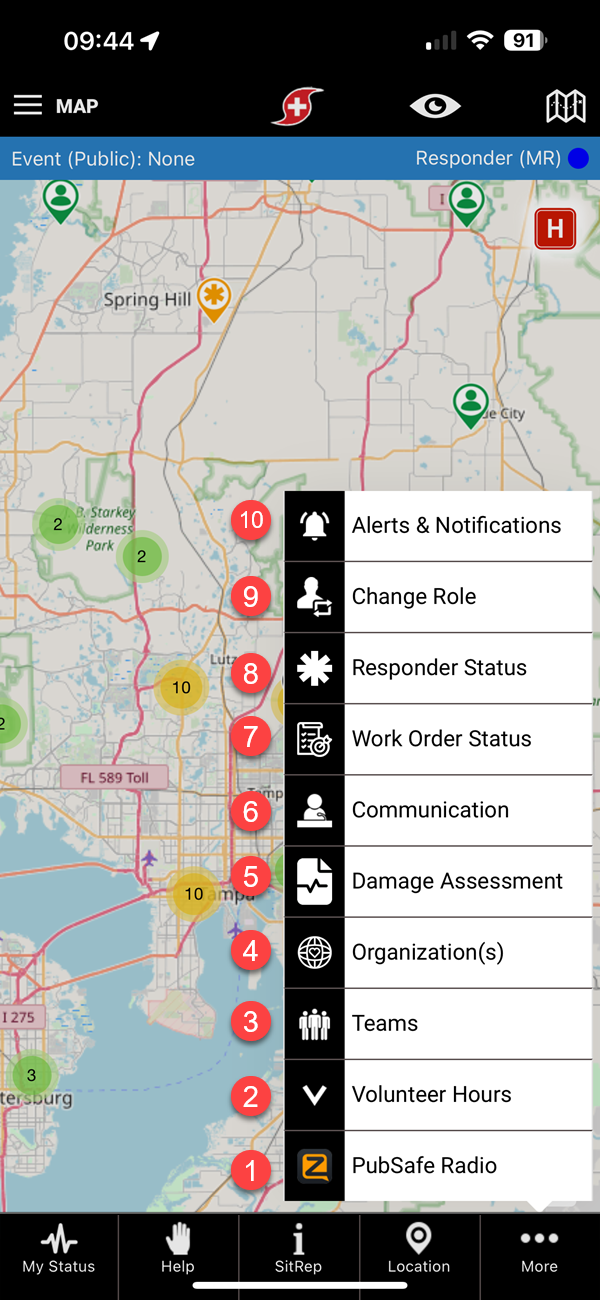
More Menu
- Zello channel for any PubSafe user
- Log and review volunteer hours
- Team administration
- Organization switching and Joining
- Link to online Preliminary Damage Assessment form
- List of all Notifications
- Open work order status for updates, acceptance, and closure
- Your availability to accept new work orders
- Change Role between Responder and Citizen
- List of Alerts & Notifications
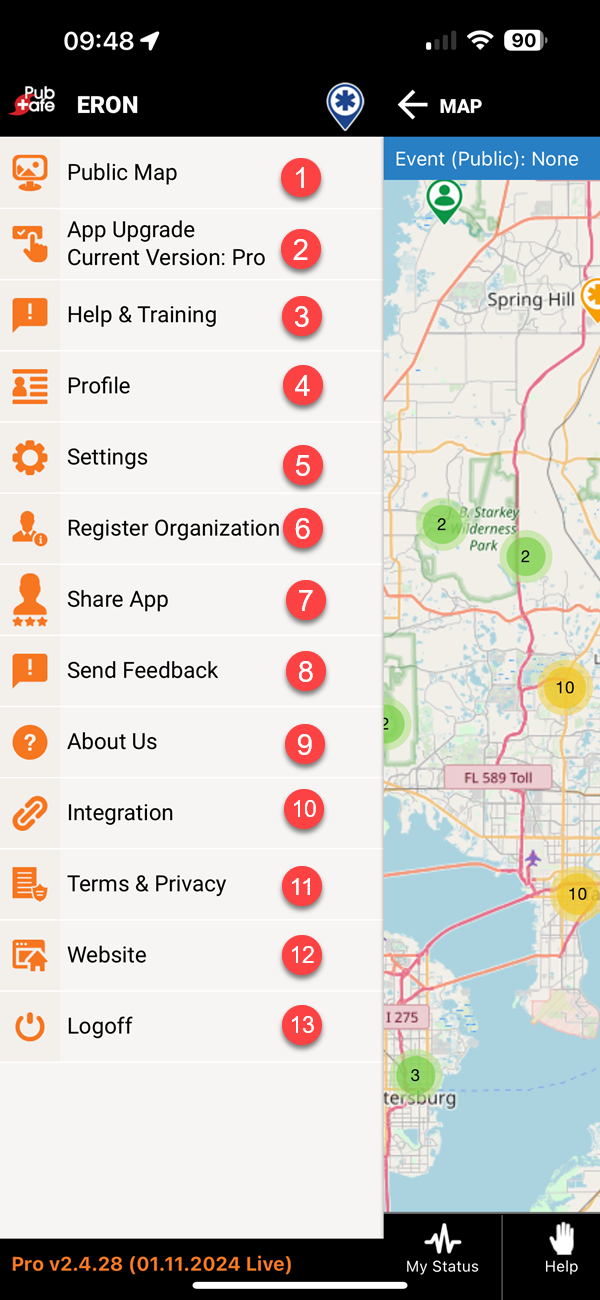
Admin Menu
- Link to the PubSafe public and members-only map (login with mobile app credentials).
- Upgrade options and current app version.
- Link to the PubSafe Knowledge Base (this site).
- Your user profile. Name, picture, skills, etc.
- App Settings. Events, local emergency number, media and social media options.
- Register a new organization.
- Share the PubSafe mobile app.
- Share feedback on app performance and ideas.
- About PubSafe.
- Learn about integration opportunities with other platforms.
- Terms and privacy
- Link to PubSafe.net
- Log out of PubSafe app.
Author: PubSafe
Last update: 2024-11-01 14:59
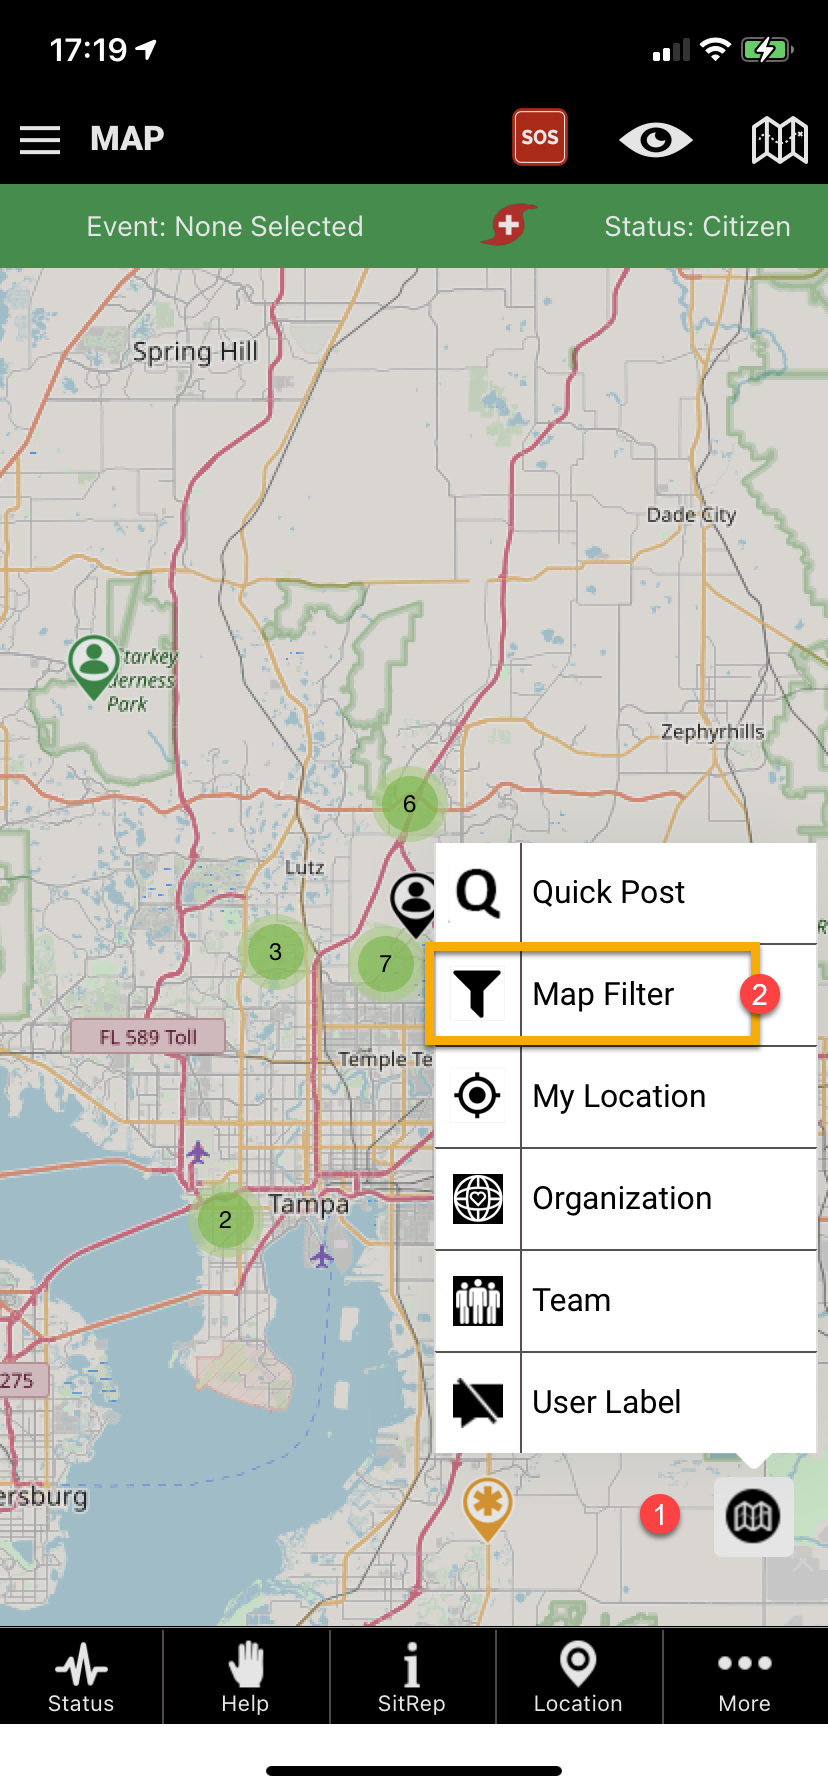
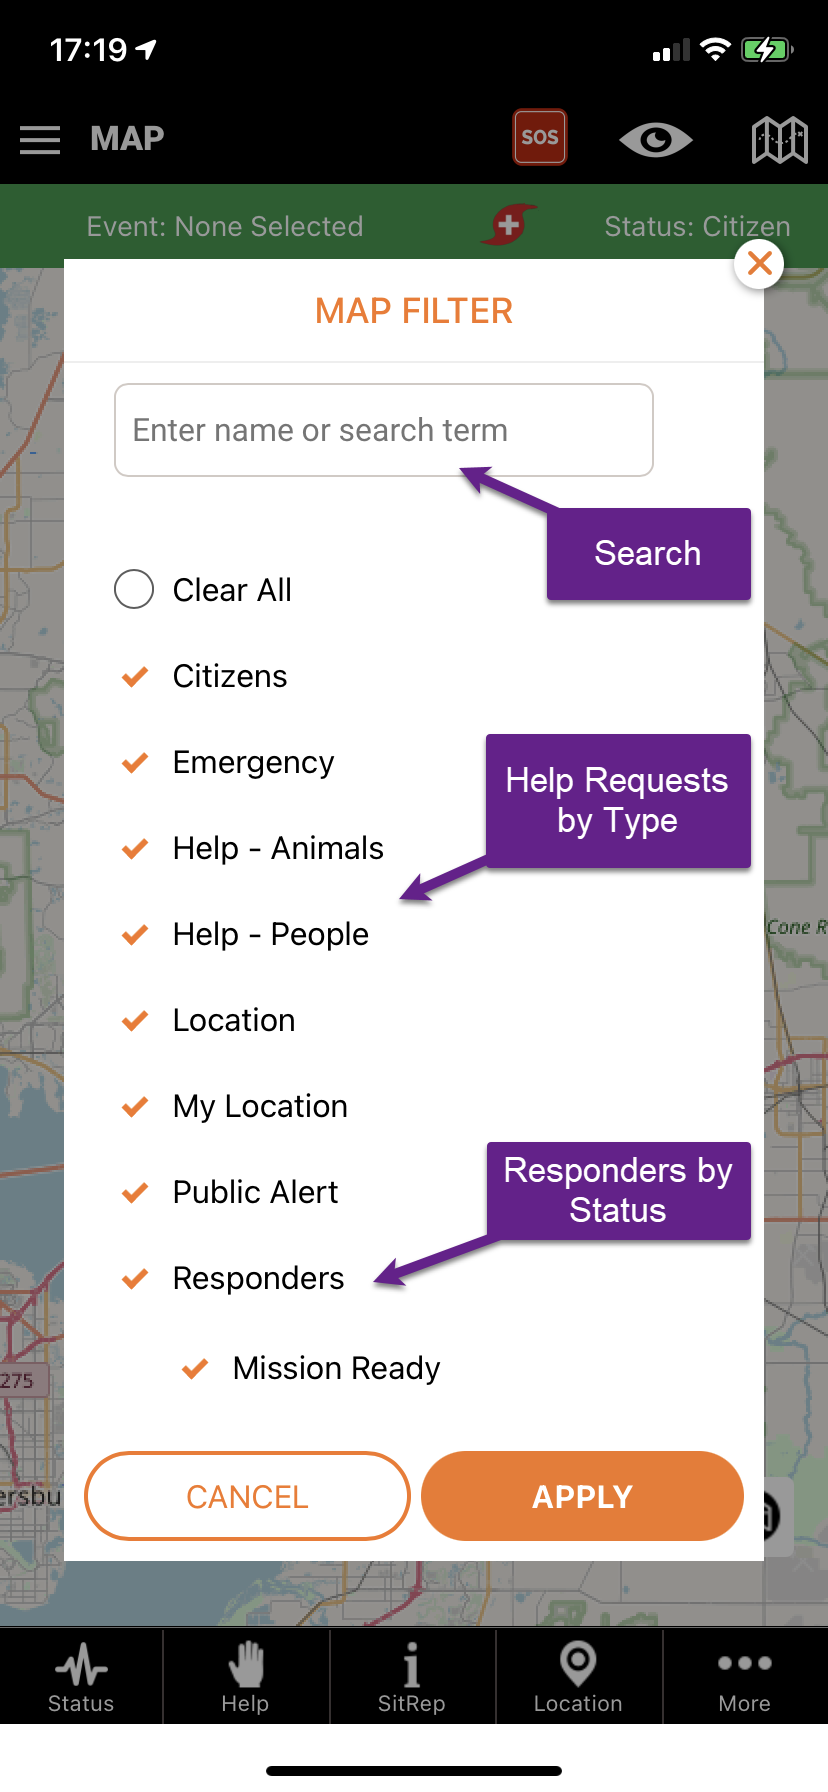
How do I find users, search or filter map contents?
- Click the map icon in the lower right corner.
- Select Map Filter
- Select or search for contents
Author: PubSafe
Last update: 2021-07-22 21:11
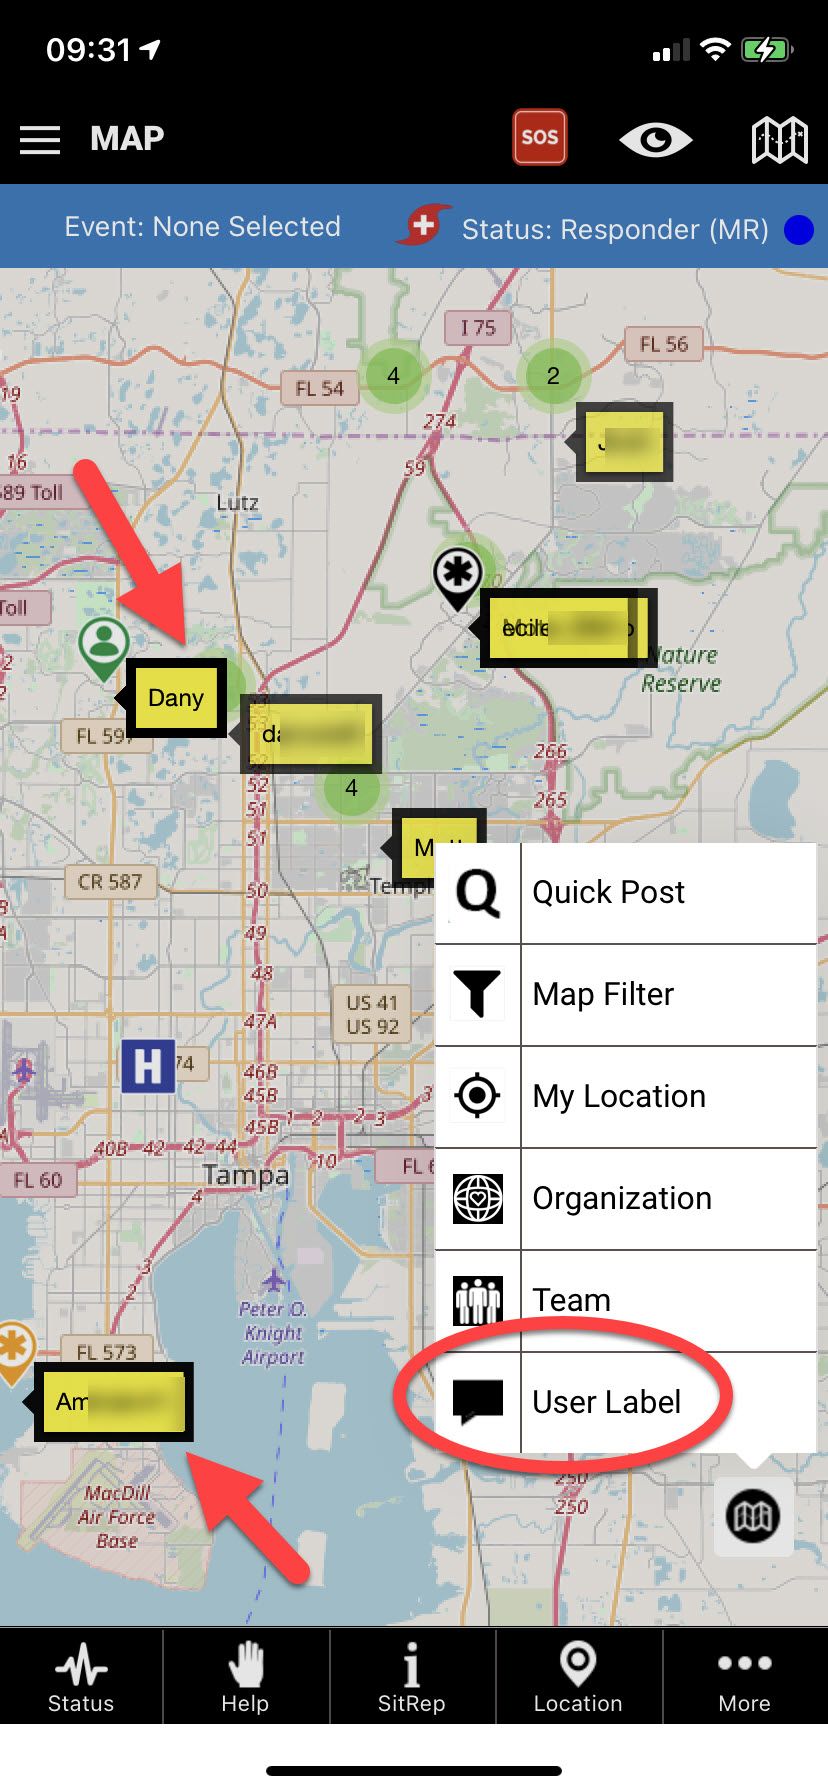
How do I show map labels?
Click the map icon on the lower right corner. Select User Label.
Author: PubSafe
Last update: 2021-07-22 21:10
Understanding the Map
The map is the most important aspect of PubSafe because it allows you to see and share what is going on around you. The map will help you make rapid and informed decisions. For an explanation of the map Icons - Click here
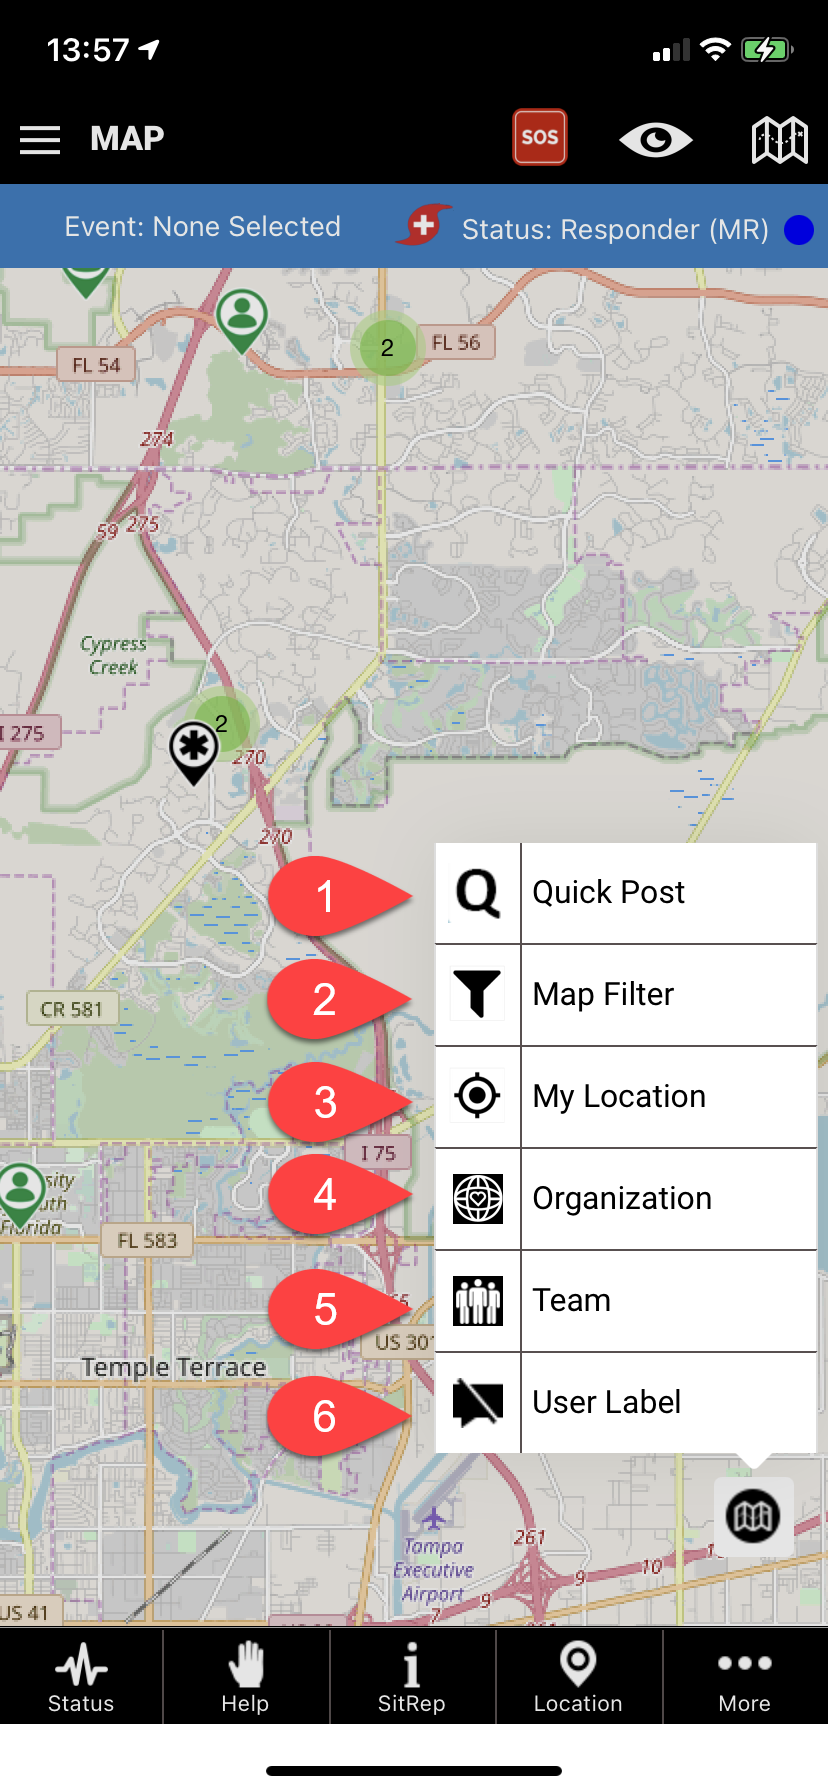
- Shortcut to commonly used posts and functions
- Filter the information viewed on the map
- Show or hide your location to access data below your icon
- Select an organization (must already be accepted as a member)
- Select a team (must already be part of a team)
- Show or hide user profile labels
Click on an icon to view the information window
Author: PubSafe
Last update: 2021-07-22 21:10
Help Request Window
test
Author: PubSafe
Last update: 2021-09-02 22:29
About OpenStreetMap (OSM)
PubSafe uses OSM for a variety of reasons, the most important being that is global and can be edited by anyone. If operating in remote parts of the world, this is an essential function. Users can add roads, trails, bridges, and a lot more as seen below. It does not mean Google, Bing and Here maps are not excellent in many ways, there is just a cost to them. We enable linking out to them whenever it makes sense.
- The map is free to use and edit which means we do not have to charge users. Google mapping is quite expensive and billed on a per-user basis and on the number of images displayed. An image is every change in the map zoom level. Zooming in may use 15 images in just a few seconds.
- Users can edit the map and the changes appear relatively quickly. Watch this video which demonstrates how OSM was used to map Haiti after their devastating earthquake in 2011. https://youtu.be/BwMM_vsA3aY
- Since OSM is built by users, you tend to get more interesting data and micro details important to rescue and relief operations
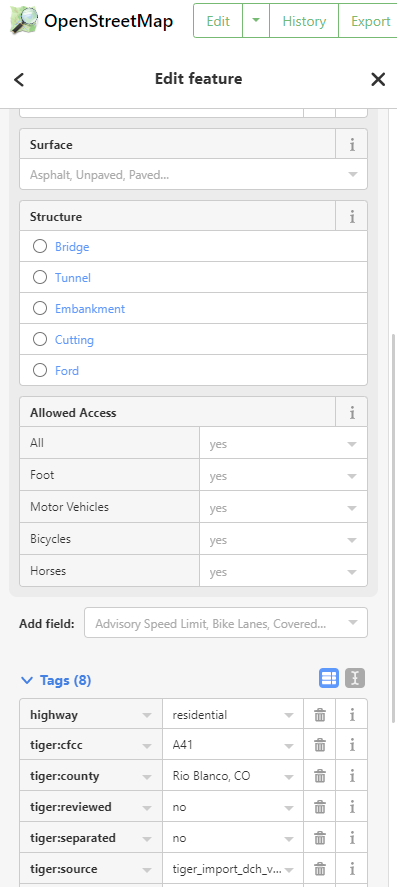
Author: PubSafe
Last update: 2021-09-10 23:50
Map Selection Tools
Circle: Click a point on the map and a circle is created. Click the edges to resize the circle.
Corridor: Click points in succession along the route and an area is selected creating a corridor. This is useful when selecting users in advance of an event such as a tornado or an expected vehicles route of travel.
Current map view: All users on the current map view your permission level enables you to communicate with. Only gov level users can communicate with all citizens.
Draw: Click on the map and with your mouse button held down, draw a shape around the area of interest.
Polygon: Click on the corners of the area of interest releasing the mouse between each point. Click to close the area selected.
Square: Click a point on the map and a square area is created. Click the edges to resize the square.
Author: Aftermath Data
Last update: 2022-02-21 15:52
SAR Tracking
Overview
The tracking functionality is primarily provided to aid in search operations. When a team is searching an area, being able to see the ground covered is important to being thorough. A lost child or evidence may be in a small clump of trees which is overlooked by the search party.
Security Considerations
- SAR Tracking is limited to org members with specific permissions. It is not available to any PubSafe user, or guest website visitor.
- Search activity is stored in the History table for accountability. It indicates who, what and when a search was made so Orgs can determine if a search is appropriate.
- Users can opt to be excluded by chaning their visibility settings. User visibility always supercedes Team and Org functionality.
- Search windows are limited to 96 hours. For SAR operations track history outside a search event is unnecessary.
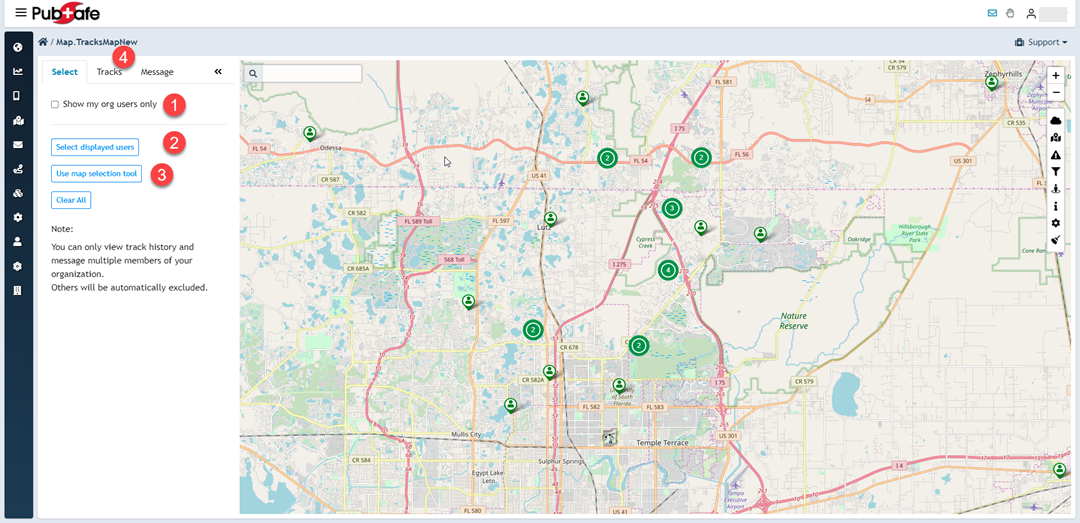
"Select" Tab Options
- To remove non-org members from the map, check this box.
- All users displayed on the map will be part of the users available on the Tracks tab. Non-Org members will automatically be filtered unless your org and user role has permission to track people outside your organization. This is intended for Public Benefit Researchers only.
- A very specific group of users can be selected by right clicking on the map and using the various selection tools to select org members.
- Click on the Track tab after selecting org members to track.
"Track" Tab Options
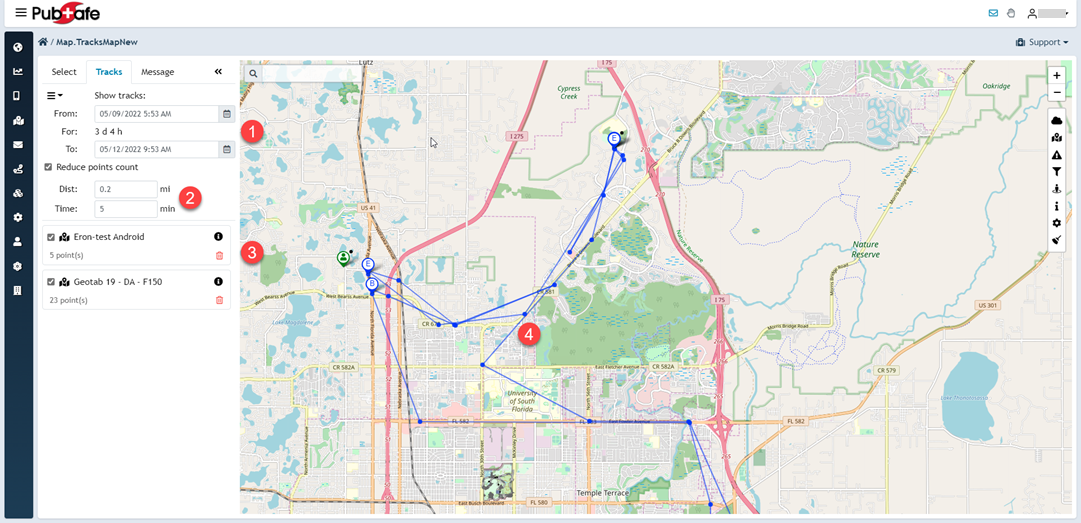
- Select the date and time window within the previous 96 hours.
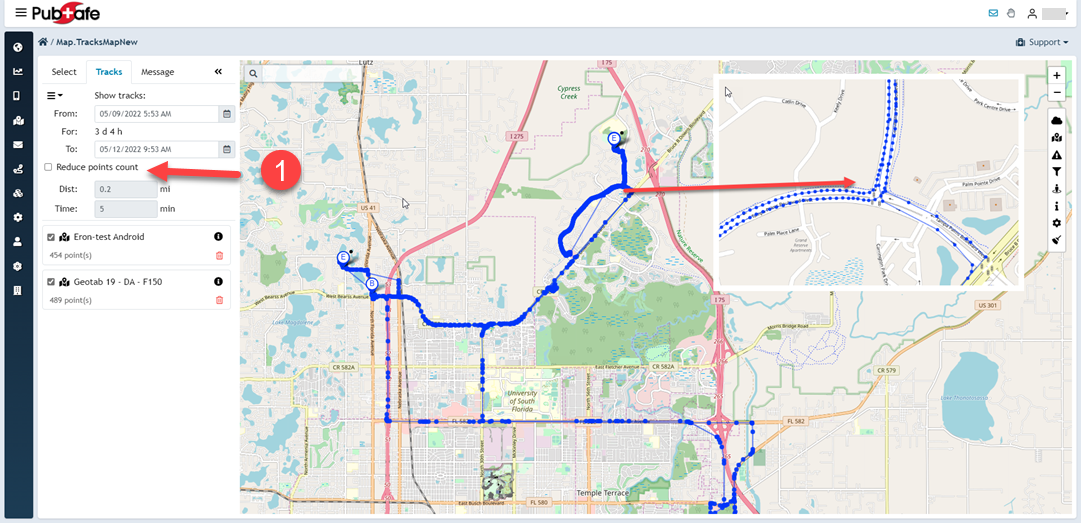
- Select the resolution for the track data. The few the data points, the faster the return and the larger the period and number of users which can be included.
- View the data points to be included to get an idea of track resolution.
- Track points will be determined by user visibility selection plus variables which may include changes in speed, direction, and distance traveled.
Maximum Data Points
There is a maximum number of data points which can be returned in a single query. If your data query exceeds the total a warning will be display. You must then change the query to reduce the number of returns. To do this, reduce the number of users or the data/time range and click apply. The current limit is 6,000,000 track points. This enables approximate 200 users (org members only) to be tracked for 8 hours at a rate of 1 GPS point per second. This is sufficient to review the area covered by a large search party to ensure the team covered the entire area.
"Message" Tab Options
- After users are selected they may be sent a message from the same menu for convenience and efficient communication.
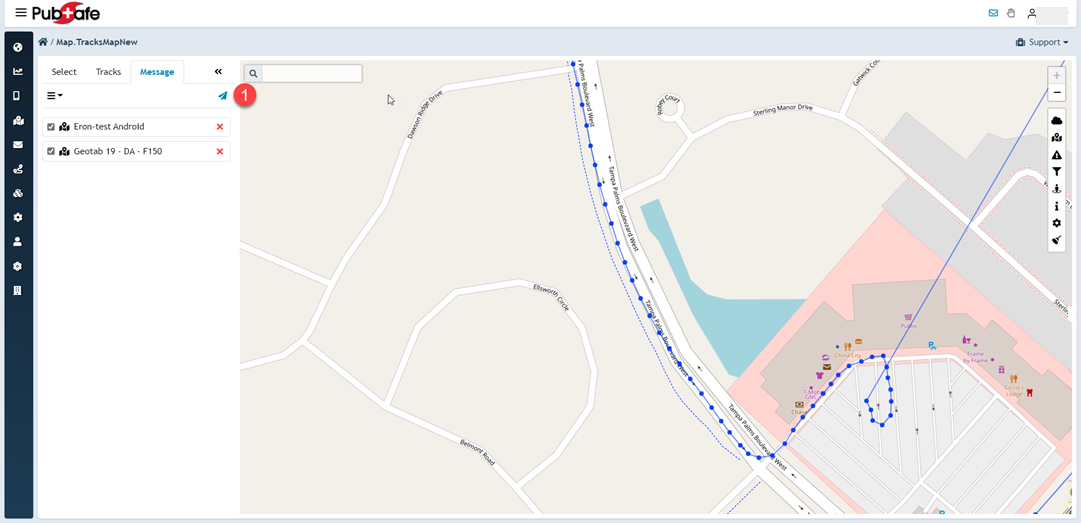
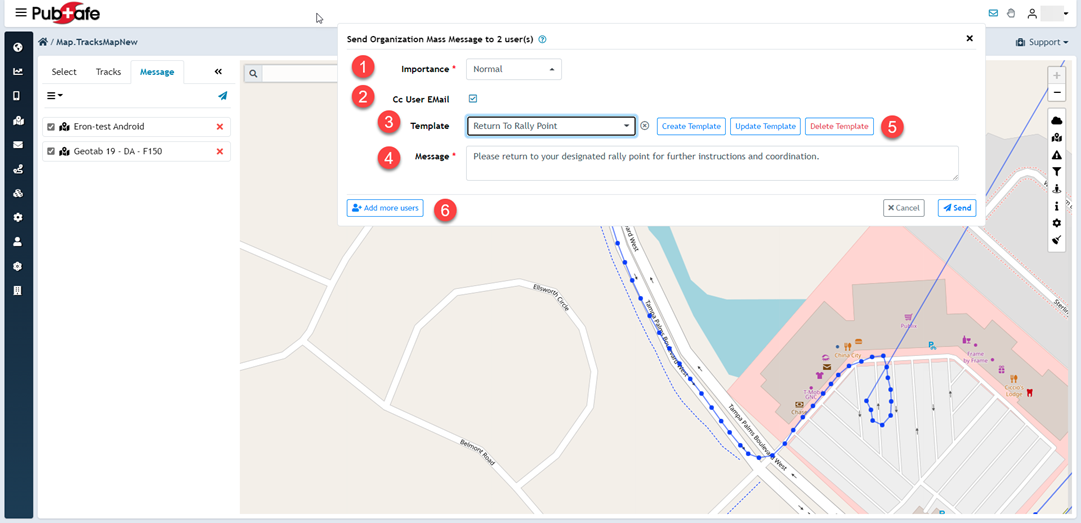
- Set the message importance. Normal, Low, High, Very High
- CC the user sending the message to confirm the message was transmitted.
- Select a message template for your organization or create a unique message.
- Add more users to the outgoing message as needed.
- Create, edit and delete message templates for efficient and consistent messaging.
- Government agencies that can message any PubSafe user are required to have two user permission to reduce the chance of errors and improve accountability.
Author: PubSafe
Last update: 2022-06-24 18:16
Administration, Portal
How is the PubSafe portal free?
As a public benefit corporation, we are not driven by making money for shareholders. This enables us to focus on features and functionality for the sake of citizens globally.
The portal is currently funded by user subscriptions to upgraded services. This enables organizations and government agencies to spread the cost among the members. In most cases, this avoids fundraising for non-profits or annual budgeting issues for government agencies.
We hope to keep this model in place or only charge for some of the most advanced and costly features based on an organizations membership.
Author: PubSafe
Last update: 2021-07-22 20:48
How do I access the PubSafe portal?
A user must have at least the Base version of the PubSafe app to log in. Users with the free version can log in to view the member map but cannot see organization tools such as dispatching. Features and functionality increase with upgrades to the mobile app. The lowest level to access dispatching, volunteer hours tracking, CRM and other tools is the Pro level.
On our website choose the Login menu from the top right corner or click the link below.
Login - Pubsafe - Citizen Public Safety Network
Author: PubSafe
Last update: 2024-05-29 23:45
How does the Contact Manager work?
CM stands for contact manager. CMs are used by all major corporations to manage and organize customer and vendor information. A CRM (customer resource manager) is an advanced version of a CM. Popular CRMs include Salesforce and Microsoft Dynamics. PubSafe recognizes how important information organization and security is to NGOs. Many NGOs are still operating on Excel spreadsheets shared across multiple personal computers. This lack of control and central management puts the entire organization at risk if one person leaves. THE VALUE OF HAVING A CM FOR NGO'S CANNOT BE OVERSTATED!
Your organization can store member information, vendors, document calls and meetings, and more. There is a separate and independent permission structure in the CM that can be set up to allow everyone in your organization to access and enter information from the web portal or mobile app. No more hunting around for phone numbers, look them up in the CM. The CM will evolve into a CRM which will include scheduling activities, and saving files (training certificates) online.
The instance of CM is provided free for a limited time. Individual training can be quoted based on what is needed.
Use of the CM is free until the database size reaches 3 gigabytes. Once the limit is reached you will be contacted with pricing.
Author: PubSafe
Last update: 2022-06-17 19:09
How do I integrate with PubSafe?
PubSafe is open to sharing information provided the PubSafe privacy, location, and data use policy is maintained. To connect to PubSafe data an organization must identify a viable use such as public benefit research by a university, FEMA or DHS in relation to rescue and relief operations. Connections for the purpose of law enforcement or other non-rescue and relief operations are not allowed.
Data is shared using industry-standard APIs. Contact us through the website to initiate discussion.
Contact - Pubsafe - Citizen Public Safety Network
Author: PubSafe
Last update: 2021-07-22 20:49
Transportation Assistance
PubSafe offers users the ability to identify is transportation assistance is needed. The reason assistance is needed is not collected to avoid HIPPA (personal medical information in the USA). Users in need of transportation assistance may be contacted by non-government organizations support a disaster or government officials as part of a public service program.
Transportation assistance is not a guarantee of service, or a replacement for a government program, unless specifically stated by local government officials. PubSafe is a data augmentation tool for other data sources and systems.
If assistance is to be provided (not guaranteed), it is likely that you would receive a call to confirm your location, type of assistance, and special needs.
Author: Eron Iler
Last update: 2022-01-10 19:36
Definitions
See the PubSafe Glossary of Term
View the PubSafe Glossary
Author: PubSafe
Last update: 2022-07-12 16:59
Damage Assessments
Overview of Damage Assessments
The Damage Assessment (DA) module is modeled after the industry standard outlined by FEMA. By enabling citizens and NGOs to submit DAs, PubSafe has reduced the time and effort for data entry, enabled data sharing with stake holders in near real-time, and enables every citizen to be a source of data. By default, DAs collected by all PubSafe organizations will be shared with other PubSafe organizations and made available through API to third parties with a vested interest in the recovery process such as the Red Cross Disaster HUB and insurance companies. Data is not sold or shared for marketing.
Citizen DAs
PubSafe has chosen to enable any citizen (PubSafe user or not) to submit a DA as "unverified" for several reasons. First, the more data accessible by decision makers, the faster and better their decisions. Second, DA data, verified or unverified, can be used to create a general picture of the situation in an area. When citizens are enabled to submit DAs, significantly more data can be collected than relying on a team of adjusters.
Unverified DAs need to be considered with a margin of error because the people reporting are not trained. It does not mean the data has not value, it means the quality of the data will be less accurate than a trained inspector would provide. Trained inspectors or adjusters will ultimately need to "verify" all "unverified" DA but this process can be prioritized based on the severity and nature of the data collected.
Org Specific DA Forms
As with many features in PubSafe (assistance requests, DA, volunteer registration, etc) PubSafe organizations are provided a custom URL and form specific to the org. The customer form means the data collected is visible inside the organizations PubSafe portal account. It may be shared with other PubSafe organizations based on selected options. By sharing DAs and other data across organizations, PubSafe facilitates the cross organization coordination needed in large scale disasters.
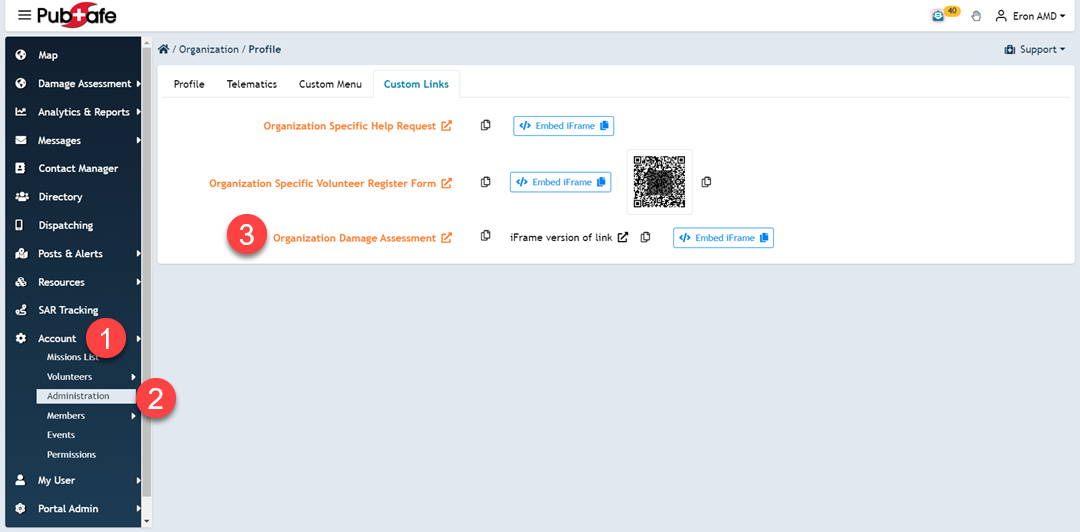
Locate Your Organizations Custom Form URL
There are three options provided to share and collect data using the org specific URL. 1. Copy and paste a link into an email or social media. 2. Embed the form in your website as an iFrame. 3. Share via phone using a QR code.
If a user submits a DA using the PubSafe form it will be placed into the queue for any PubSafe organization to claim and verify.
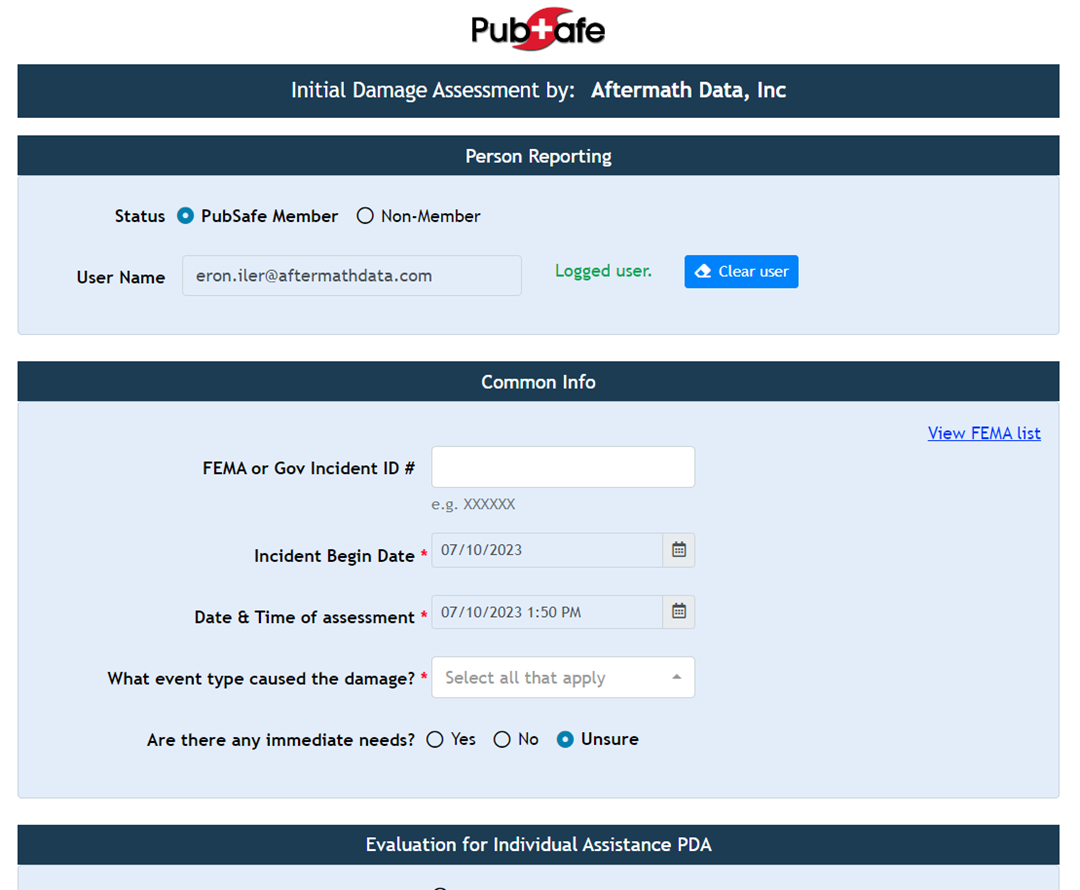
Collect Data Using the DA Form
View DA Data in the PubSafe Portal
To "claim" a DA to verify, navigate to the Queue and select a DA.
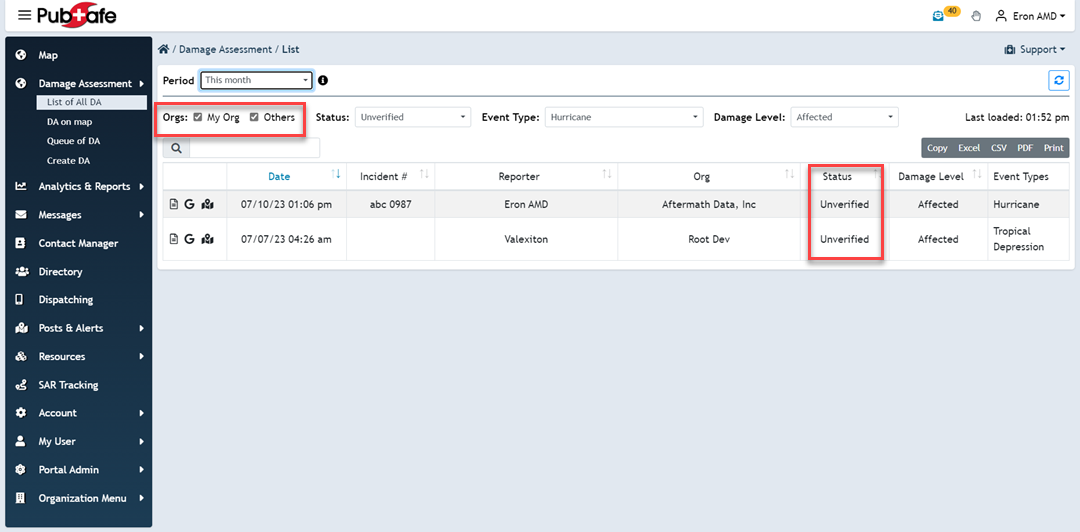
Global Map View
DAs can be viewed anywhere in the world on the PubSafe DA map. Click an icon to view the DA details on the map or filter the DAs on the List of All DAs menu.
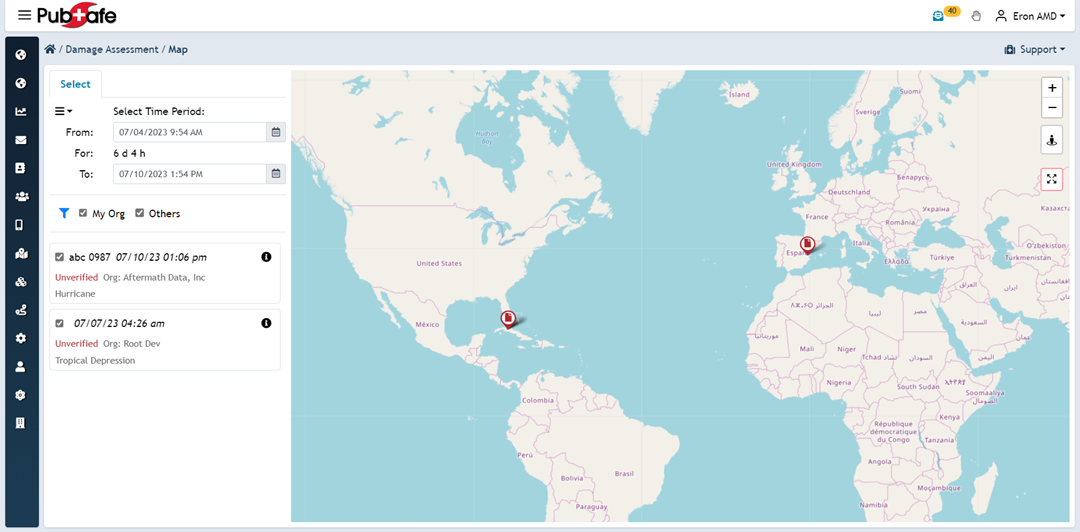
Claim an Unverified DA to Verify
- Zoom the map to an area to view the DAs in that region.
- Check the Queue options. Click the filter icon for more options
- Select a DA from the list
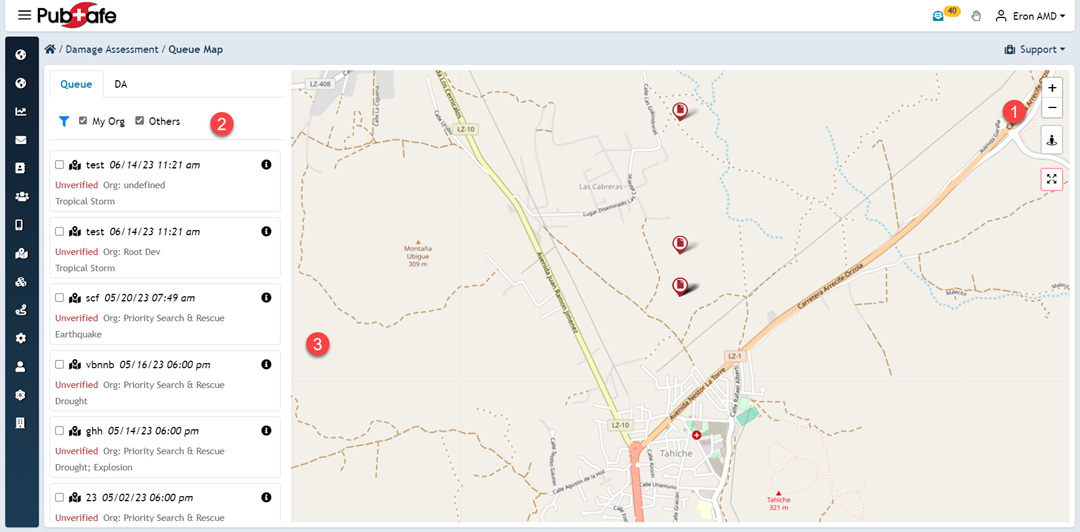
The DA you claim will be the green icon.
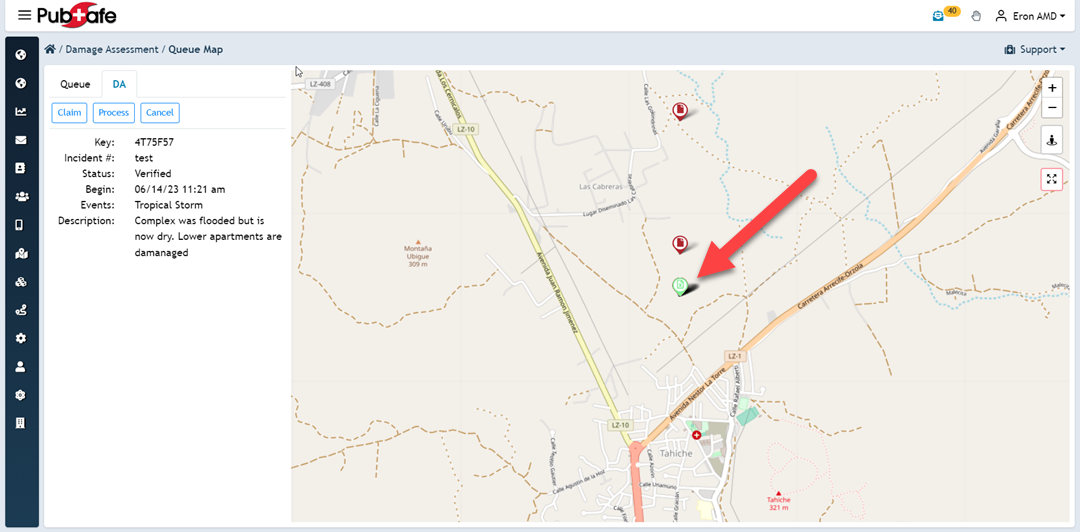
Verify a DA
Once you have claimed a DA you can change it to Verified as an organization. App users to do not currently have the ability to change a DA in the field. Field personnel will have to update the dispatcher to relay the DA is accurate and should be marked as Verified. If a DA is inaccurate, mark it unverified, and archive it.
Author: PubSafe
Last update: 2023-07-25 21:38
Communication, Alerts, Teams & Organizations
What type of alerts are available?
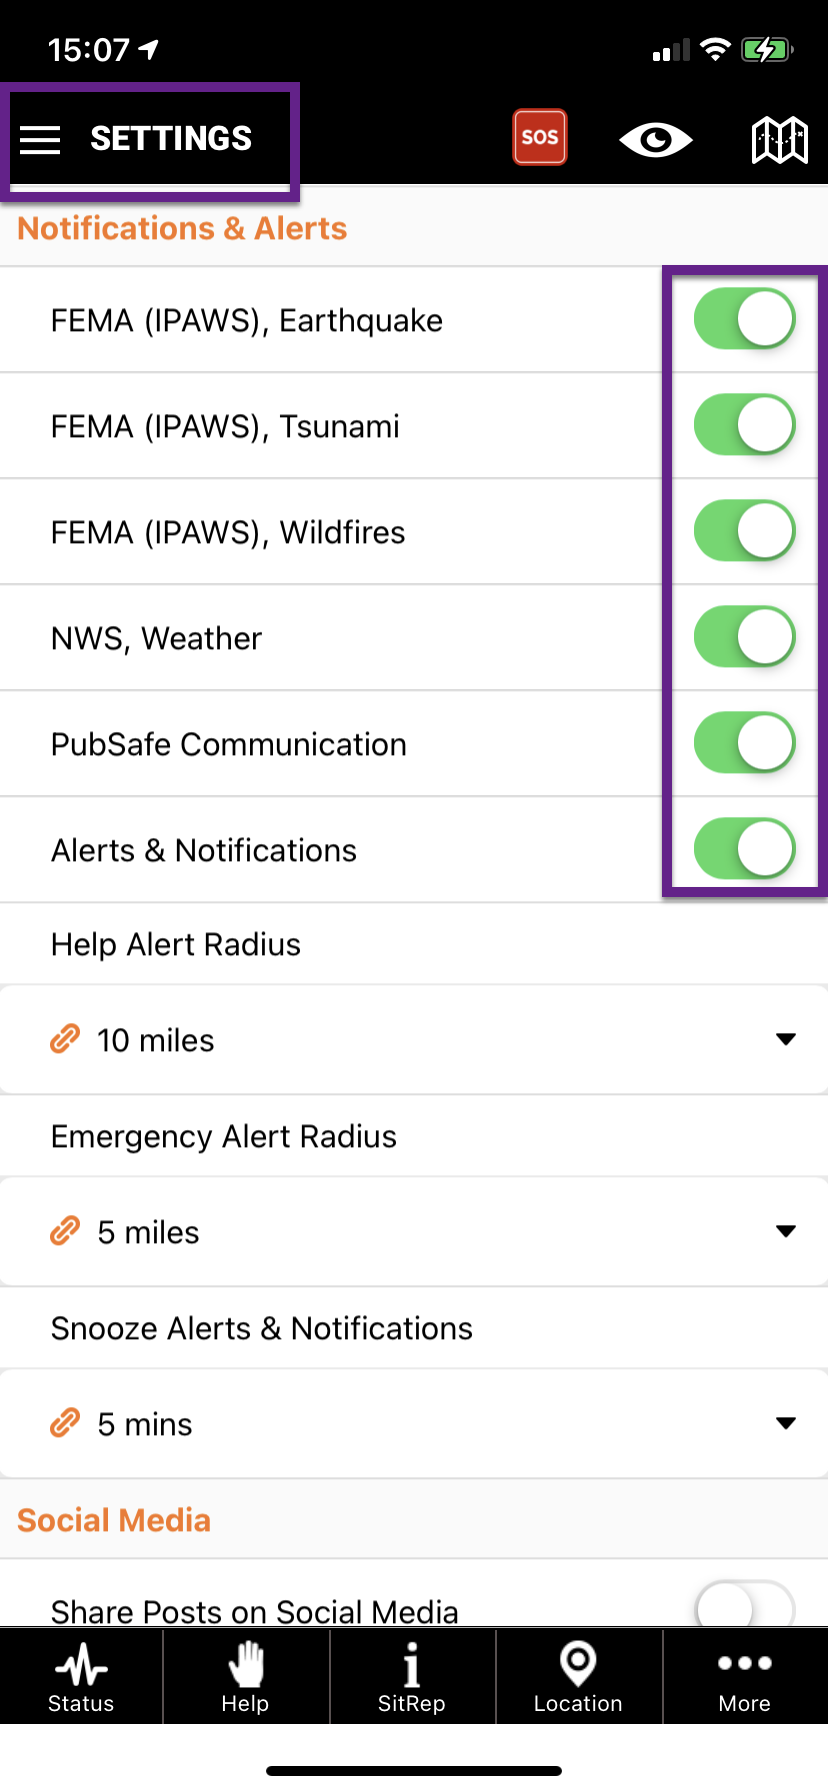
The alerts available to all users can be found under the Administration>Settings menu. These alerts include many of those provided by FEMA iPAWs (earthquakes, tsunamis, wildfires), National Weather Service, PubSafe communication, help requests, and emergency requests. Other alerts from organizations and teams are limited to upgraded app versions.
Author: PubSafe
Last update: 2021-07-22 21:08
What happens if there is no cellular or data service?
The PubSafe app requires a cellular connection with a data service to work.
Since almost all citizen communication is cellular dependent, cell service is a top priority for utility companies. Everyone understands how important cellular service is to help those in need. Until cell service is restored, you need to be self-sufficient.
Things to do before a disaster.
- Charge your devices and backup batteries.
- Select the Event in the PubSafe app so you can be grouped with others getting even specific alerts and communication. Admin menu>Settings>Public Event
- Check-in using the Status option in the lower-left corner to report your last known location and plan of action.
- Put devices in battery saver mode or turn them off until needed.
- Check your phone for service and then turn it off if there is none.
- Turn off Bluetooth and Wi-Fi service to reduce battery consumption.
- Dim the screen. Screen brightness takes a lot of battery.
- Avoid unnecessary phone use like recording social media videos.
- Be sure to enable "Show my last location" under Settings.
- Suspend background tracking in all apps but PubSafe. Background GPS tracking can consume a lot of battery.
Author: PubSafe
Last update: 2021-07-22 20:49
How can NGOs use the PubSafe platform?
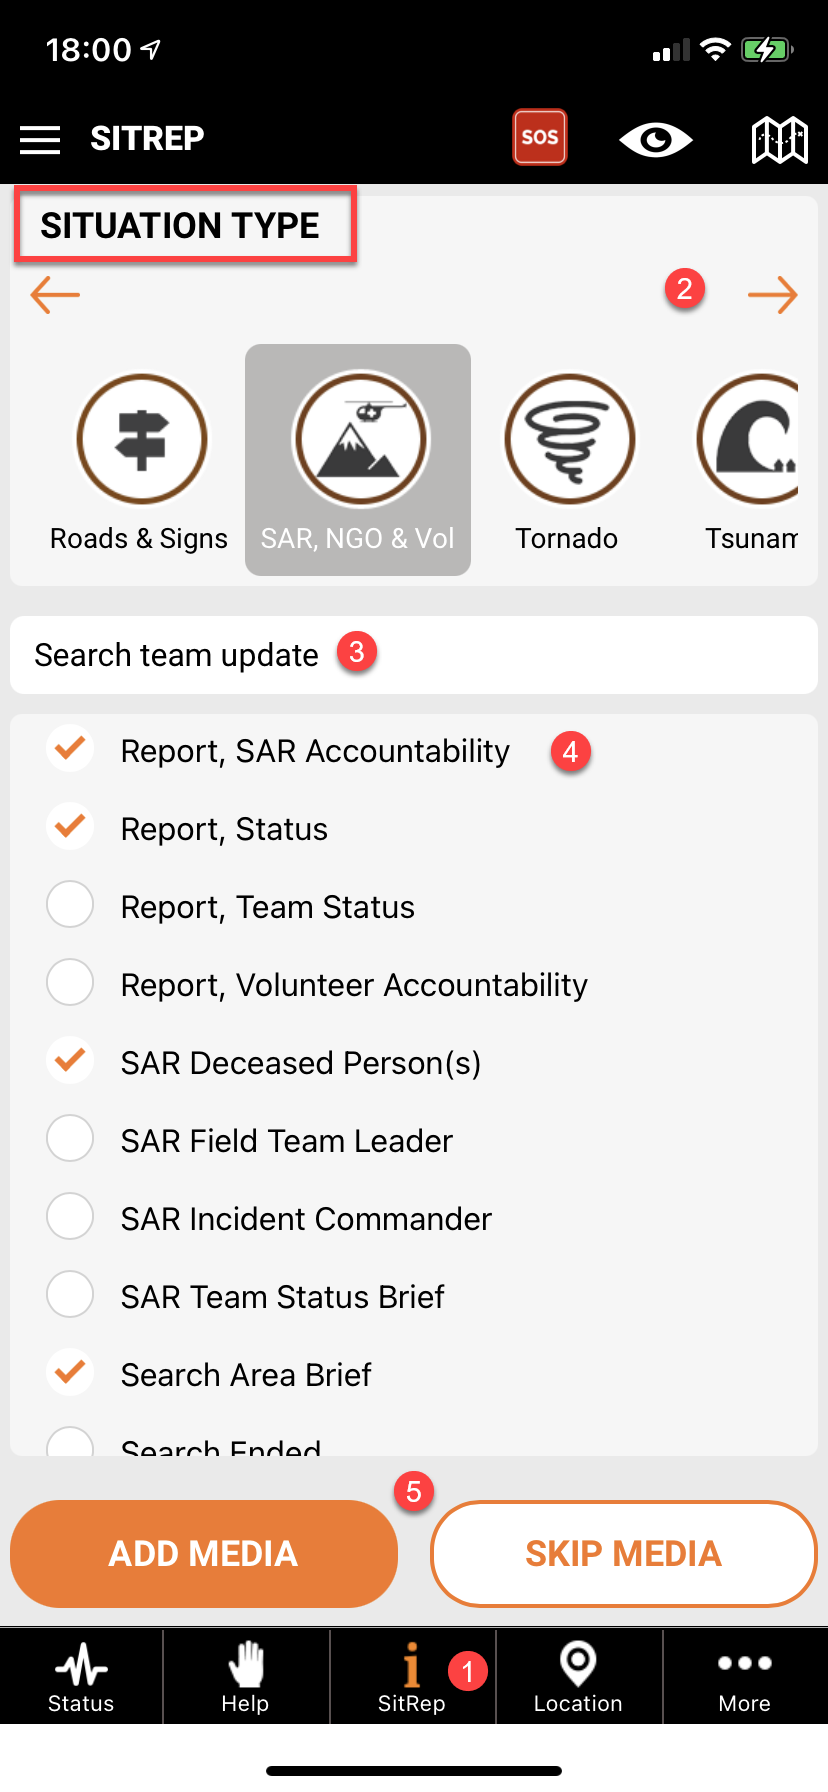
The PubSafe portal was purpose-built around volunteer organizations like the Cajun Navy and Team Rubicon. There are specific tools in the app that facilitate SAR, CERT, and NGO-related activities. In the SitRep example below, select the SAR, NGO & Vol category. The list below demonstrates the wide variety of information that can be log data and coordinate efforts.
PubSafe is a dispatching, data collection and information sharing platform to improve rescue and logistics response. It brings associated activities into a single portal so all NGO members are operating from the same environment. The PubSafe portal even lets you add User Defined Menus (UDM) to the portal so you can customize it with resources your team frequently uses.
Potential Uses For NGOs
- Coordinate impromptu search parties. Have all participants install the PubSafe app so you can see everyone in the area for their safety and to ensure proper coverage. If you want to be able to view them in the portal, users must upgrade to the Pro version for the annual fee.
- When conducting search operations, mark evidence found so follow-on personnel can move to the exact location to evaluate the finding.
- Identify rally points and share a rally time with everyone at one time.
- Get team status reports to the map for all users to see.
- Log various key points during an event such as search start time, team location, special skills personnel, victims, and more.
Global Travel
The PubSafe platform is very well suited to assist international organizations with keeping up with employees and volunteers globally. As long as cell and data service is available, users can be viewed by a central monitoring station for their safety and coordination. In high-risk situations, an organization can limit the visibility of members to just the organization. If someone were kidnapped, locating them on the PubSafe mobile app would be far faster than waiting to coordinate with authorities.
Getting Started - Organization Setup Process - https://kb.pubsafe.net/index.php?action=faq&cat=1&id=87&artlang=en
Author: PubSafe
Last update: 2022-03-17 20:11
How do you message a users, a team or an organization?
One user can call or text another user if contact information is visible. A user who is not part of a team or organization cannot communicate with multiple people using the PubSafe messaging functionality. The portal is reserved for organizations.
A team member can communicate with other members of the team using the app messaging functionality but not with users not part of the team. A team can be independent or inclusive of an organization.
An organization with Pro or Enterprise users can communicate with org members but not with users not part of the organization.
A government organization may communicate with org members and individual users not part of the organization (general users). Limits apply.
Author: PubSafe
Last update: 2021-09-22 21:58
How do teams work?
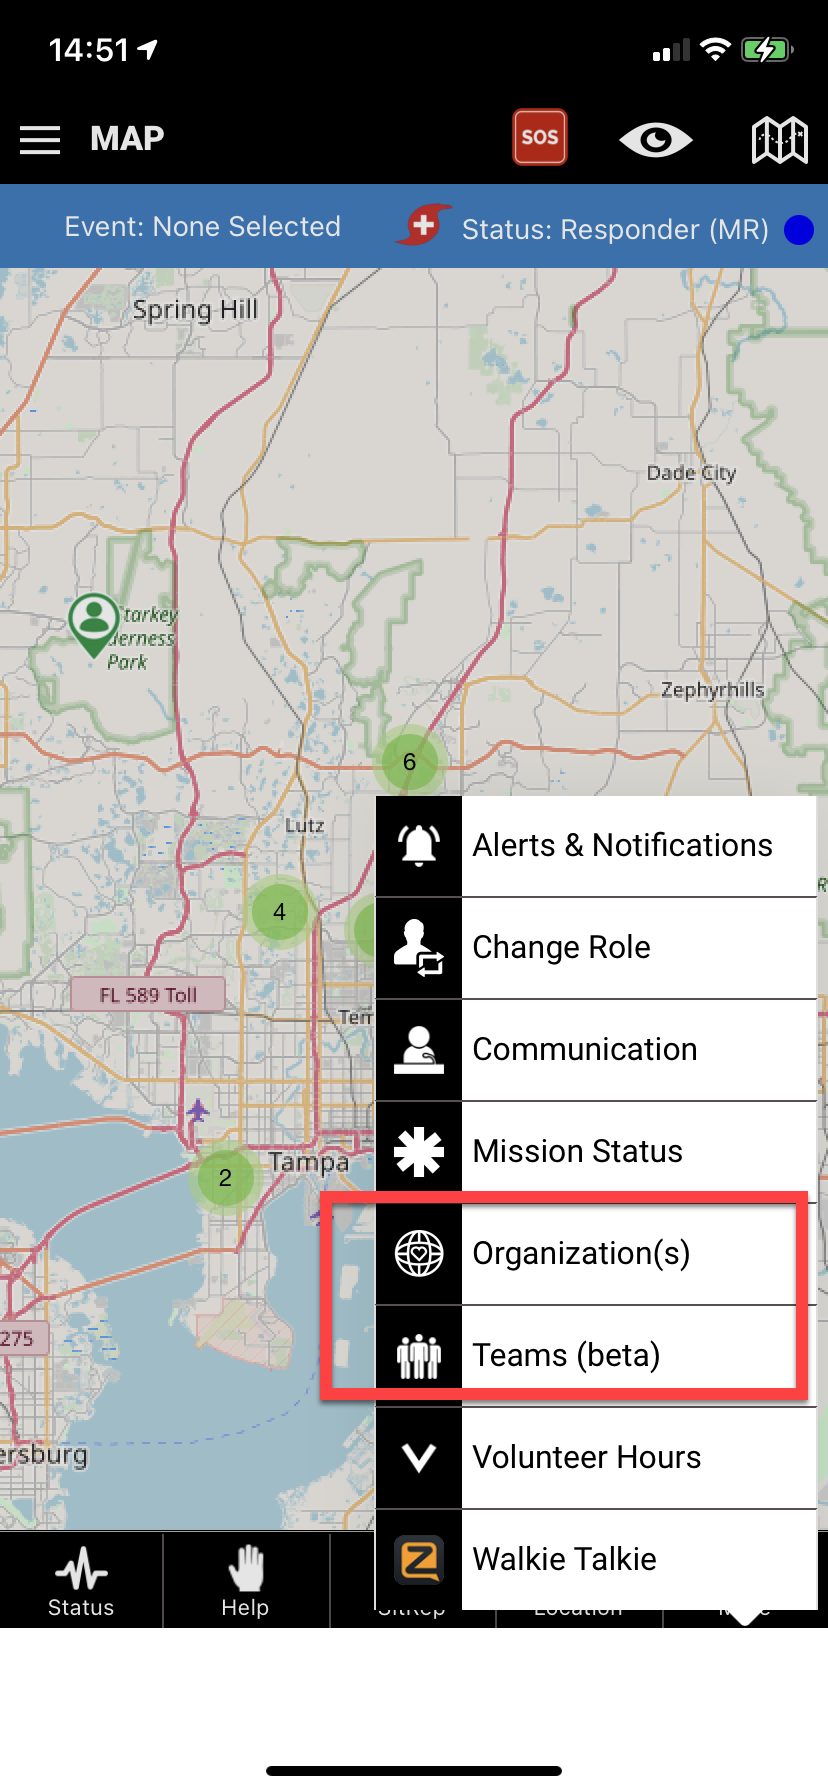
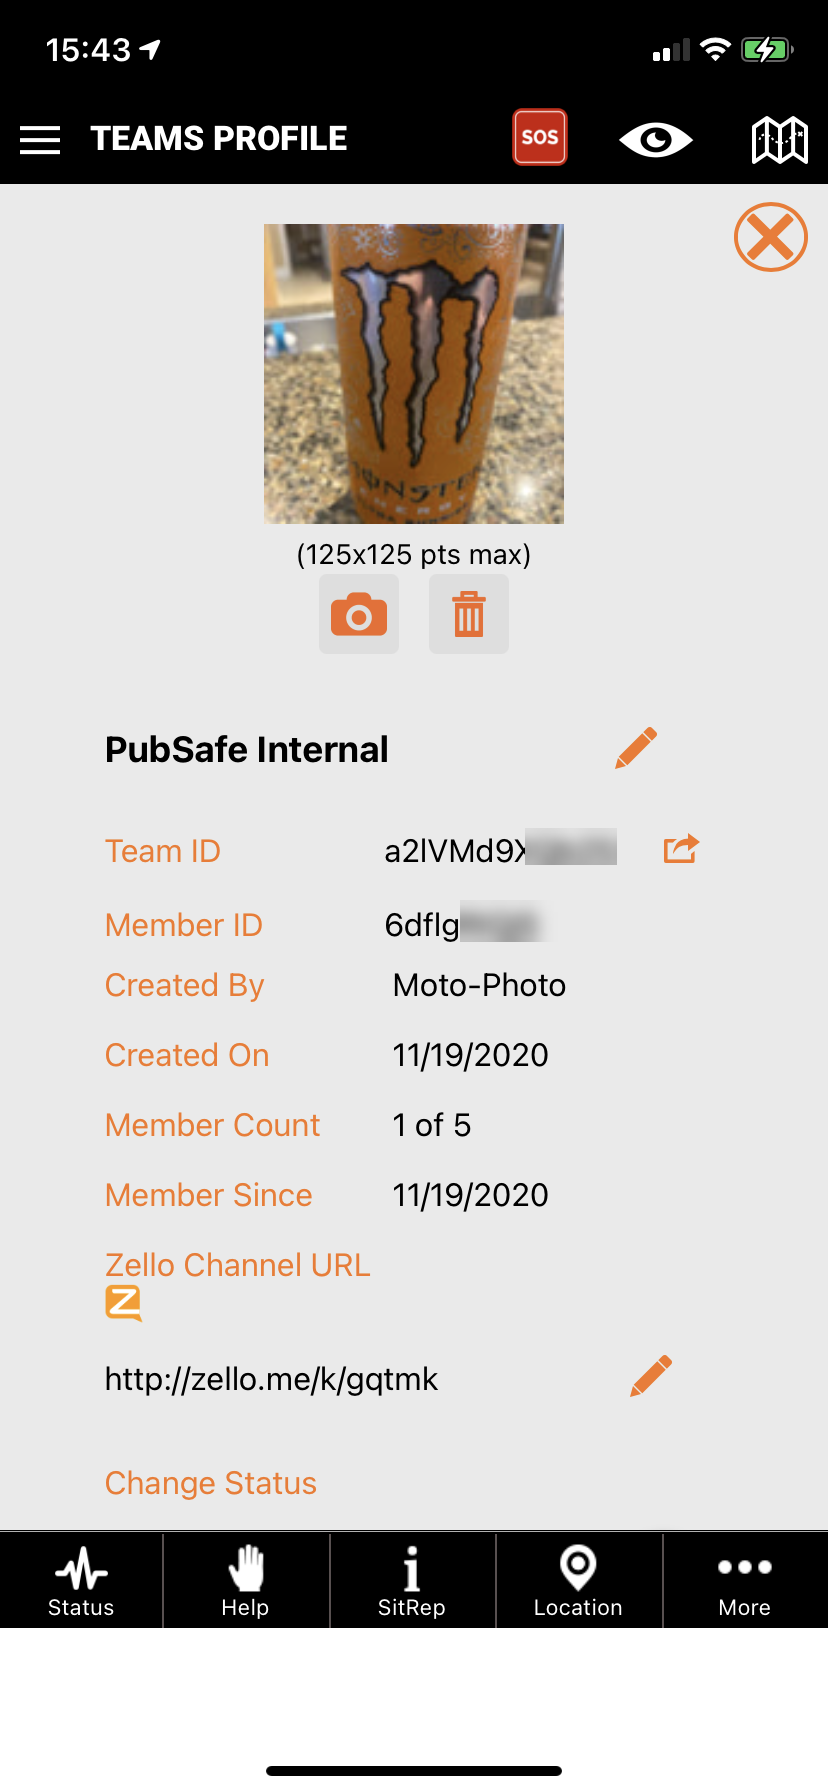
Teams are a grouping of users that want to share and communicate within the team. Teams can be used for families, impromptu search parties, or enterprise organizations tracking employees globally. Every organization has a team created by default so users can be invited to join an organization team. A unique org team link is created when an organization is approved to utilize the PubSafe portal.
Users must have the Base or higher version of the PubSafe mobile app to join a team. The number of teams and the number of team members is limited by the app version. Users must select one active team and one organization at a time for information management. Users can change the active team or organization at any time.
Team and Team Member Limits:
Free: 0 & 0
Base: 2 & 5
Plus: 5 & 10
Pro: 7 & 30,000
Enterprise: 10 & 35,000
Government: 10 & 35,000
Contact us if you need a higher member limit.
Users must have a Pro or higher version of the PubSafe mobile app to join an organization.
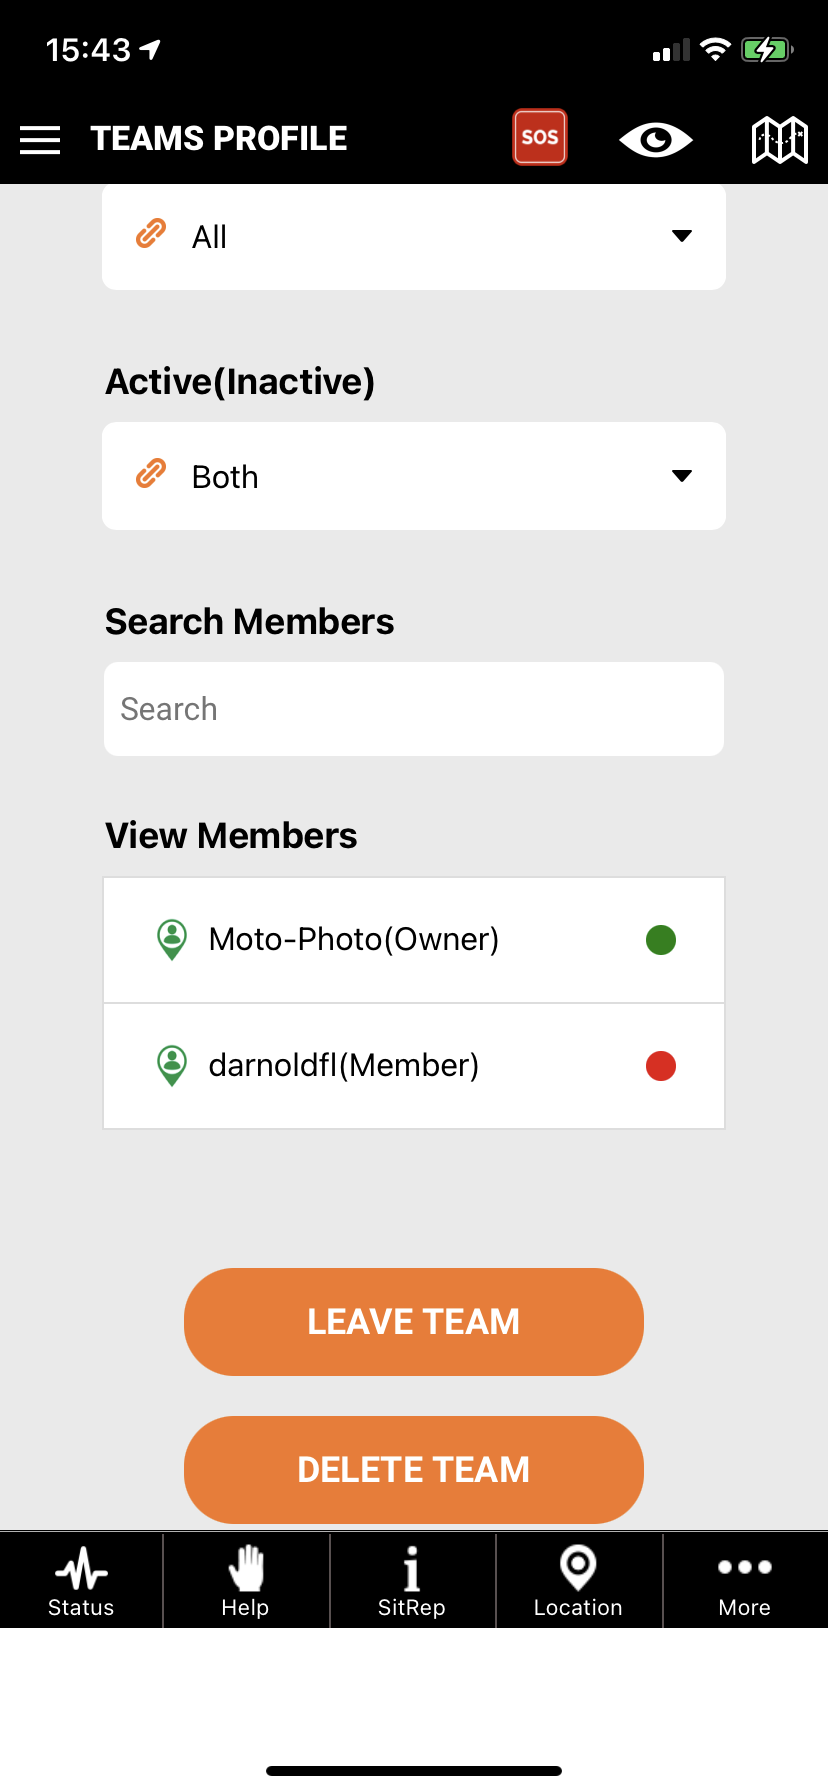
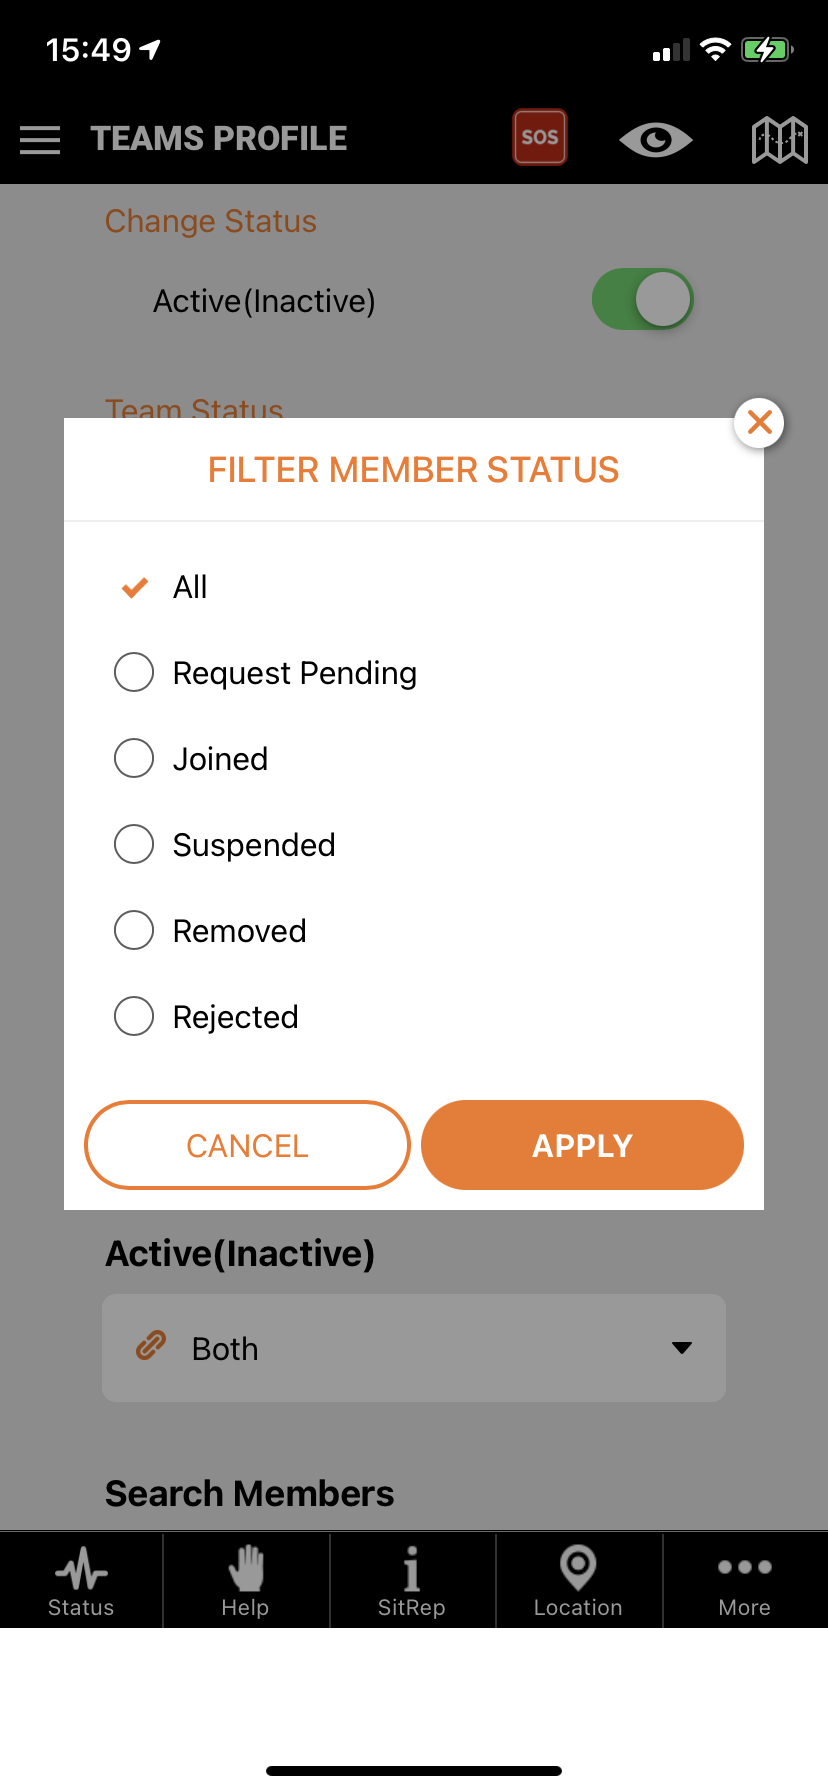
Team Member Status
Author: PubSafe
Last update: 2022-02-23 18:31
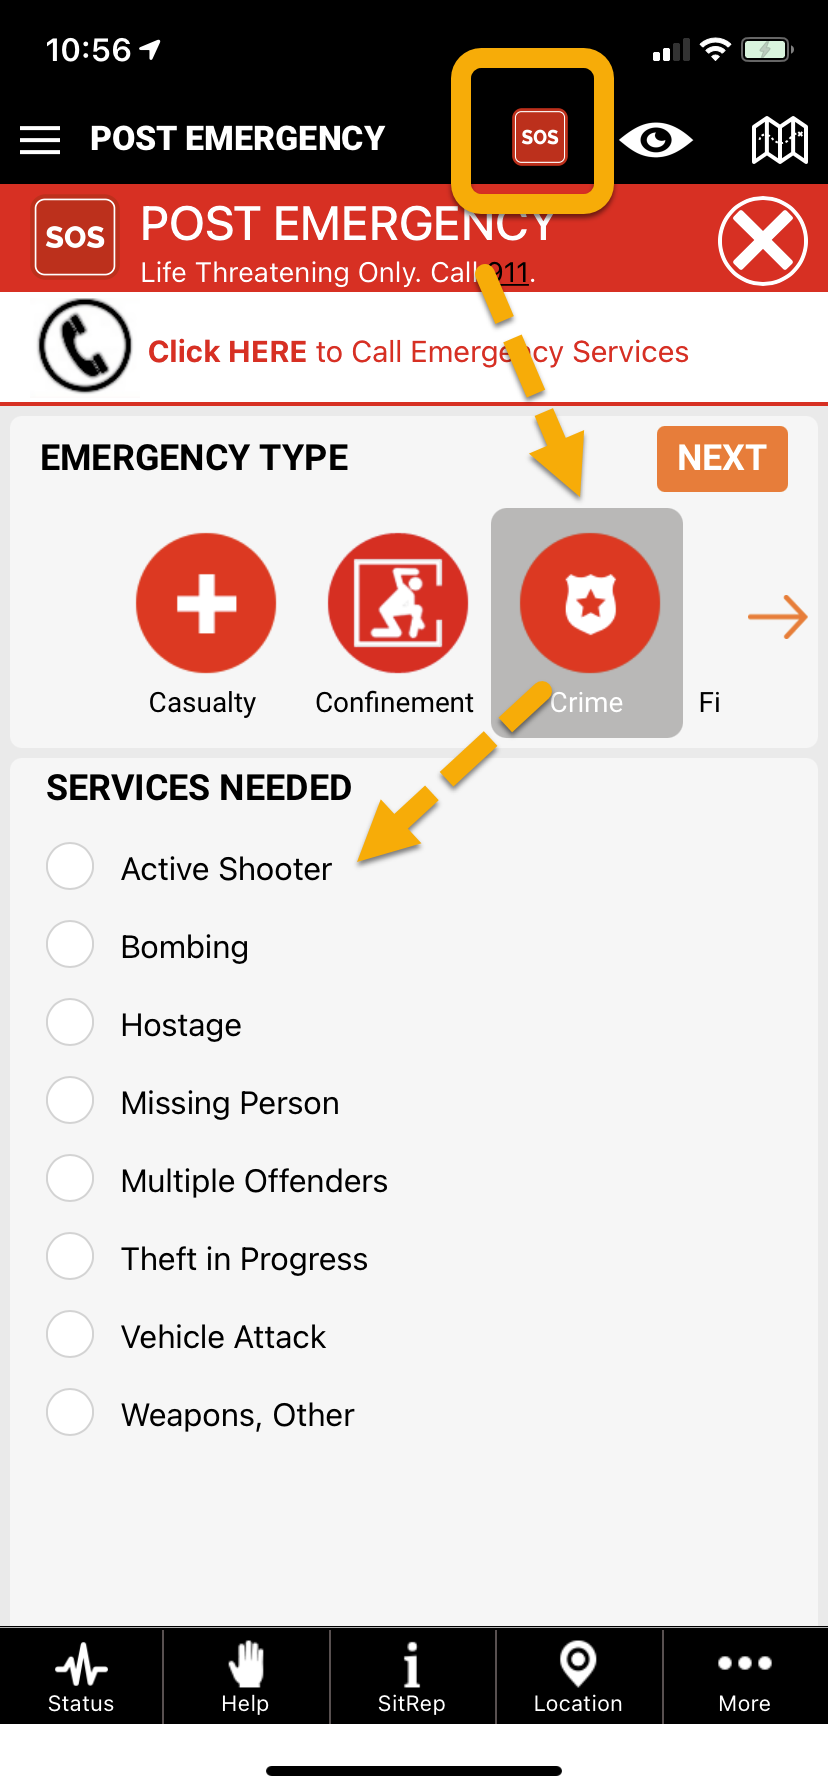
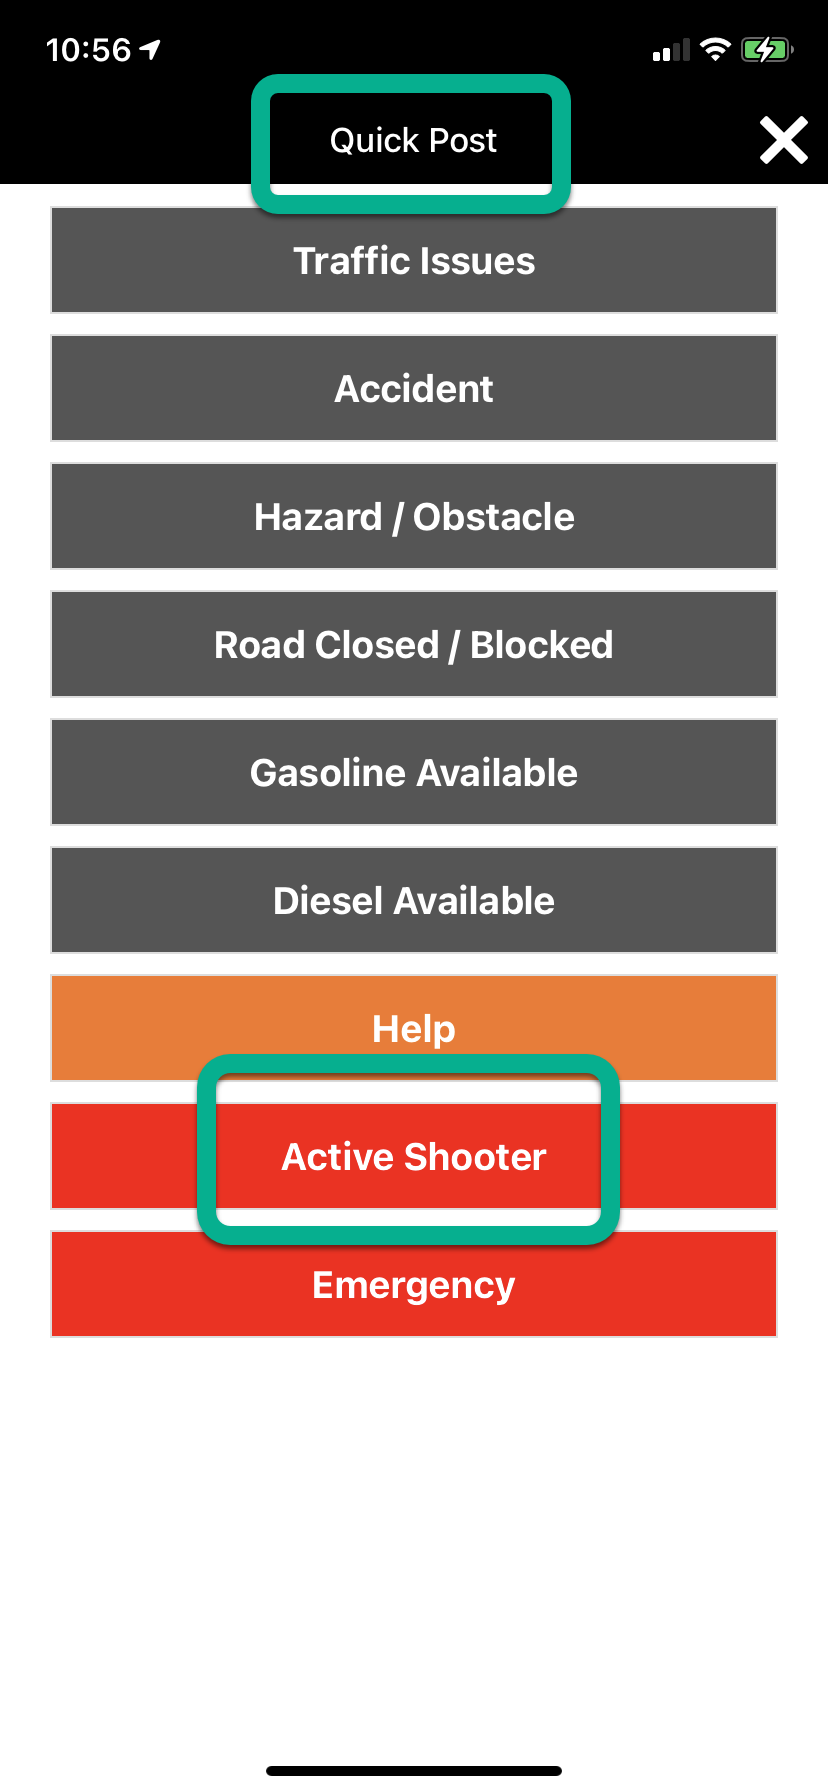
How does the Active Shooter alert work?
Active shooter alerts are to designed to very quickly alert users in the immediate area of an active mass casualty event, primarily a shooter or terrorist action. Entire buildings and campuses can be alerted in seconds in most scenarios. Users must have the PubSafe mobile app, cellular service and a data plan to receive alerts. Download - Pubsafe - Citizen Public Safety Network
An active shooter (AS) alert is a very serious function, which if abused, is likely to result in criminal charges. Since PubSafe is not monitored by law enforcement, users should call 911 or local emergency services first. Then alert other users in the area using the PubSafe active shooter alert function. PubSafe is designed to augment or be part of, an overall safety program, not the primary element.
The active shooter alert can be used in schools, churches, event venues, or any gathering. The alert is shared with all users regardless of team or organization affiliation. It is a great way to alert users in different departments or companies that work the same area.
When an AS emergency is initiated, users in an X-mile radius are alerted and automatically switched to "invisible" on the map for 60 minutes. Users can change their status back to visible by clicking the visibility icon (eyeball) in the header menu.
Users are shown a screen prompting them to 1. Flee 2. Shelter 3. Attack
Users can still post help and emergency requests during the 1 hour period of being "invisible". Under normal operations, users cannot be invisible and interact with the system or other users for safety and privacy reasons.
SOS Menu Option
Quick Menu Option
Author: PubSafe
Last update: 2021-07-22 21:05
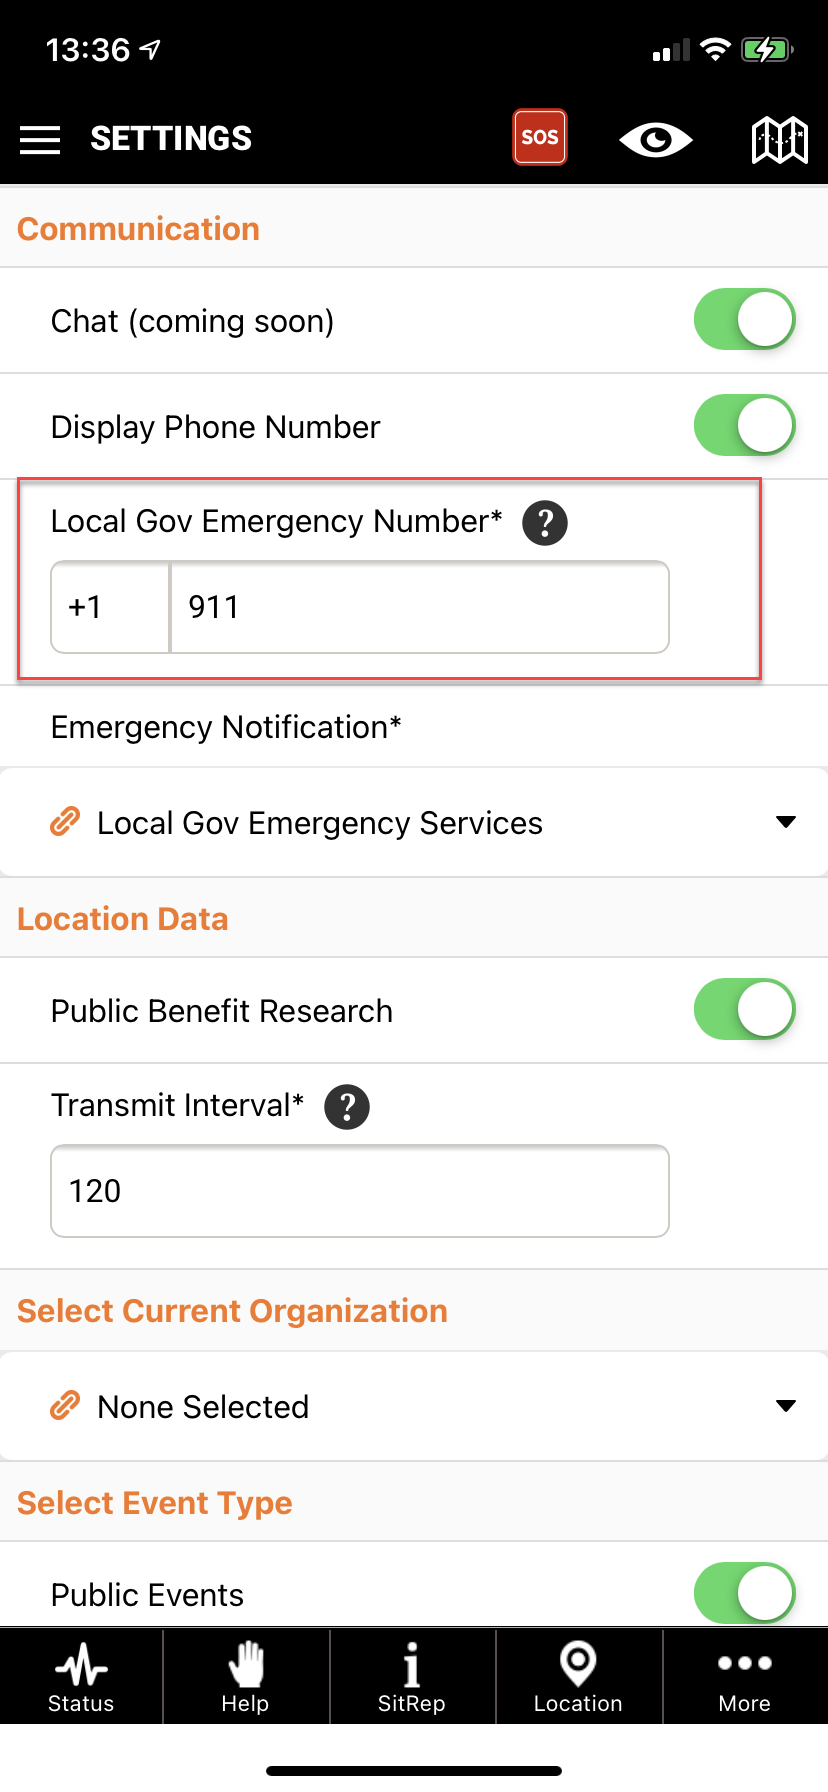
What is a Local Gov Emergency Number?
This is the number you call in your area when there is an emergency. In the United States, it is 911, in most of Europe, it is 112. This number is tied to the Click to Call Emergency Services in many areas of the application. When traveling, you must update this number. If you are unsure of the number in your area, try searching the Internet.
Author: PubSafe
Last update: 2021-07-27 17:30
Messaging a Team or Organization
Members of a team or organization can message all members of the team or organization provided the user sending the message has selected the team or organization as their active group and they have the correct permission assigned. Users can switch teams or organizations at any time to send to various groups. A user must be an active member of a team or organization in order to send a message.
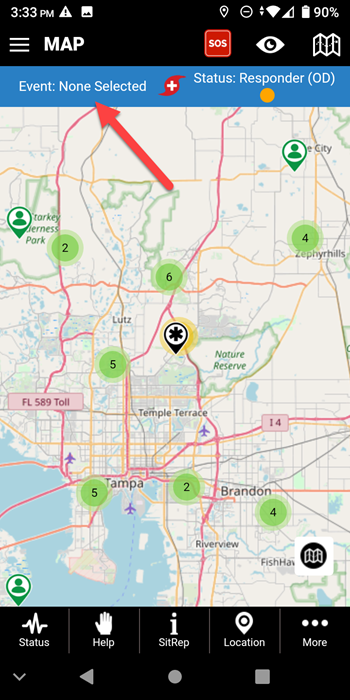
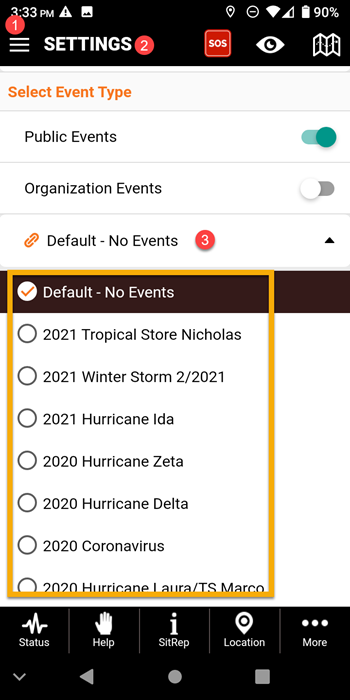
Users that are only visible to their active team or organization, cannot message users outside the team or organization for security reasons. Change your visibility to Public and then message any visible user.
Author: PubSafe
Last update: 2021-09-22 22:05
What are the Team member status options?
- Green = Member
- Orange = Suspended
- Red = Removed
Author: PubSafe
Last update: 2021-07-28 21:31
Dispatch and Messaging Functionality
Overview
Dispatch and Messaging functionality is limited to registered organizations and their members. Only government organizations can send a message to any PubSafe user. To be a member of an organization you must upgrade the PubSafe mobile app to Pro and be accepted by the organization. Not all organizations that apply will be approved.
To learn more about registering an organization click here.
To learn how to change Orgs or Teams click here
Dispatching
Dispatching is sending a message with information compiled from a help or emergency request or to a specific waypoint location. Communication is through the PubSafe mobile app. Dispatching also includes logic for managing the flow of help requests between organizations.
Messaging
Messaging is generally the same process as dispatching but you are generally sending information that is not associated with assigning a mission to respond to a help request or a mission.
There are two ways to select users for who you want to send a message. 1. By using the map selection tool and the map 2. From the Member list.
Map Selection Process
Zoom the map to the area you want to interact with. If you do not see users, zoom in closer.
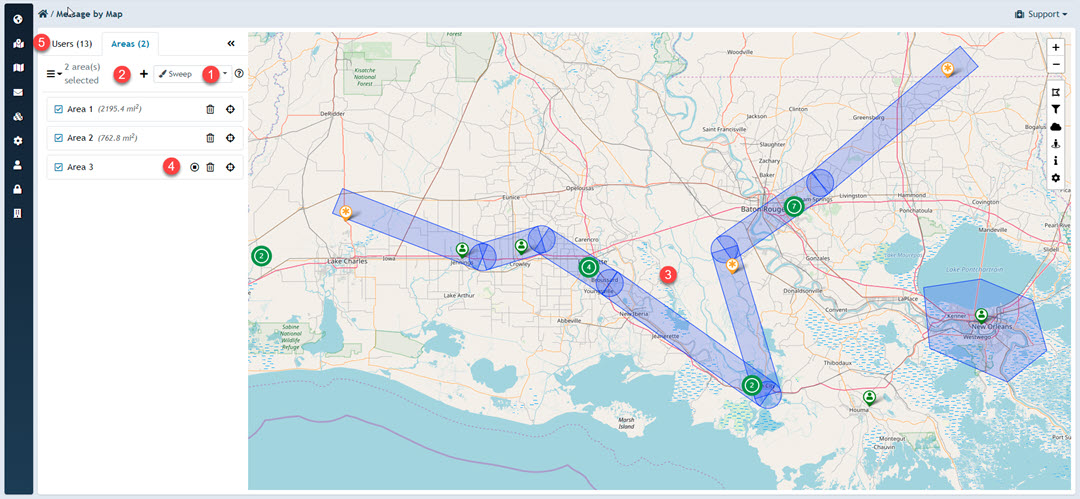
- There are several tools available to make a map selection, choose a selection tool from the drop menu
- Click the "+" sign next to the drop menu. You can repeat this process to select users in multiple areas which are not connected.
- Select the users from the map.
- Depending on the tool, you may need to click the stop icon (sweep tool). Others like the square or circle do not require stopping the function.
- As you select users, you will see the user count increase on the second tab on the top left. Click this tab when done selecting users on the map.
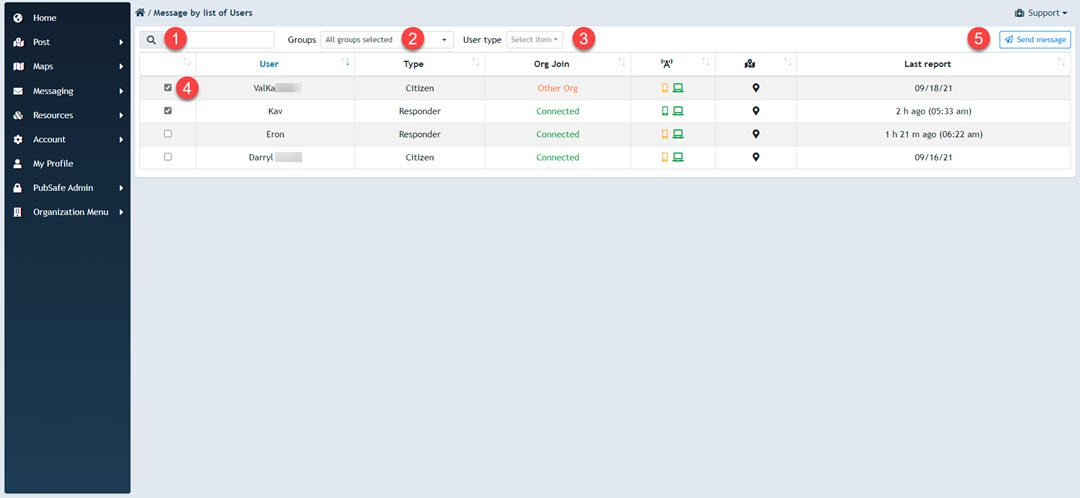
User List Selection Process
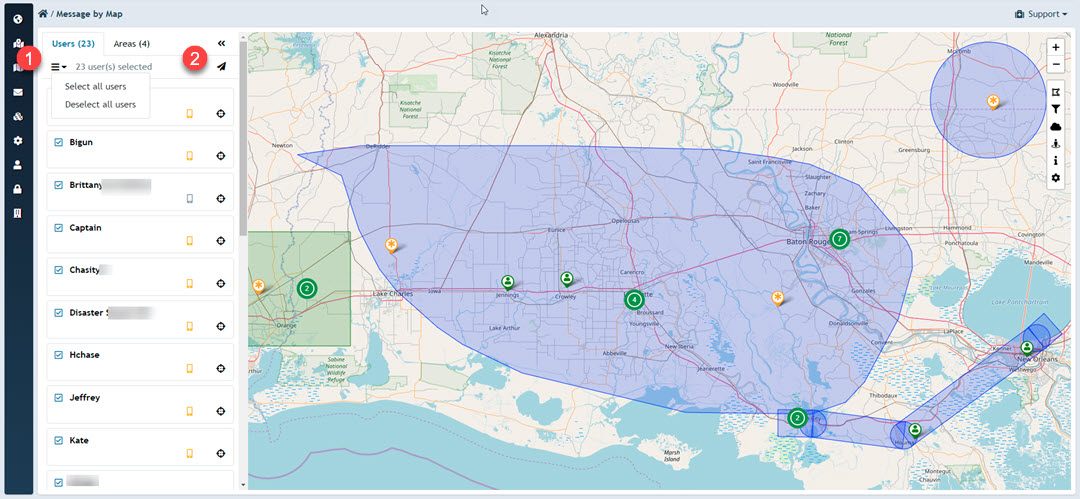
- From the Messaging>Members menu select the users you want to message.
- Click the Send Message button in the top right corner. Complete the form and you are done.
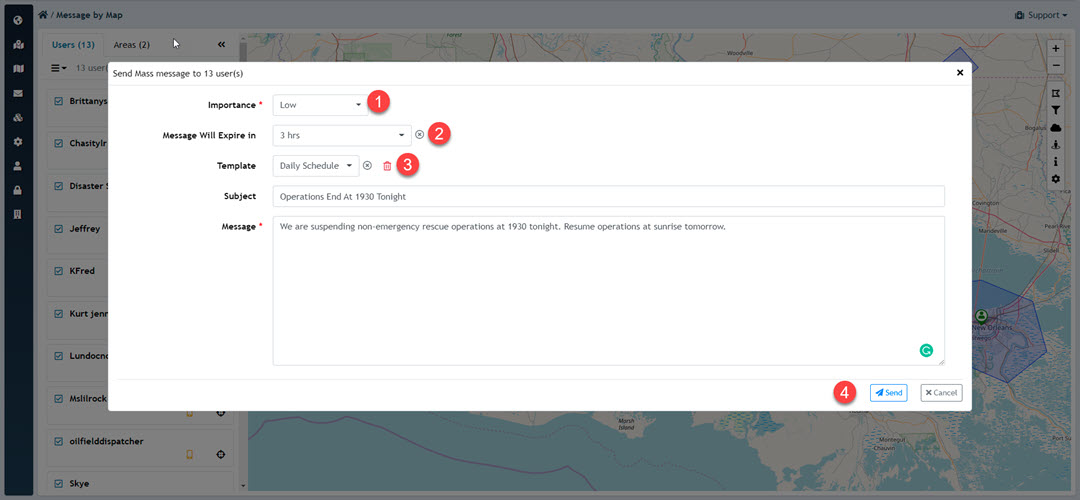
Messaging UI
- Set the priority
- Set the during the message will remain available
- Select a temple or create a freeform message
- A template can be created from any message for repetitive and consistent messaging
Member List Selection Process
Navigate to Messaging>Members
- You can search for a member if you have a long list.
- You can filter members by their group assignment. (Supervisors, Dispatchers - you set up groups for your organization)
- Filter by Responder or Citizen. Members can function in either role in an organization.
- Select individual users by checking the box.
- Open the create message window.
Author: PubSafe
Last update: 2021-09-24 15:40
Teams Administration
Team functionality is strictly at the mobile app level and for Android only. Apple has blocked us from doing updates due to safety concerns. If you are a governement agency and are willing to request Apple to release our updates, please email contact@pubsafe.net. Apple is requiring PubSafe to receive an expression of interest in the PubSafe platform from a government agency.
A team is not visible to an organization in the PubSafe portal. Users can be invited to, and join, an organization to interact with dispatchers using the portal.
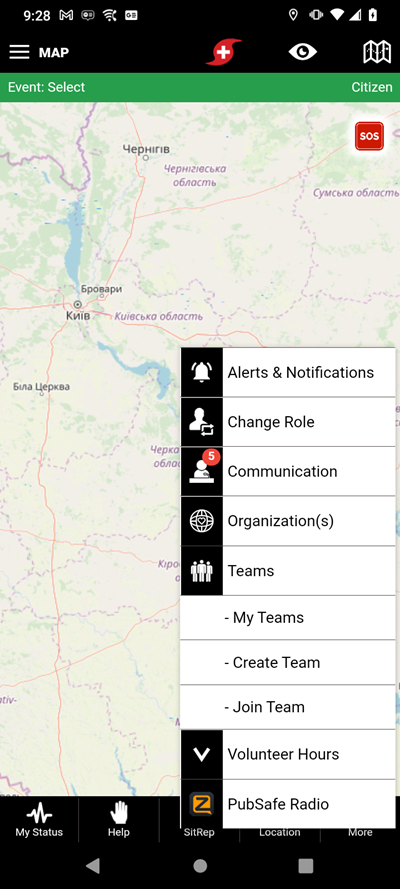
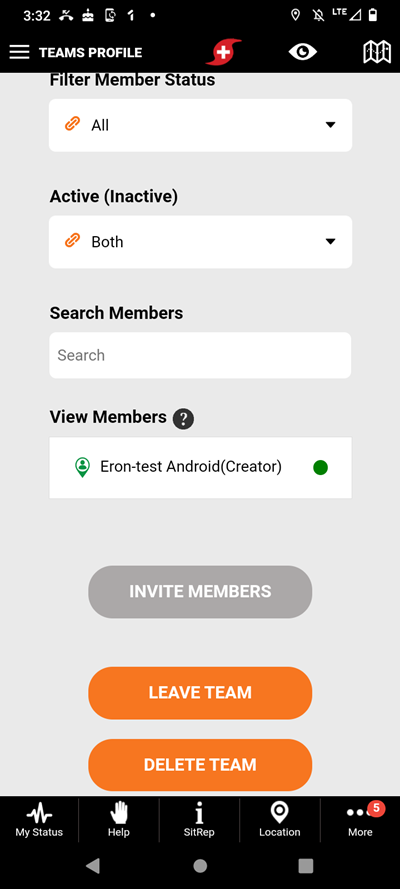
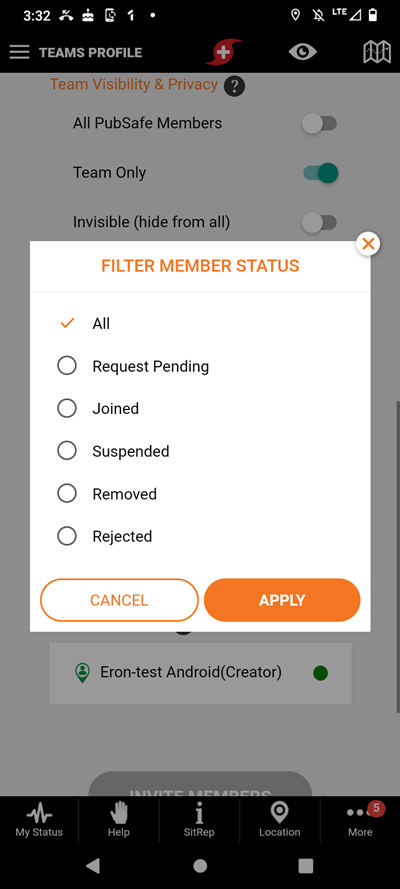
Teams access is controlled by the app version. Teams is not available until the Base level at $.99/yr. The higher the app version, the more teams a single user can join and the more members can be in a single team. Users can change between teams at any time as seen in the screen captures. A users teams cannot see or interact between teams if a user is a member of multiple teams; teams are independent of other teams.
Step 1 - Create a Team
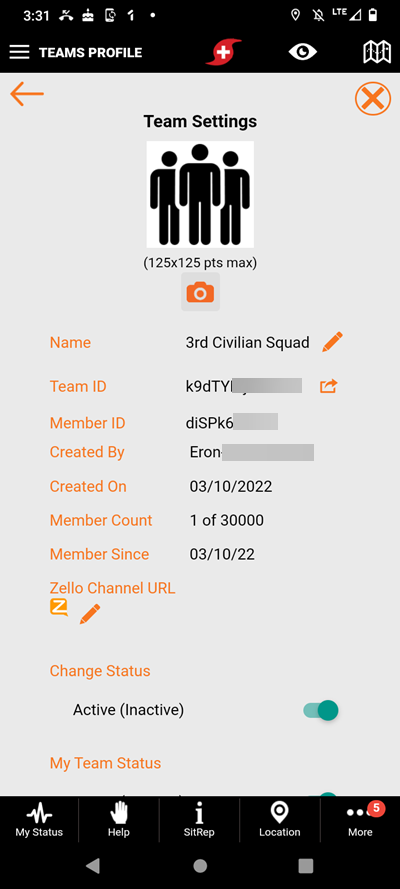
Step 2 - Setup Team Parameters
Step 3 - Invite Members to Join
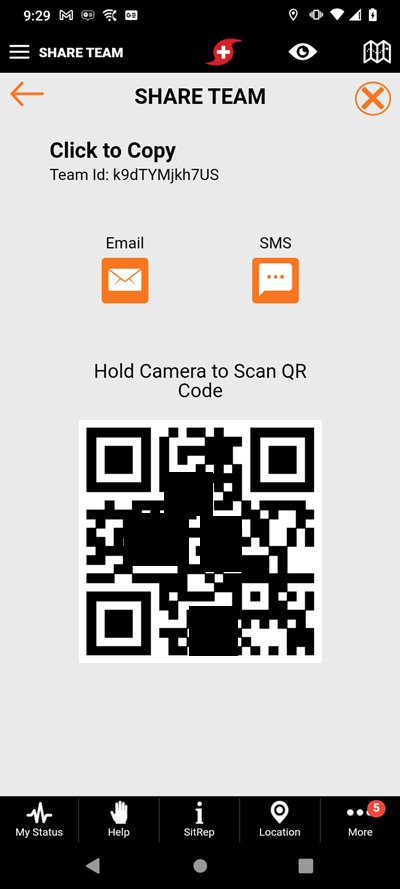
Step 4 - View Teams Administration
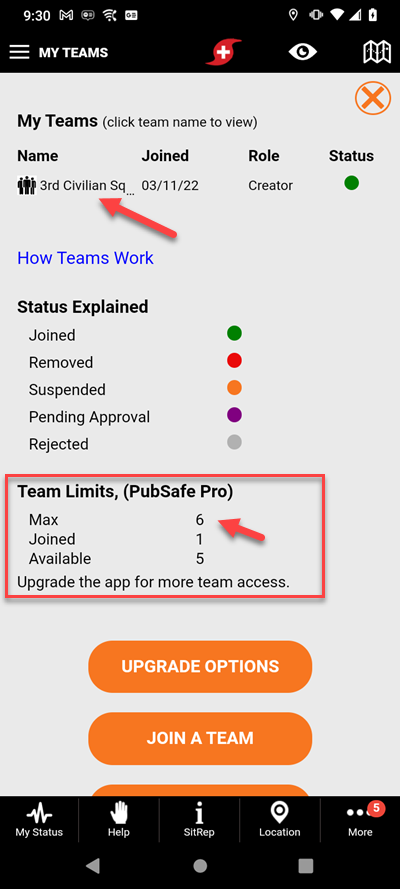
Step 5 - Administer Team & Members
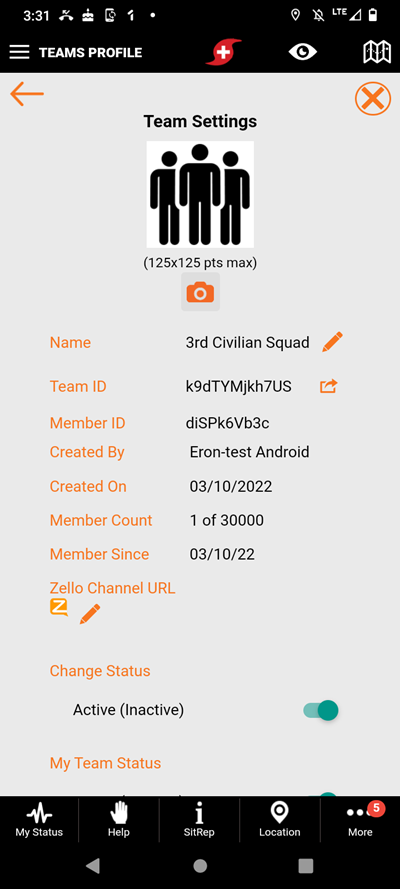
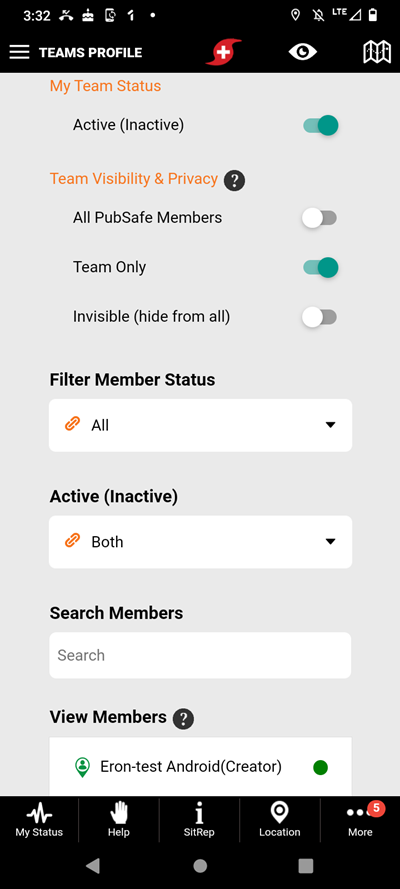
Author: PubSafe
Last update: 2022-03-18 20:49
Search Parties
PubSafe offers the ability for organizations to work with hundreds of temporary volunteers in a single search party by temporarily associating them with the organization for a single event, and a limited period of time. During the search party timeperiod, volunteers can be tracked in the web portal, collectively sent messages from the web portal, and have their hours automatically tracked for reporting (in development).
Volunteers must install the free version of PubSafe and then upgrade to Plus to join a search party.
Note: Although not required, it is a good practice to have volunteers register using the custom registration link provided to each PubSafe organization. By doing so, orgs will capture contact information to send a thank you note, contact in the future for assistance, or for fundraising. Volunteers are automatically inserted in the Contact Manager in the left menu with a volunteer status for easy filtering.
Creating a Search Party
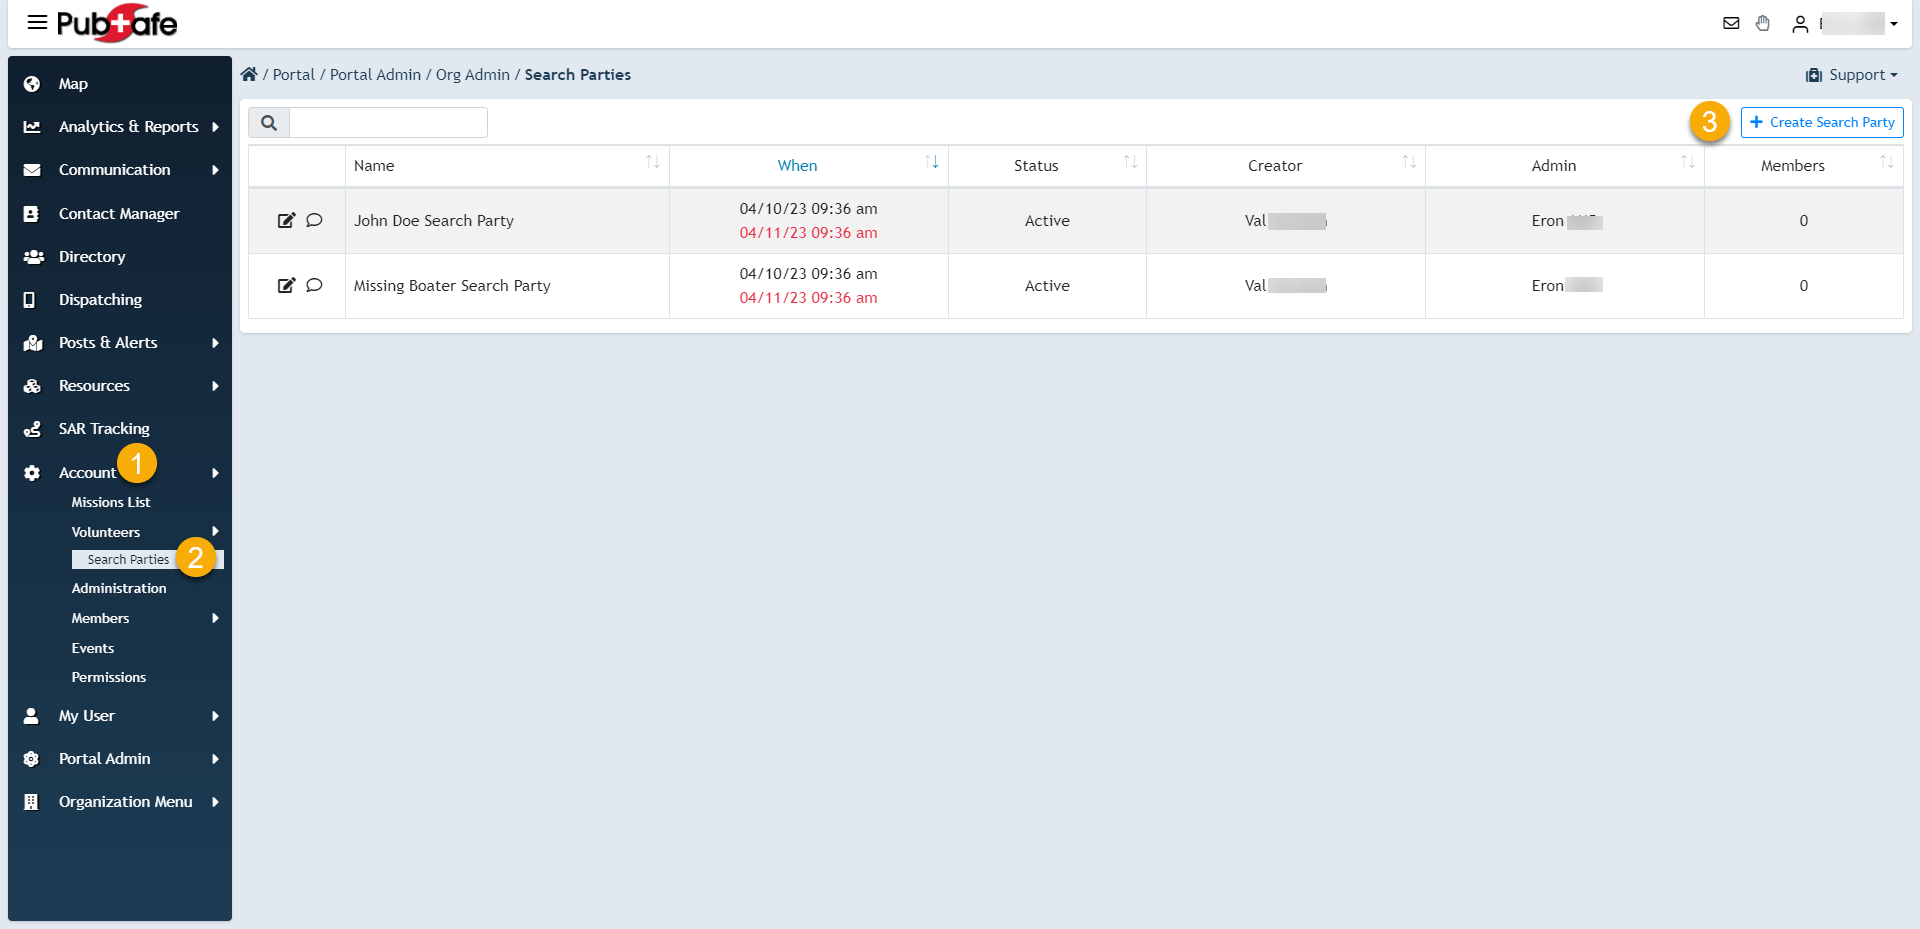
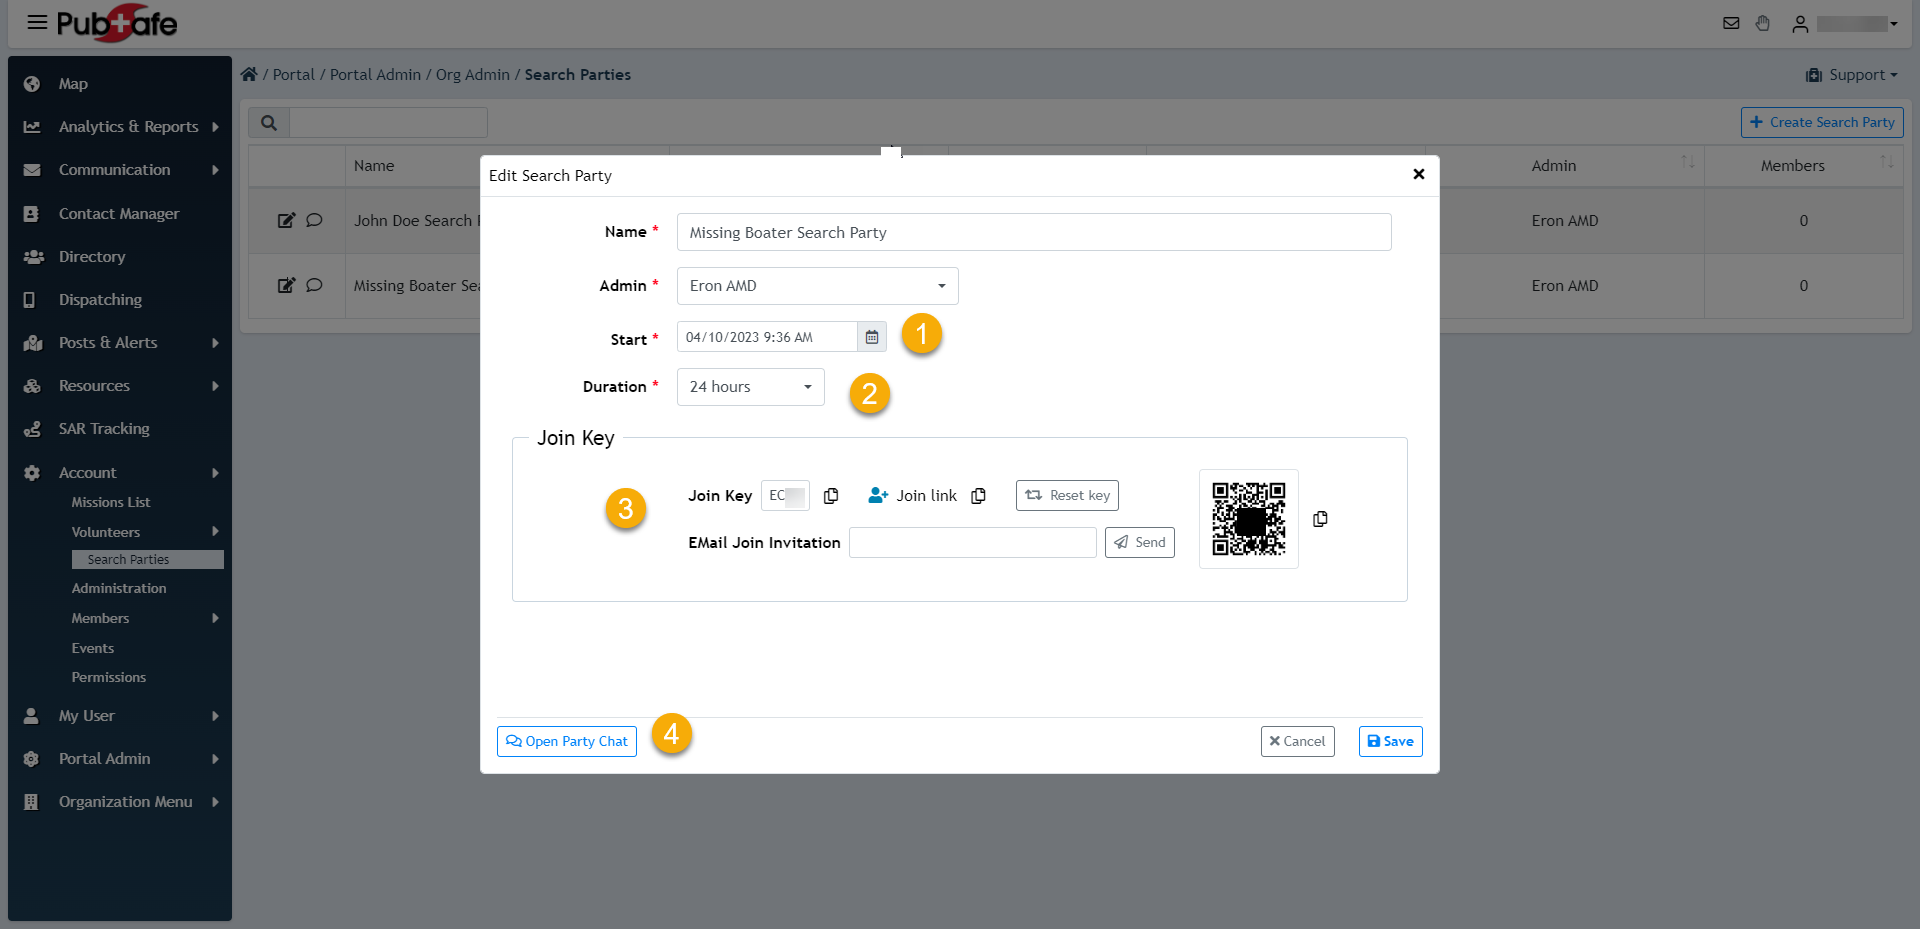
Search Part Parameters
- In the future, by setting the start date and time, it automatically enables the hours to be logged for all volunteers. This can be used for funding, marketing, etc.
- Search parties are limited in duration and often times the people change day-to-day. By limiting the duration, a daily roster can be built.
- Invite people using the custom link provided. When the user has PubSafe Plus, they will automatically be joined on accepting the invitation. There is not an additional admin approval step like required when joining an organization as a member.
- Consider printing the QR code for people to scan at the incident command center. The QR code can also be put on several phones and share to other phones by walking through the crowd so volunteers can scan the app quickly and easily. It is also recommended that you print the QR code for each app store to make it easier for volunteers to install the PubSafe app before scanning the QR code for the search party. Visit pubsafe.net/download for links to iOS and Android app stores.
- You can two-way chat with search party volunteers individually or all at once. Chat sessions will appear in the mobile app under the More>Communication menu.
Author: PubSafe
Last update: 2023-04-10 16:52
Join a Search Party
Once an organization sends you a join link or shares a QR code, you can temporarily link to the organization to participate in a seach party. Once connected the organization will be able to track you in the PubSafe.net web portal until 1. the link expires 2. you unlink from the organization 3. you go "invisible" by selecting the visibility icon (eyeball) on the top of the PubSafe mobile app.
You will receive an email with the below information.
Subject: Search Party Volunteer Invitation
Dear Volunteer,
An organization using the PubSafe platform for search operations invited you to temporarily join and participate in a search party. Follow the instructions below so the organization can track your location and communicate with you. You can remove yourself from the organization or make yourself “invisible” at any time by clicking the eyeball icon at the top in the PubSafe app.
Step 1. Install the PubSafe mobile app. From your phone - Click here for iOS and Click here for Android or search for “PubSafe SOS”
Step 2. Upgrade to PubSafe Plus. From the admin menu in the top left (“hamburger menu”), select App Upgrade, select Plus. You can cancel the app after the search or keep the free version.
Step 3. In the PubSafe Plus app navigate to More>Organizations>Join Org. The More menu is in the lower right.
Step 4. Enter the 4-digit temporary key below or scan the QR code into the Join Org section.
Join key: TBD
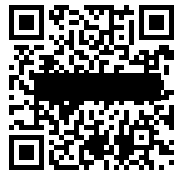 example only
Author: PubSafe
Last update: 2023-04-10 18:42
Search Party Volunteers
Working with Impromptu Search Parties
Organizing a large number of volunteers that show up to participate in a missing person search event can be challenging. You do not know who they are, their skills, fitness, resources, or background. Additionally, once in the field, traditionally you do not have a means to track their location or communicate with them. The PubSafe platform offers tools to aid in the administration of volunteers as well as temporarily joins them to an organization so they may be tracked and included in organization communication from the PubSafe portal to the mobile app.
Getting Volunteers on the PubSafe App
The organization will send a org specific search party invitation link using email or SMS or share a QR code. The most efficient methods are printing a QR code for the specific search party and passing it around the crowd. Displaying a QR code on a phone and showing that to members is also a good way to walk through the crowd and let volutneers scan it.

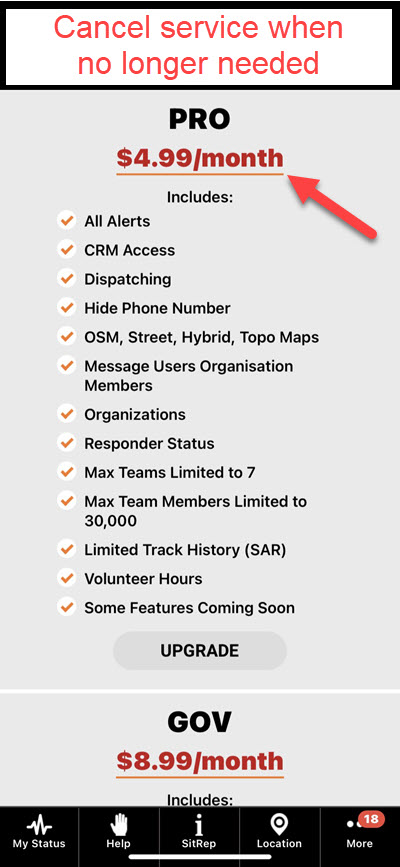
Everyone must install the free version of the PubSafe mobile and then upgrade to Pro. Links to install the app for Android and iOS are found on the volunteer registration form page. Users will be prompted to upgrade when attempting to join a search party.
Once volunteers are linked or bound to a specific search party, they can be tracked on the Search Party map and sent messages through the built in chat window. You can warn volunteers of impending weather, ajust search areas, annouce the end to search activities, etc.

Tracking Search Party Members (SPM)
While SPM are part of a search party, their location is being tracked through the PubSafe mobile app. The app should remain active on the phone to provide good track data. After the event, or when the event expires, user tracking is stopped for their privacy. Tracking is broken into two parts 1. current location 2. route history.
Current location is just that and is used for monitoring team members while searching, command and control from the portal map, and marking possible evidence through the PubSafe app SitRep>Sar & NGO menu.

Route history shows where a person has traveled. Route history can be used to identify areas that may not have been search for some reason. This is vital to ensuring thorough coverage of an area.

Author: PubSafe
Last update: 2023-07-12 20:45
Messaging Citizens Outside an Organization
Sending Messages to Users Who Are Not Members of Your Organization
NGOs and Enterprise organizations can only message members of their organization with an active subscription to the PubSafe Pro or Enterprise mobile app. All members must be "joined" to an organization to be a member.
Users can switch between organizations but they will only receive messages from the organization active in the mobile app. A user can only be signed into a single organization on the app and/or portal at one time.
Message Citizens (Government only)
Citizens refer to people using the PubSafe mobile app. They typically use the free version of PubSafe and are not interested in directly volunteering to help others in a Responder capacity.
Only government organizations can message any PubSafe user in their direct area of responsibility. This includes citizens or people within a region entrusted to the messaging agency through a formal treaty, agreement, or memorandum of understanding between nations, communities, or other formal relationships. A government that messages users outside of the established guidance may be banned or fined by PubSafe.
Maximum Recipients in a Single Message
There is a limit on the number of users that can message simultaneously. The current limit is 100,000. This is subject to change.
Maximum Messages in 30 Day Period
There is limit on the number of messages that can be sent in a 30-day period. The current limit is 300,000 in a 30 day period. If additional messaging is needed, email sales@pubsafesos.net. This is subject to change.
Author: PubSafe
Last update: 2025-02-11 17:36
Dispatching
How do I offer Help or Emergency Requests on my website?
Every organization gets a custom URL specific to use on their website and social media. This is generated when an organization is created and can be found under the Account>Admin section. This URL can be added to a website using an iframe or the link can be otherwise embedded.
When a help request is received, the unique organization code in the URL is attached to the help request. The request is then made available in the organization's queue for X minutes. If it is not dispatched to an available responder in X minutes, the request is moved to the PubSafe queue, where any organization can assign to a mission-ready responder. Only mission-ready responders can be dispatched a new mission. A responder can only be assigned one mission at a time. The duration of "X" will vary by the nature of
The process of the mission timing out repeats until the mission is completed or marked inactive. Mission activity is tracked and will eventually be part of statistics for an organization and to study the response efforts of NGOs and other organizations.
Request Help - Pubsafe - Citizen Public Safety Network
Author: PubSafe
Last update: 2021-07-22 21:02
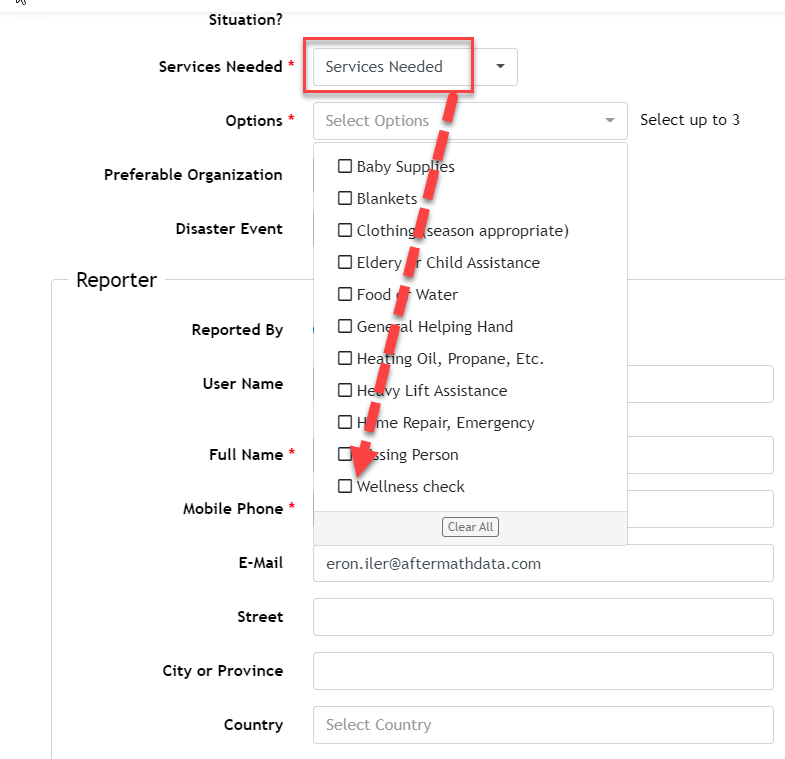
How is a Wellness Check done?
A wellness check is initiated like a help request using a web form. A wellness check will be treated like a help request but with a low priority in most cases. Wellness checks enable a person, not on site, to initiate a dispatch. Because the person making the request cannot be verified or the location validated, wellness checks are more likely to take a long time to complete and can only be submitted using a web form.
If someone needs help, they request it using the PubSafe mobile app so their location information is included.
Request Help - Pubsafe - Citizen Public Safety Network
Author: PubSafe
Last update: 2022-03-17 22:58
What is the process for dispatching a mission to a responder?
A mission is a request for routine or non-life-threatening assistance or help in an emergency. A mission might be a simple wellness check or it can be a sinking boat or heart attack. How a mission is dispatched has to do with how it is received and the availability of mission ready responders in an organizations.
When someone needs help at any time, by default, other users in the area receive an alert to the PubSafe app. To find people near those that need help, your approximate location is used even when the app is closed if you allow this function. If you disable it, your last know location may be used even though you are 1000 miles away. If you need help and your location is turned off for the PubSafe app, your location cannot be broadcast to others in the area. This enables users in either a Citizen or Responder Role to respond at their discretion. Users are not trained, certified, or vetted so those responding are responding in good faith. Sometimes just a friendly face makes a situation better. Other times, like that of a sinking boat, the nearest boat may be on scene an hour before the Coast Guard.
Organizations can utilize a special link provided to collect help requests and put them into the PubSafe portal. The organization can then dispatch its members in a mission-ready responder status to a help request. This can be done at any time and might be for something as simple as a family needing food or firewood. It can also be for a family stuck on a roof during a flood and emergency services are so busy they cannot respond. During disasters, help requests which are not dispatched in X minutes will be automatically put into the PubSafe queue so any available organization can dispatch within the prescribed time limit. The amount of time allowed to be in the queue and not dispatched will vary by request time, backlog, and overall situation as determined by PubSafe.
When a dispatcher sees a help request (HR) in the queue that matches their skill set and resources, they can forward the mission to a responder which is in a mission-ready status. The responder can then review the mission details and location and accept or decline the mission. Once accepted, the responder cannot get another mission until the current mission is cleared and they return to mission-ready status. If a mission is not updated by the responder, and the dispatcher is not communicating with the responder, the dispatcher or an organization supervisor can cancel the mission and assign to a different responder.
Once a mission is complete it is archived for future analytics.
Author: PubSafe
Last update: 2022-09-24 00:01
Help Request Form - Request Details
Provide as much information as possible to assist Responders to be safe and efficient.
Examples:
- Number, ages, and health of people and animals
- Location inside
- Names of people
- Cell phone numbers
- Animals - type, number, size
- Landmarks or unique features
- Gate or building code
- Special equipment needed
- Medical issues
- Hazardous material such as chemicals, propane, oxygen
Request Help Now from NGOs
Author: PubSafe
Last update: 2024-04-22 20:19
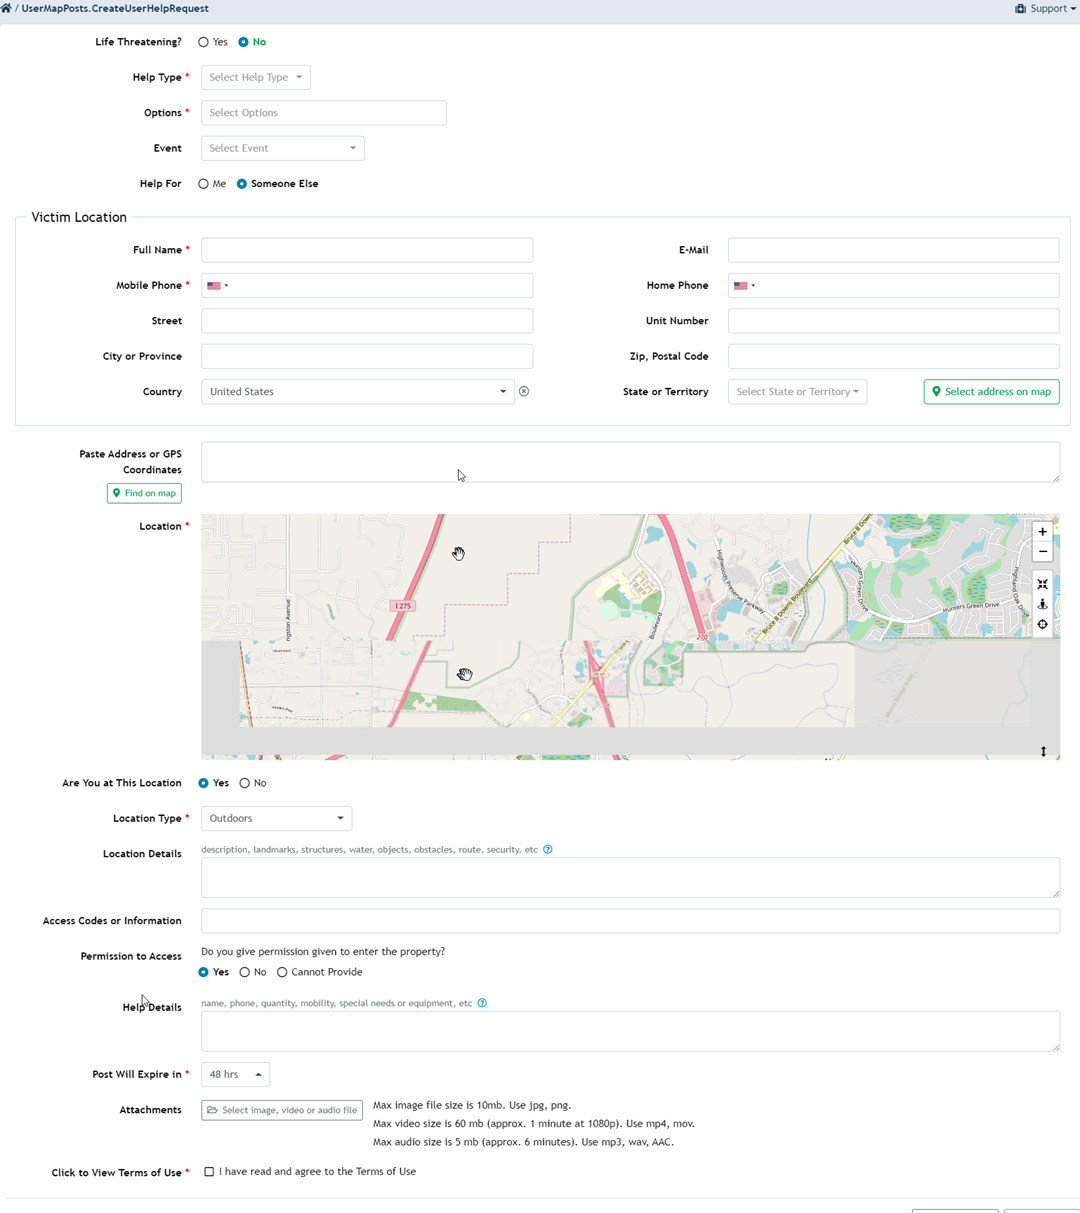
Help Request Form
The help request form is generally used by 3rd parties to seek help for others in a different location. If you need help or at the location, submit the form and then install the PubSafe mobile app for onging information sharing. Download - Pubsafe - Citizen Public Safety Network
Share as much detailed information as you can that will help Responders find the location more efficiently and bring the right resources.
Location Details
- Size, color, and type of location or building
- Landmarks such as a pond, water tower, gate, statue, etc.
- Gate or building codes
- Hazards
- Security or physical access constraints
Help Details
- Number, ages, and health of people and animals
- Location inside
- Names of people
- Cell phone numbers
- Animals - type, number, size
- Landmarks or unique features
- Gate or building code
- Special equipment needed
- Medical issues
- Hazardous material such as chemicals, propane, oxygen
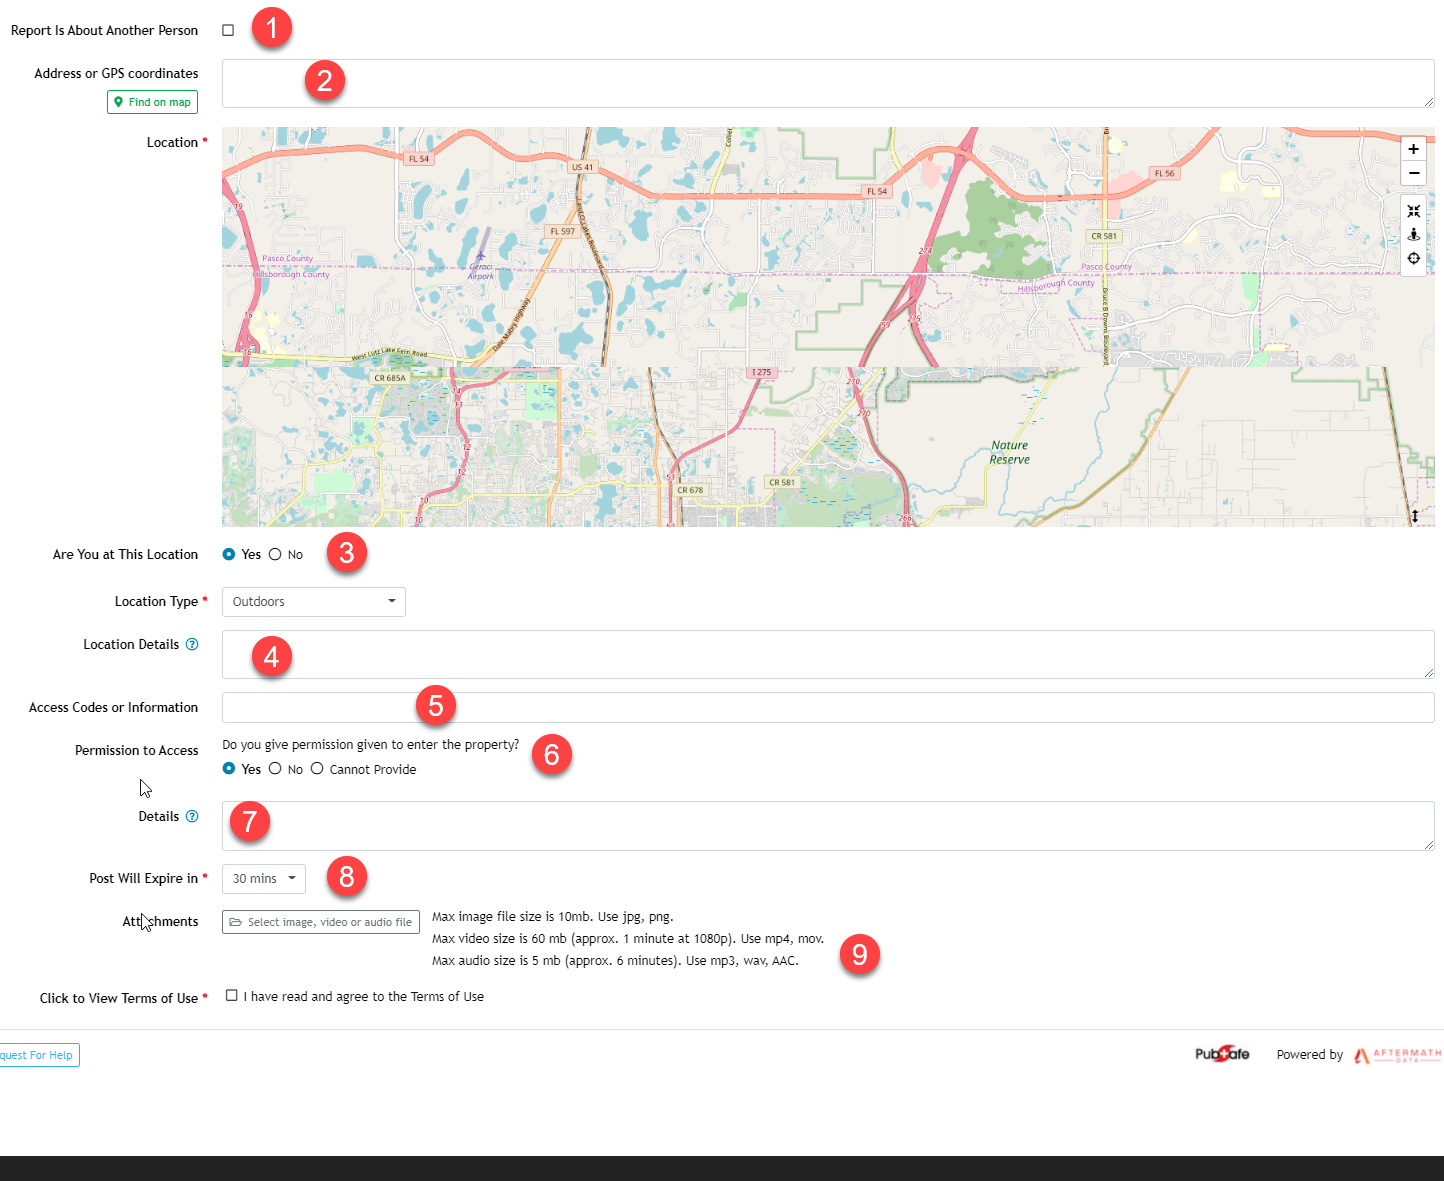
Form Explanation
- Is the help for you or someone else?
- Paste GPS coordinates from Google or Bing or find the location on the map below.
- Are you at the location where help is needed? Use the PubSafe app if you are onsite.
- Describe the location to aid responders. Remember signs and normal landmarks may be missing in a fire or storm.
- Can you give permission to access the property?
- Is an access coded needed to enter a community or building?
- Describe the help needed in as much detail as possible.
- PubSafe Knowledge Base - Help Request Form - Request Details
- The time the request should remain active.
- Include photos, videos and audio files if it will improve the rescue effort.
Author: PubSafe
Last update: 2021-07-22 22:50
What is Departure Lead Time?
This represents the amount of time you require before you can leave in response for help. This time is generally not less than a day to pack gear, get supplies and alter work plans.
Author: PubSafe
Last update: 2021-08-30 22:51
Responder Details
Experience
- What level of expertise do you bring with the resources and skills listed? If you are an medical doctor you are an expert. If you are a home owner, that trims trees in the yard, you are a beginner. Over selling your skills may result in lost time time and reduced efficiency.
Skills
- Your skills based on training and years of experience. Consider the tasks you may receive when indicating your skills.
Departure Lead Time
- How quickly can you be ready to deploy to a natural disaster and be gone for a 2 to 7 days? Being self sufficient is important to avoid limited resources in a disaster area.
Resources
- List the machinery, tools, boats, trucks and vehicles you will take with you on a deployment.
Author: PubSafe
Last update: 2021-08-30 22:58
Responder Status vs Citizen Status
Users can choose to be a Citizen or Responder in the PubSafe platform. Citizens are everyday users that have no skills or desire to identify as someone ready, willing, and able to help. Being a citizen does not preclude you from helping another user and Citizens are alerted when a nearby help request is posted. Responders are volunteering to be called on and are typically part of an NGO, but are not required to be part of an NGO. Responders who are not part of an NGO are only going to get tasked with a mission if all org members in the area are not available. It is best if all Responders work with an NGO or government agency.
To be a Responder you must upgrade to a paid subscription of PubSafe Plus or higher. The minimum fee is $.99/mo. This is to discourage the average person from holding themselves out as a Responder needlessly. Even $.99/mo will discourage many unqualified or disingenuous Responders.
Users can go between being a Citizen and Responder user at any time but only Responders with a status of Mission ready can be assigned a mission. Update your mission status frequently.
Author: PubSafe
Last update: 2021-09-13 19:38
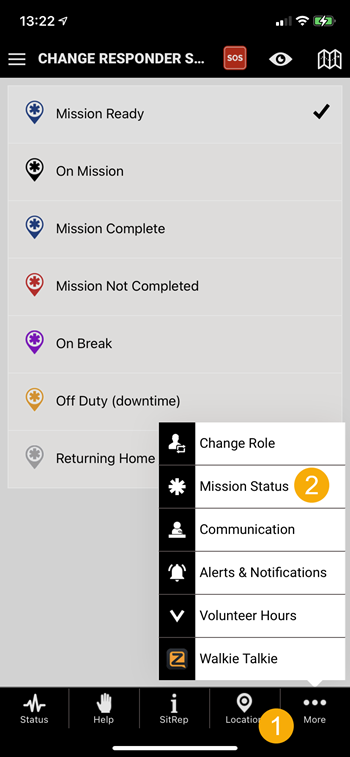
Responder Mission Status
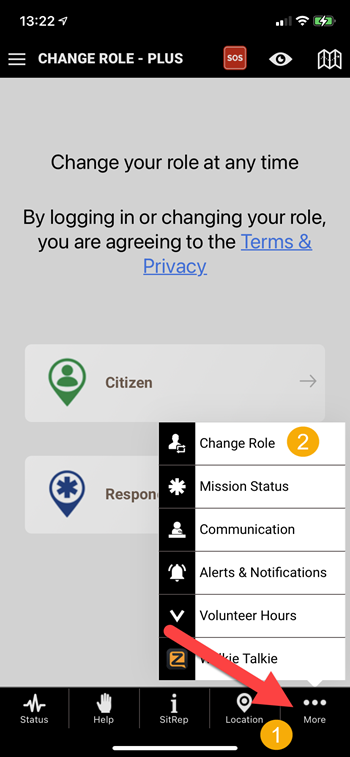
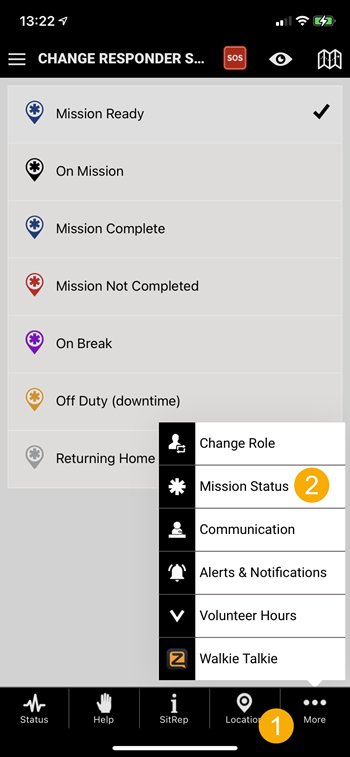
Only responders can be tasked with a mission and only when in mission-ready status. To receive a mission open the More>Change Role menu and select Responder. If you want to stop acting as a responder, simply switch back anytime. The bar above the map will be green for Citizen and blue for Responder. It will also show your Mission Status.
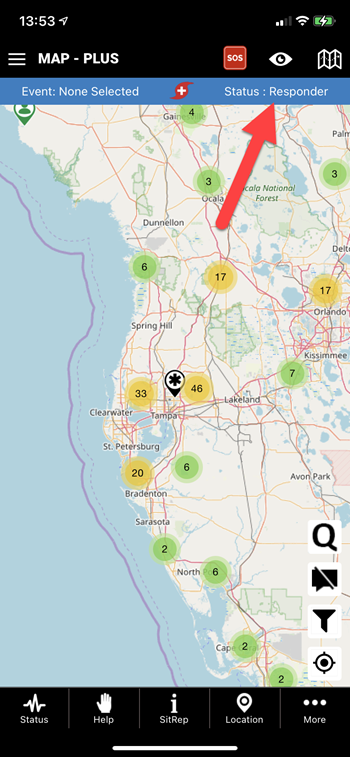
When en route to a large natural disaster, you should go into a responder role and indicate you are mission ready. Dispatchers monitoring the situation will see your location and assign you an appropriate mission based on your location, skills, and resources. There is a lot of misinformation during disasters so responders must be ready for any situation and never operate alone.
Responder Status:
- Mission Ready - No current mission assigned and ready for a new mission. Only 1 mission can be assigned at a time.
- On Mission - Actively working an assigned mission.
- Mission Complete - This shares the disposition of a mission with the dispatchers so they can mark the mission complete and focus on the next mission.
- Mission Not Complete - This shares the disposition of the mission with the dispatchers so they can search for an alternative course of action.
- On Break - Resting and recovering, unable to accept a mission for a "short" period. This helps dispatchers work efficiently and not call people who are not ready to receive a new mission.
- Off Duty - No longer working the event. Likely preparing to leave the area.
- Returning Home - Still in responder status but returning home or to long-term rest and recovery location.
Author: Eron Iler
Last update: 2021-09-13 19:57
Work Order Queue
PubSafe is unique in its ability to coordinate help and emergency requests across multiple NGOs and organizations from many different sources such as mobile apps, websites, social media, and call-ins.
Mission of PubSafe
The mission of the PubSafe platform is to save lives and reduce the suffering of people and animals. All portal functionality is designed to this end. All users and organizations utilizing the PubSafe platform should share this overriding belief. Sometimes this means taking actions that are for the greater good. PubSafe's goal is to eliminate challenges encountered in previous disasters, like those referenced in a comment from a government official after Hurricane Michael, "we had a thousand help requests we could not get to". PubSafe provides the tools to ensure help requests receive a response after a disaster.
Importance of Time Management
PubSafe can cross-coordinate between multiple organizations in real-time through the use of time management tools. Assistance requests are extremely time-sensitive. The longer it takes for help to arrive, the greater the loss of people, animals, and property. Therefore, the most important part of a collective response is to send the nearest qualified responder regardless of the organization that receives the request. Qualified may mean formal training, or the best available at the time. It may mean providing a general helping hand until a more qualified responder or additional resources arrive. Good Samaritan Act was intended to facilitate people helping people, to the best of their abilities.
Sources of Routine and Priority Requests
PubSafe facilitates gathering assistance requests from multiple sources so they can be managed through a single online portal. Requests can be made through PubSafe's mobile app, direct entry into the portal, or through third-party sources such as NGOs. Organizations are provided with a unique online help request form specific to their organization. Each form URL is specific to an organization so any requests received are routed to the organization's queue. Requests received through PubSafe sources are routed to PubSafe's queue where all NGOs can view and assign them.
Definitions
- Dwell Time - the length of time an assistance request remains in an organization queue without being assigned. Dwell time is a key metric used to determine dispatching efficiency and overall NGO impact.
- Good Samaritan Act: Good Samaritan laws offer legal protection to people who give reasonable assistance to those whom they believe to be injured, ill, in peril, or otherwise incapacitated. The protection is intended to reduce bystanders' hesitation to assist for fear of being sued or prosecuted for unintentioned injury or wrongful death. An example in common-law areas of Canada: a good Samaritan doctrine is a legal principle that prevents a rescuer who voluntarily helps a victim in distress from being sued for wrongdoing. Its purpose is to encourage rendering assistance to strangers in need. Consult with the general counsel to understand the risks.
- Queue - List of active help or requests for assistance
- Status - PubSafe offers the option of qualifying work orders. Some organizations want to inspect a help request before scheduling follow on services. The status filter enables a WO to be assigned to an Inspector who visits and evaluates the request and marks it qualified or unqualified. The dispatcher uses this information to make appropriate decisions. If this step is not needed, it is simply not updated.
- Inspector - a Responder designated to qualify help requests. This is an optional role and step.
PubSafe queues are available to all organizations to assist with the management of help requests. Requests received through the PubSafe mobile app, website, social media, or otherwise, are available to all organizations that use the PubSafe portal. Citizens and other responders can see these help requests on the PubSafe map. Once a work order is assigned and accepted by an organization, the work order cannot be assigned to another responder until the status is changed to Work Order Incomplete. Dispatchers work with responders to ensure work order statuses' are current and unsuccessful work orders are released back into the queue so they can be tasked to a different responder or partner organization.
Requests that exceed dwell time may be automatically moved to the PubSafe queue. This allows requests to be assigned to other responders available through other organizations. If a request is assigned from the PubSafe queue by an organization, the organization has 10 minutes of dwell time to assign it to an available responder for a priority request and 60 minutes for a routine request. If it is not accepted by a Work Order Ready Responder, it is returned to the queue for reassignment. The dwell time may be changed by PubSafe at any time without notice based on the situation.
The amount of dwell time varies based on several factors. Factors include the size of the backlog for all organizations, government feedback, the scale of the disaster, average response times, and as well as other variables. PubSafe may update dwell time as needed throughout an event to optimize the response times.

Author: PubSafe
Last update: 2024-08-22 14:58
Mobile App
How do I use the PubSafe mobile app?
The mobile app is easy to use but quite robust.
If you need assistance creating an org and logging in for the first time - Go Here
After launching the app:
- Select from the 4 menu options along the bottom based on your intended use. Only a few items are required*.
- Select a top-level sub-category
- Enter a subject for the dispatchers and others to read quickly
- Select specific items from the list so responders know what is needed to respond to a help request or to stare detailed information
- Add photos or videos to assist others in understanding the situation
- Add a free-form comment
- Submit
A user can be in either the default Citizen status or can change to Responder under the more menu. A user must upgrade to at least the Plus app version to go into Responder status. Only users which are very familiar with the app and are available to respond to help requests should change from the default status of Citizen to Responder. Qualified users can go switch between Citizen and Responder at any time to signal their status to others.
Watch more videos on our YouTube channel.
Author: PubSafe
Last update: 2024-05-30 14:58
What is the difference between a Citizen and a Responder?
By default, all app users start at Citizens. Citizens are users which are not signaling that they are ready or able to assist others during a routine help request, emergency, or disaster. Only users with some level of training should consider switching to a Responder role.
To be a Responder, you must update the app version to Plus or higher. Plus users can be responders but cannot join organizations or use the advanced functionality of the PubSafe portal. Responders operating independently could be contacted to respond to a help request by an NGO or other organization but this would only happen if responders with an organization are not available. Operating as an independent responder is discouraged for a variety of reasons. Find a non-government organization (NGO) like the United Cajun Navy, Red Cross, or Team Rubicon and join their team. There is safety in numbers and teamwork always provides a better response than lone responders. In some cases, it may be illegal to be in some areas without being part of an approved NGO.
Responders are required to list skills, resources, and qualifications so dispatchers can match the right responder to a help or emergency request.
After upgrading to Plus or higher, select the More menu in the lower right corner, and then Change Role. A responder icon on the map has an astricts (*) in the middle. The color of the icon indicates the responder's mission readiness status (mission-ready, off duty, on a mission, etc)
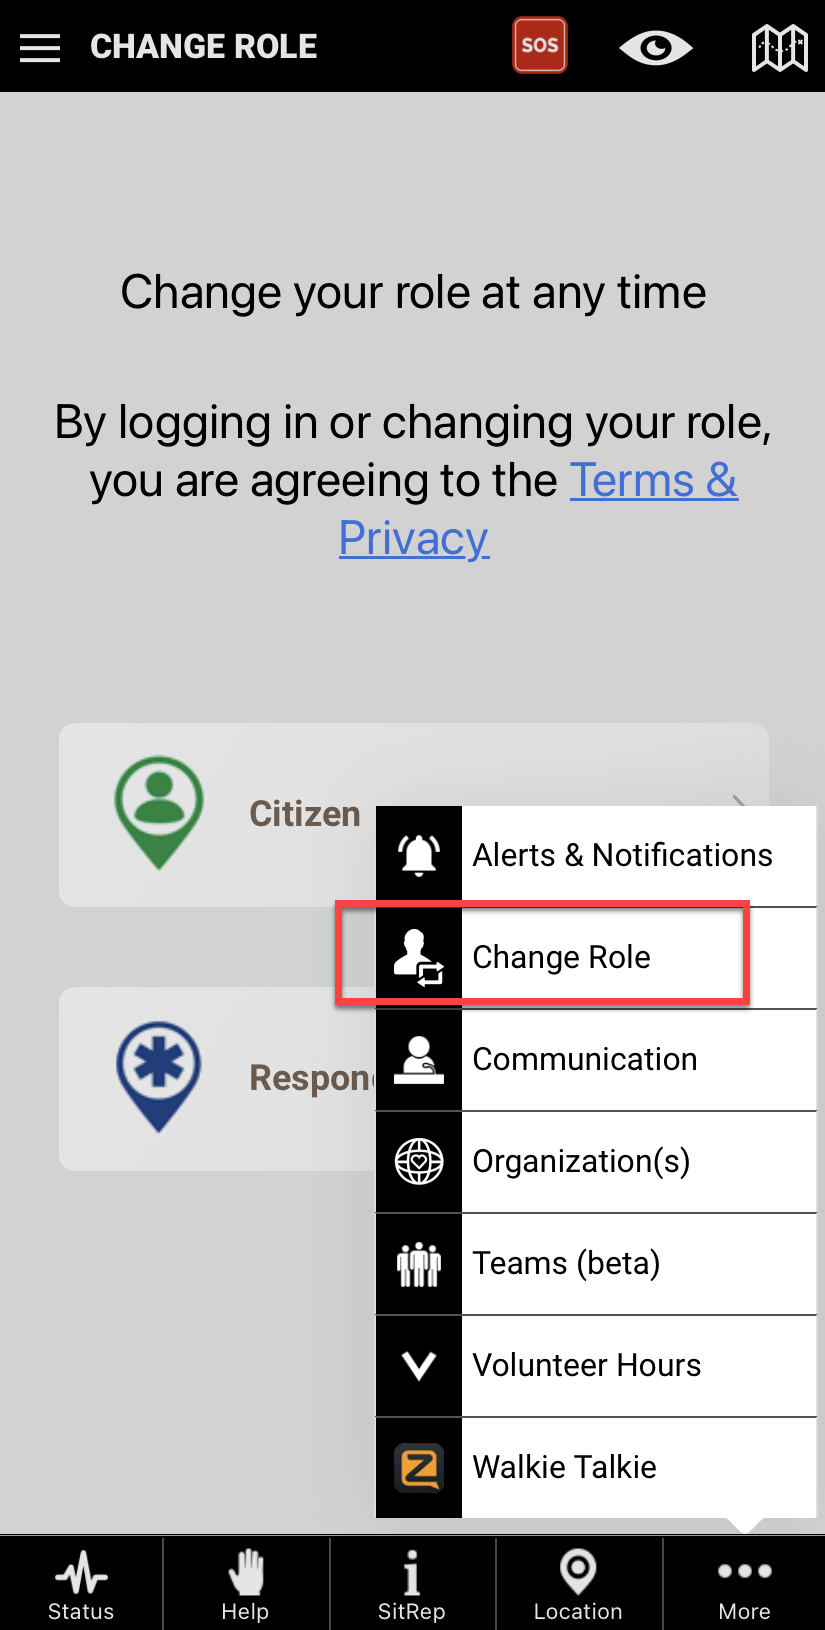
Author: PubSafe
Last update: 2021-07-22 20:56
How does an SOS emergency work?
SOS should only be used for life and death emergencies. Using the SOS falsely is likely a crime as emergency responders may, or may not, see the request and respond.
To initiate an SOS simply click the icon at the top of the mobile app and follow the steps. Any emergency must be renewed as indicated by the countdown timer. SOS emergencies that expire may be canceled and response efforts stopped.
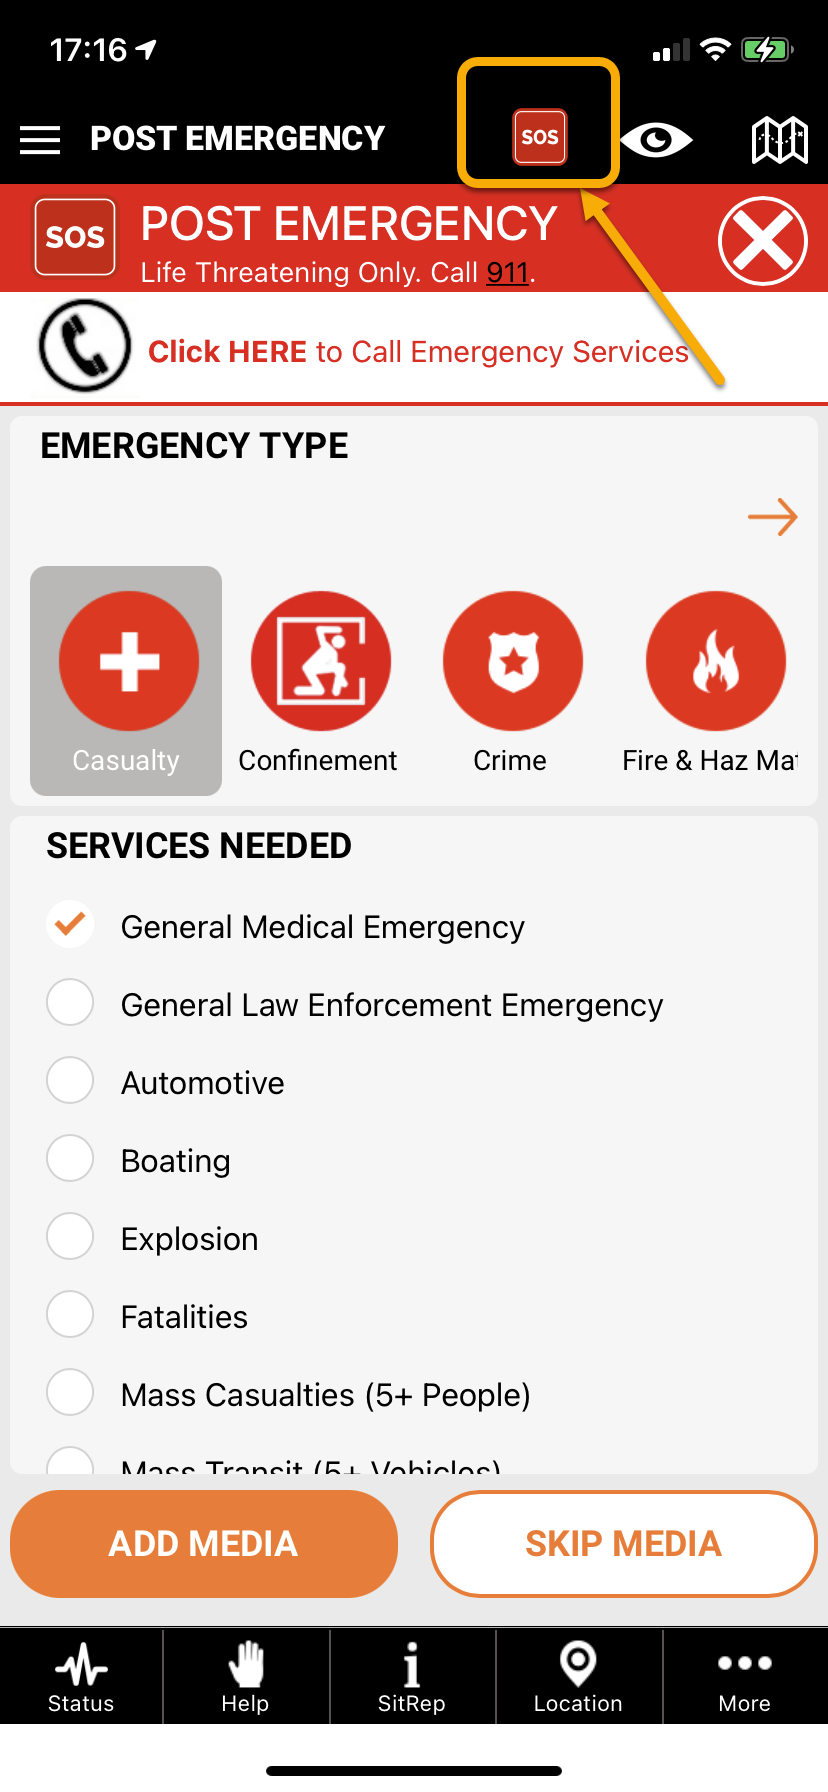
Author: PubSafe
Last update: 2021-07-22 20:56
How do I find and share my location?
Select your icon on the map. It is the one that is always black regardless of you being in a responder or citizen role. Other users will see your icon based on your status.
You can click Share via SMS, read the coordinates to someone or copy from a text message to paste into another app.
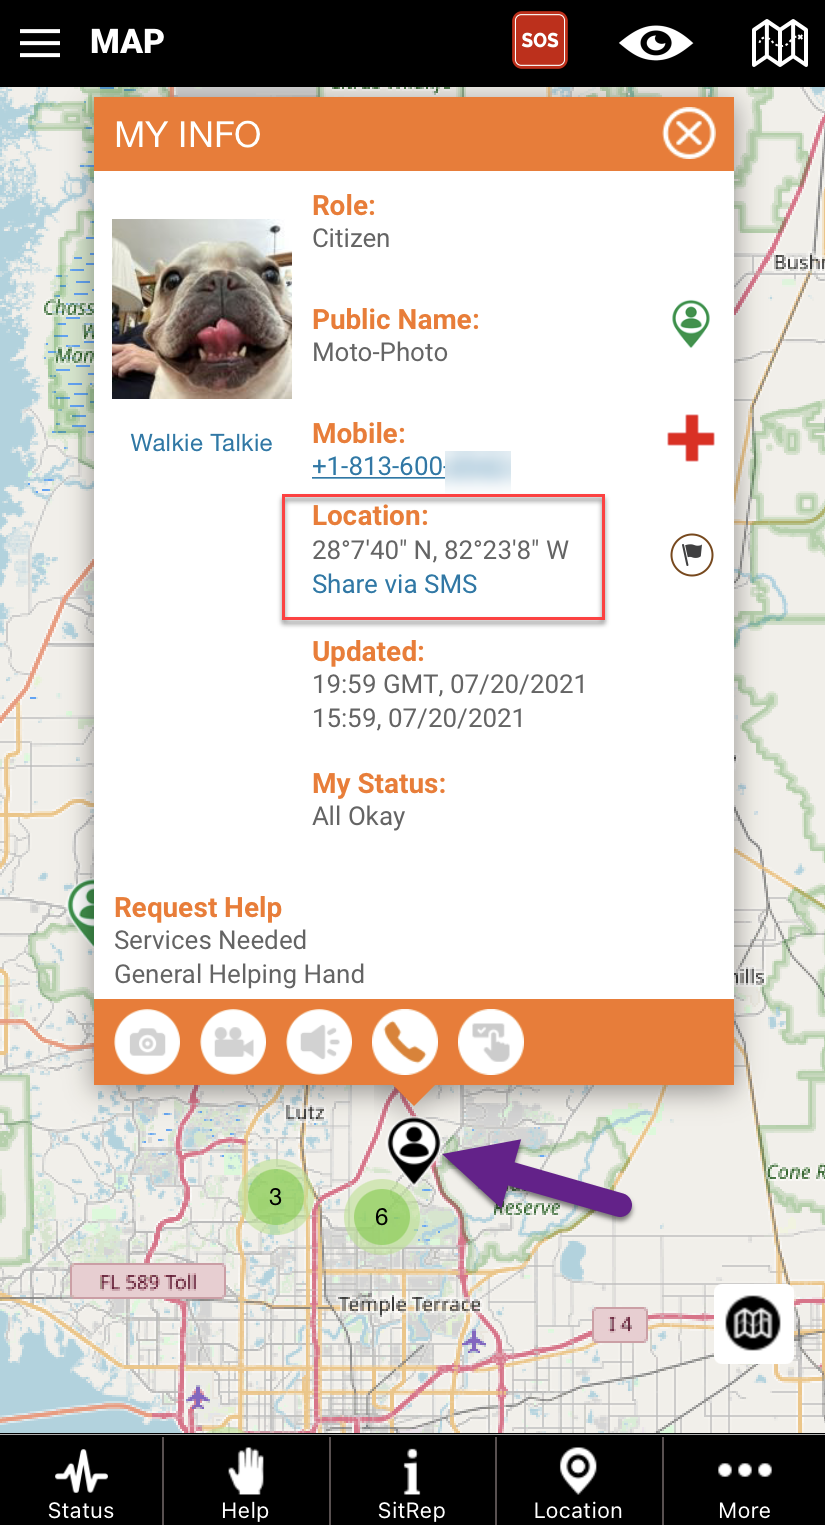
Author: PubSafe
Last update: 2021-07-22 20:56
What is a SitRep used for?
SitRep is a military term for a situation report. A sitrep is a clear, structured, and concise way to share information in a standardized format. In PubSafe, every user is a real-time data node. The more information shared, the better the information for those responding. Sharing that nothing is going on in your area is just as important as a flood or down powerline somewhere else. Responders know where and what to allocate to the response with good information. Post lots of SitReps as you move around and see what is happening. Include photos or a short video to really give people confidence in what you are reporting.
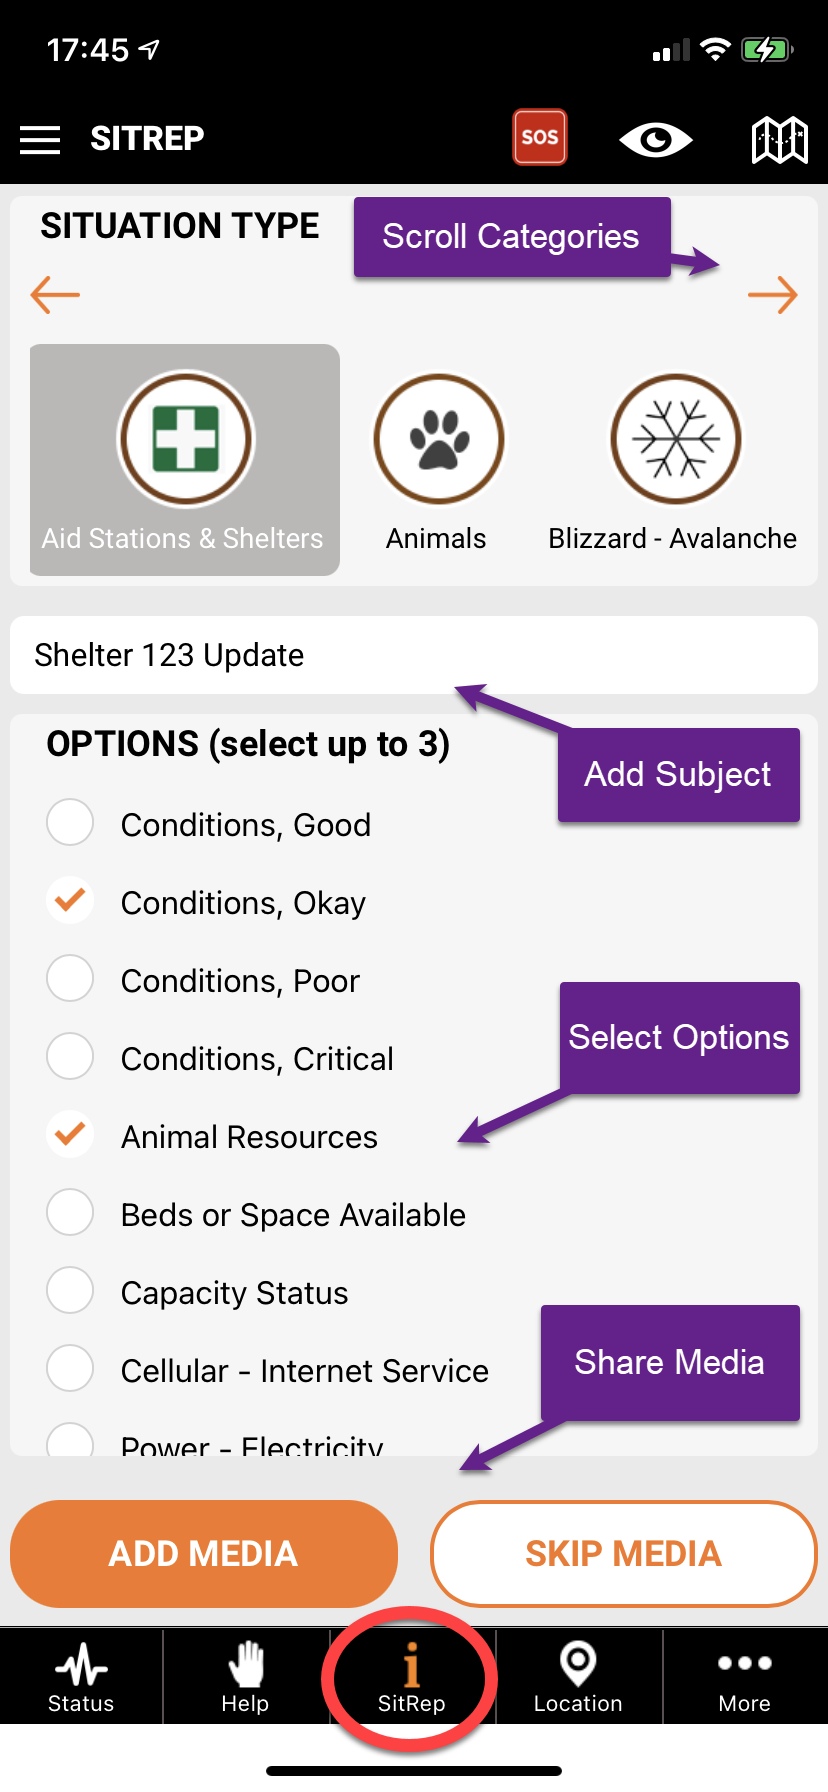
Author: PubSafe
Last update: 2021-07-22 20:56
What is the tracking interval?
This is the frequency at which your location is logged. (This data is never sold or used for commercial purposes)
For more details on all tracking settings - click here
Sharing location information is important for your safety, dispatching as part of a rescue team, sending you location-based alerts and notifications, and finding you if something goes wrong. You have many options to go "invisible" or reduce your visibility to other PubSafe users.
Cross Reference: Visibility options - Click here
Update: Update screen capture when new tracking interval options are implemented.
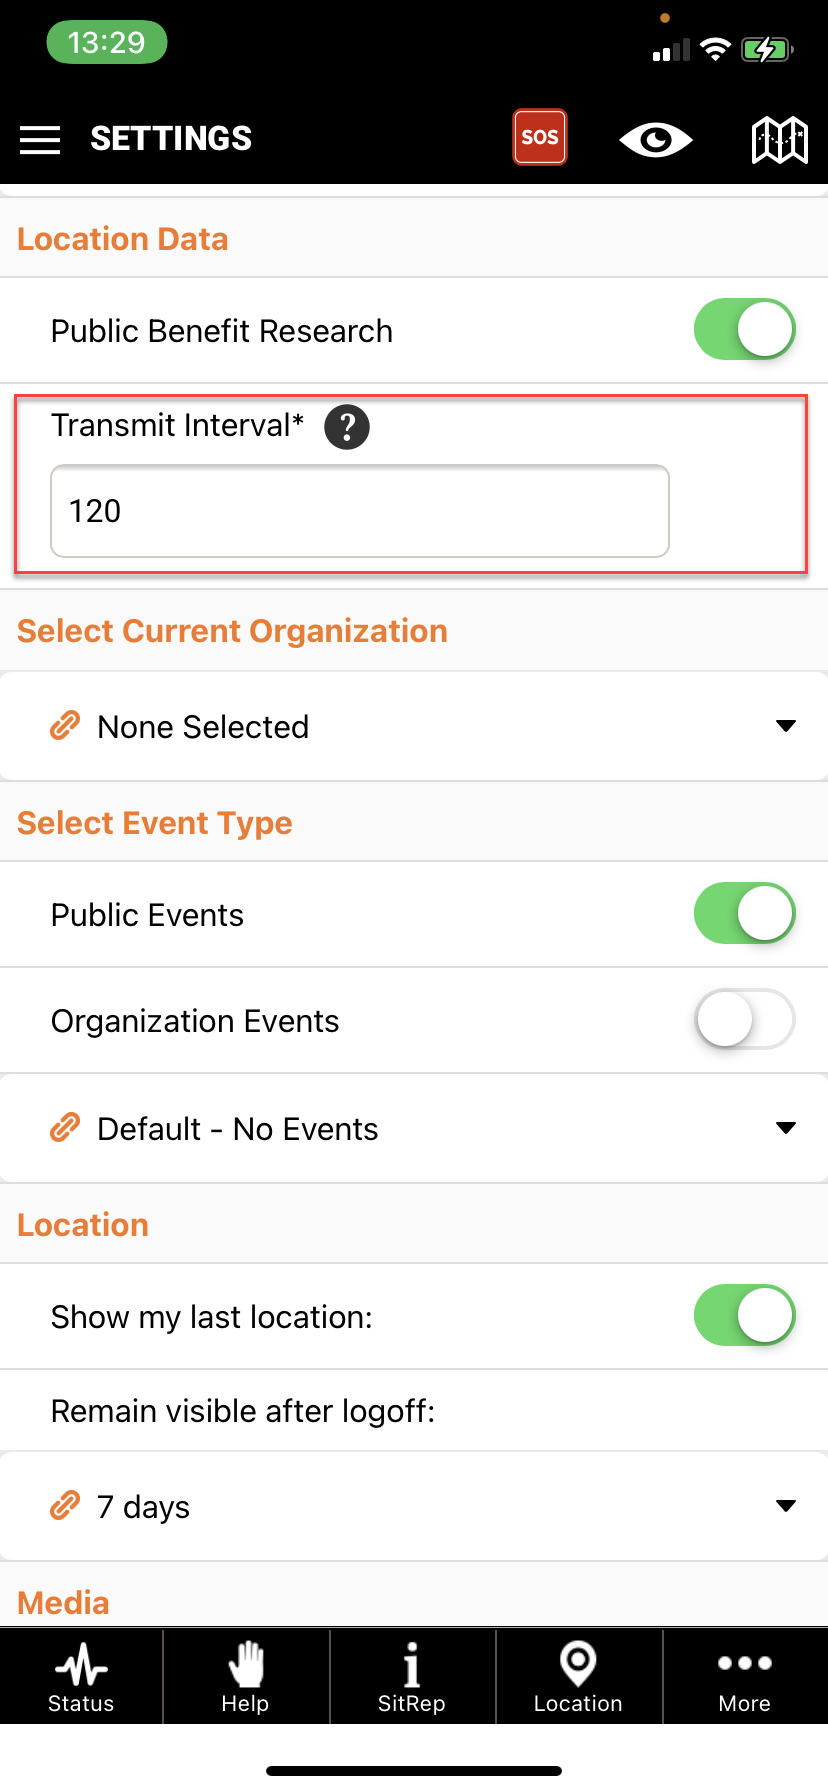
Author: PubSafe
Last update: 2021-09-27 16:01
What is the logging/tracking rate and transmit rate?
The tracking or logging rate is how often a location is captured. The transmit rate is how often a location is sent to the server to update your location in case of an emergency, to share help requests near you, and to provide alerting functions. These two variables may be the same or different depending on the options selected. You have a variety of options to customize your location and privacy settings. To edit your in app visibility to other users - click here.
If the app is not in cell phone coverage with an Internet connection, location information cannot be transmitted.
Foreground Location (app is being used or open on the phone desktop)
Location Changing:
Current Logic
- 120 seconds 9 (default)
- 20 seconds (HD - not recommended in a prolonged natural disaster or where power is unavailable for recharging)
- 300 seconds - power saver
Future Logic
- SAR Mode = 30 sec (App launched by the user. High accuracy for detailed information. Speed > 2 mph or every 100')
- Default = 2 minutes (App launched by the user. Moderate accuracy. Speed > 2 mph or every 500')
- Eco Mode = 5 minutes (App launched by the user. Low accuracy. Speed >2 mph or every 1,000')
- Battery Saver Mode = 10 minutes (App launched by the user. Minimal accuracy. Speed >5 mph or every 1,320' [quarter miles])
- Alert & Safety Mode = 30 minutes (App running in the background - has not been opened by the user. Time-based only.)
Location Changing:
Cross-reference: PubSafe Knowledge Base - What is the tracking interval?
Author: PubSafe
Last update: 2021-09-27 16:05
Physical Activity Setting
Allowing access to the physical activity setting will improve battery life. Physical activity uses the accelerometer to determine motion instead of constantly looking for GPS location data changes to determine when you are actually moving. The less activity by the GPS sensor in your phone, the longer your battery will last.
You can enable or disable this setting at anytime but it is recommended to keep it on, especially during a disaster where charing may not be readily available.
Author: PubSafe
Last update: 2022-04-08 16:12


 example only


